Connecting Tursio
Tursio can be deployed on the cloud, on-premises, or in hybrid mode. In all cases, Tursio needs access to data and LLMs. This page describes how to set up these connections.
Data Agent
A dedicated gateway establishes a secure connection between the customer and Tursio, ensuring that only authorized traffic is routed through this channel and preventing access by unauthorized users or external operations.
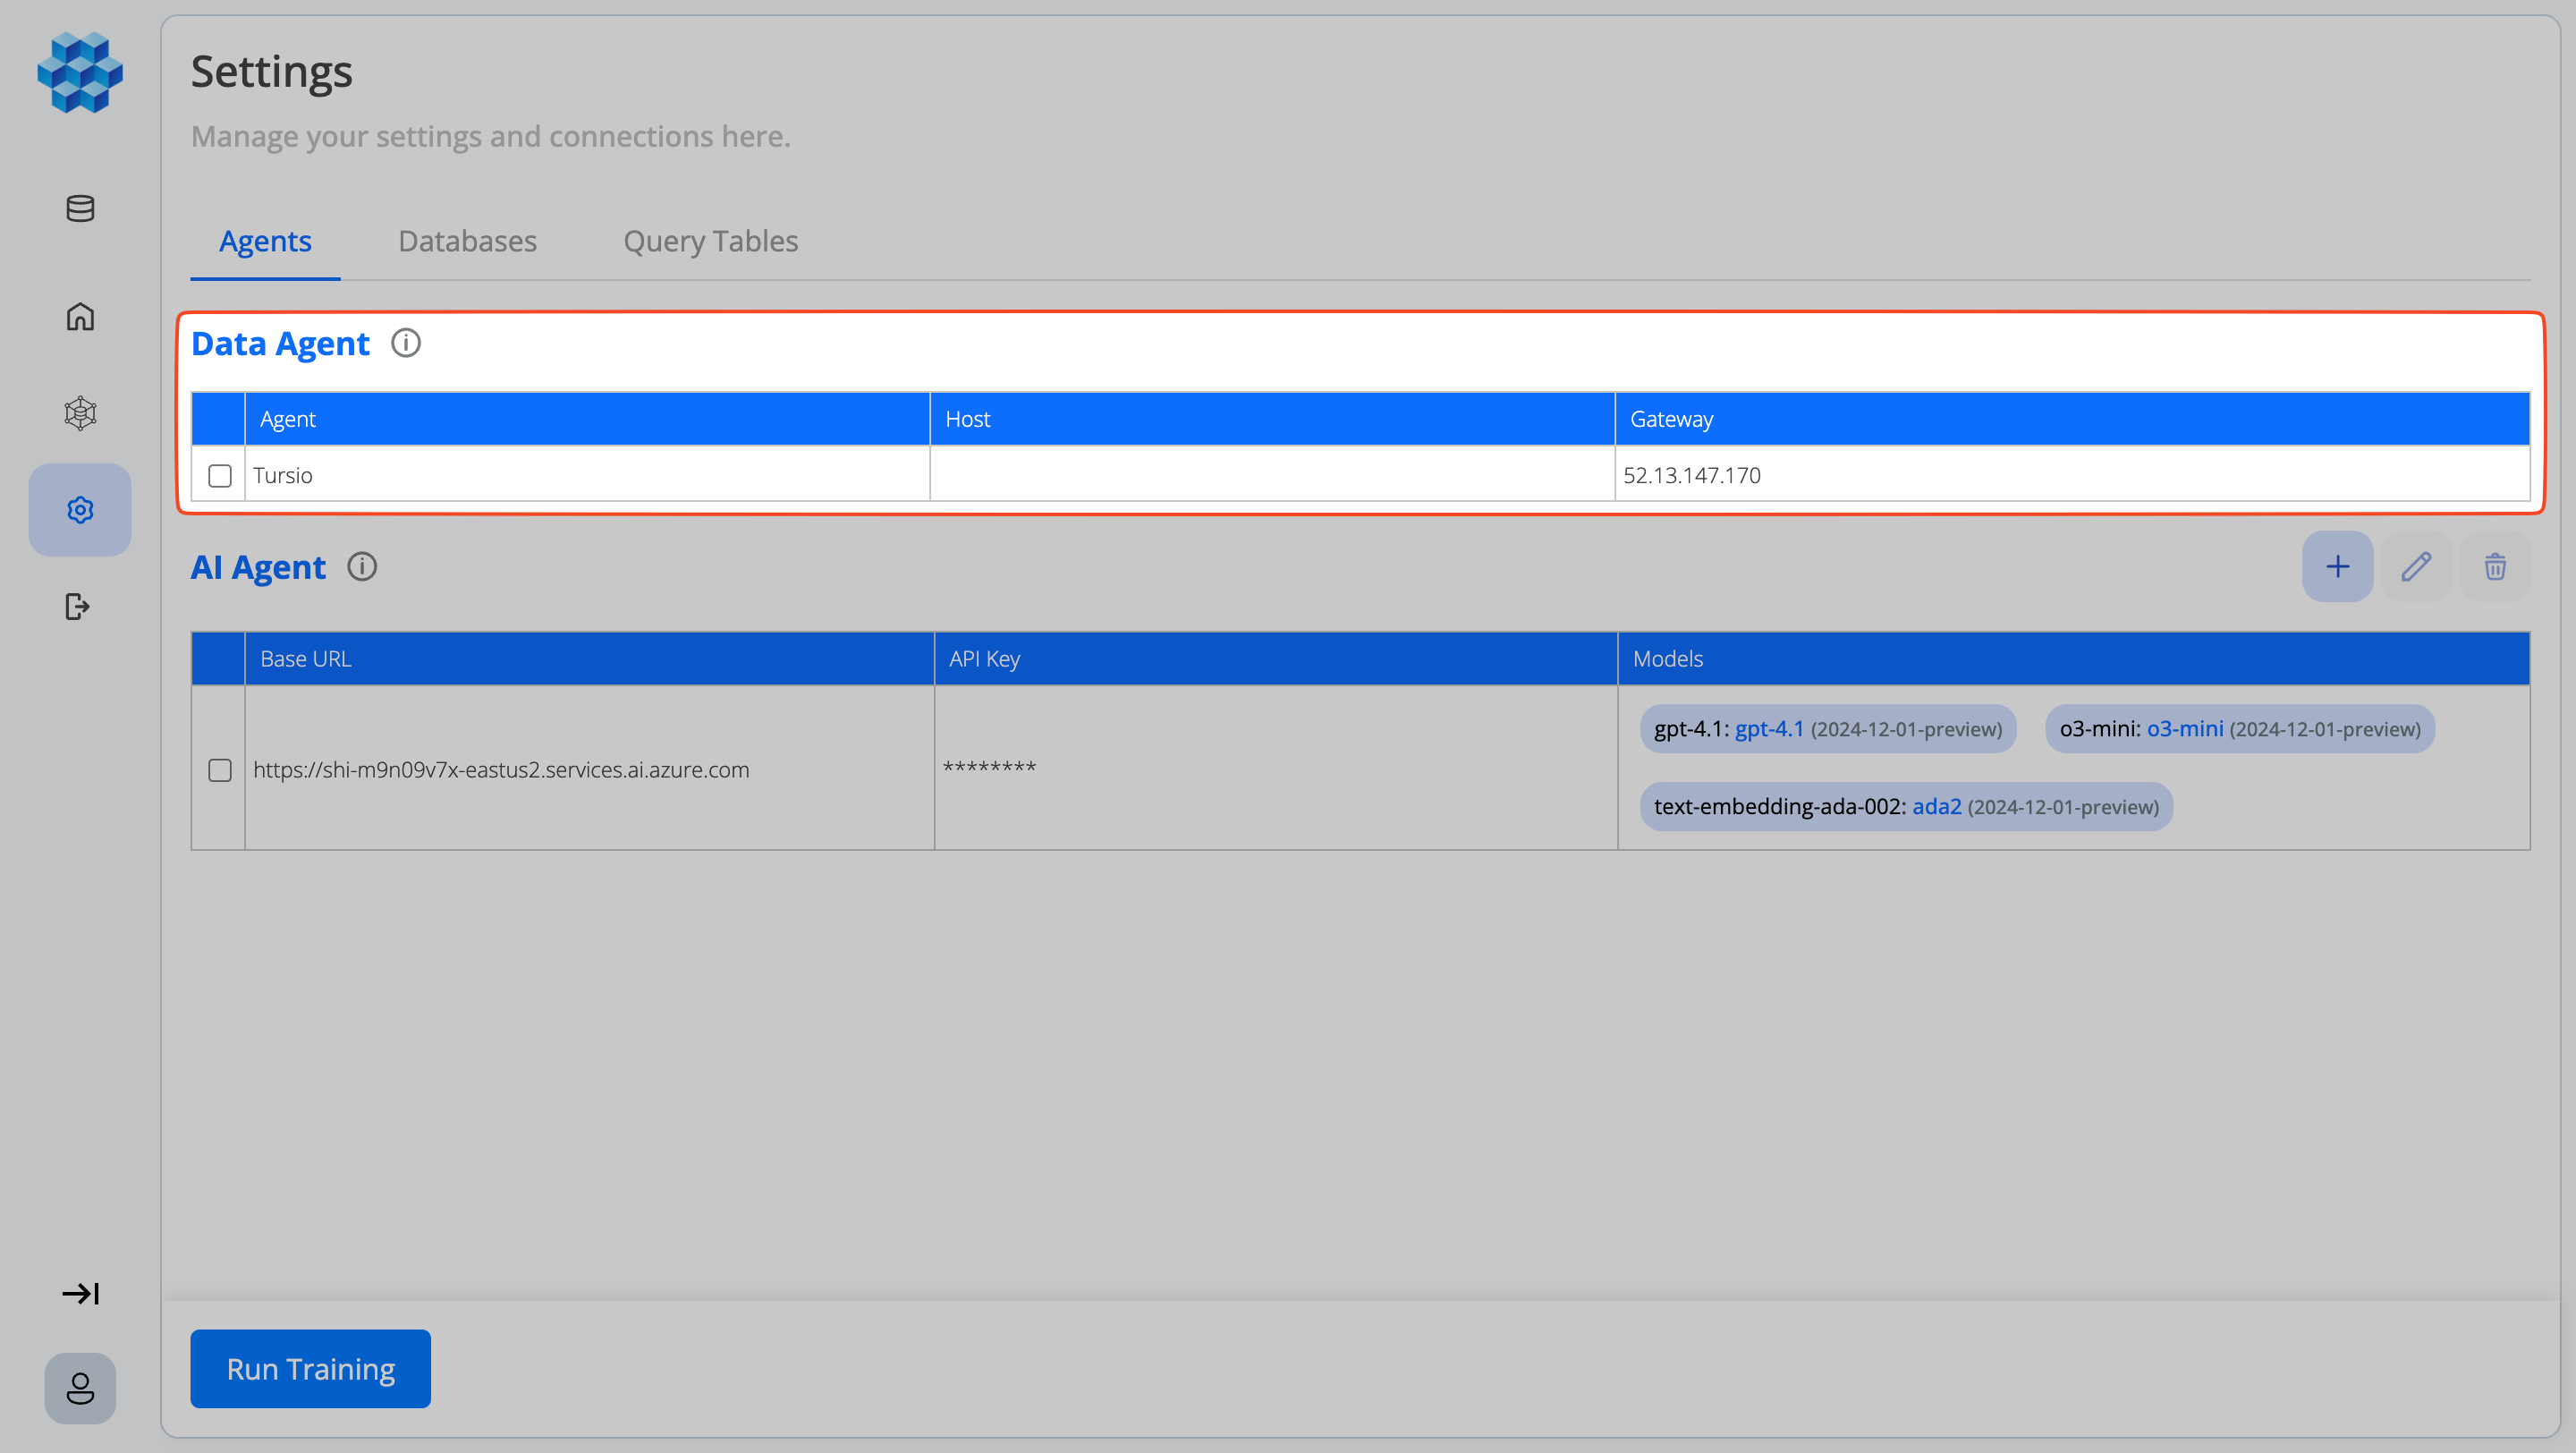
The data agent is deployed in the customer's environment for on-premises and hybrid deployments, and in the Tursio environment for cloud deployments. Once configured, the data agent appears under the Agents tab on the Settings page, as shown below:
AI Agent
Tursio supports managed LLMs for immediate use across all three deployment modes.
Users can also bring their own keys (BYOK) for privacy. BYOK works with OpenAI, Anthropic (Claude), and Azure OpenAI — the provider is detected automatically from the Base URL you supply (a *.azure.com endpoint is treated as Azure OpenAI; other endpoints use the provider's direct API). Users integrate their own subscription by providing custom credentials (Base URL, API key, and model details).
This flexibility allows:
- Using default supported models directly.
- Adding and managing customer-specific models as needed.
Note
Only one AI Agent configuration can be active per tenant. When you save, Tursio validates the credentials by making a test call to each configured model, so an invalid key or endpoint is caught immediately.
Configure
To use custom credentials, add a model configuration.
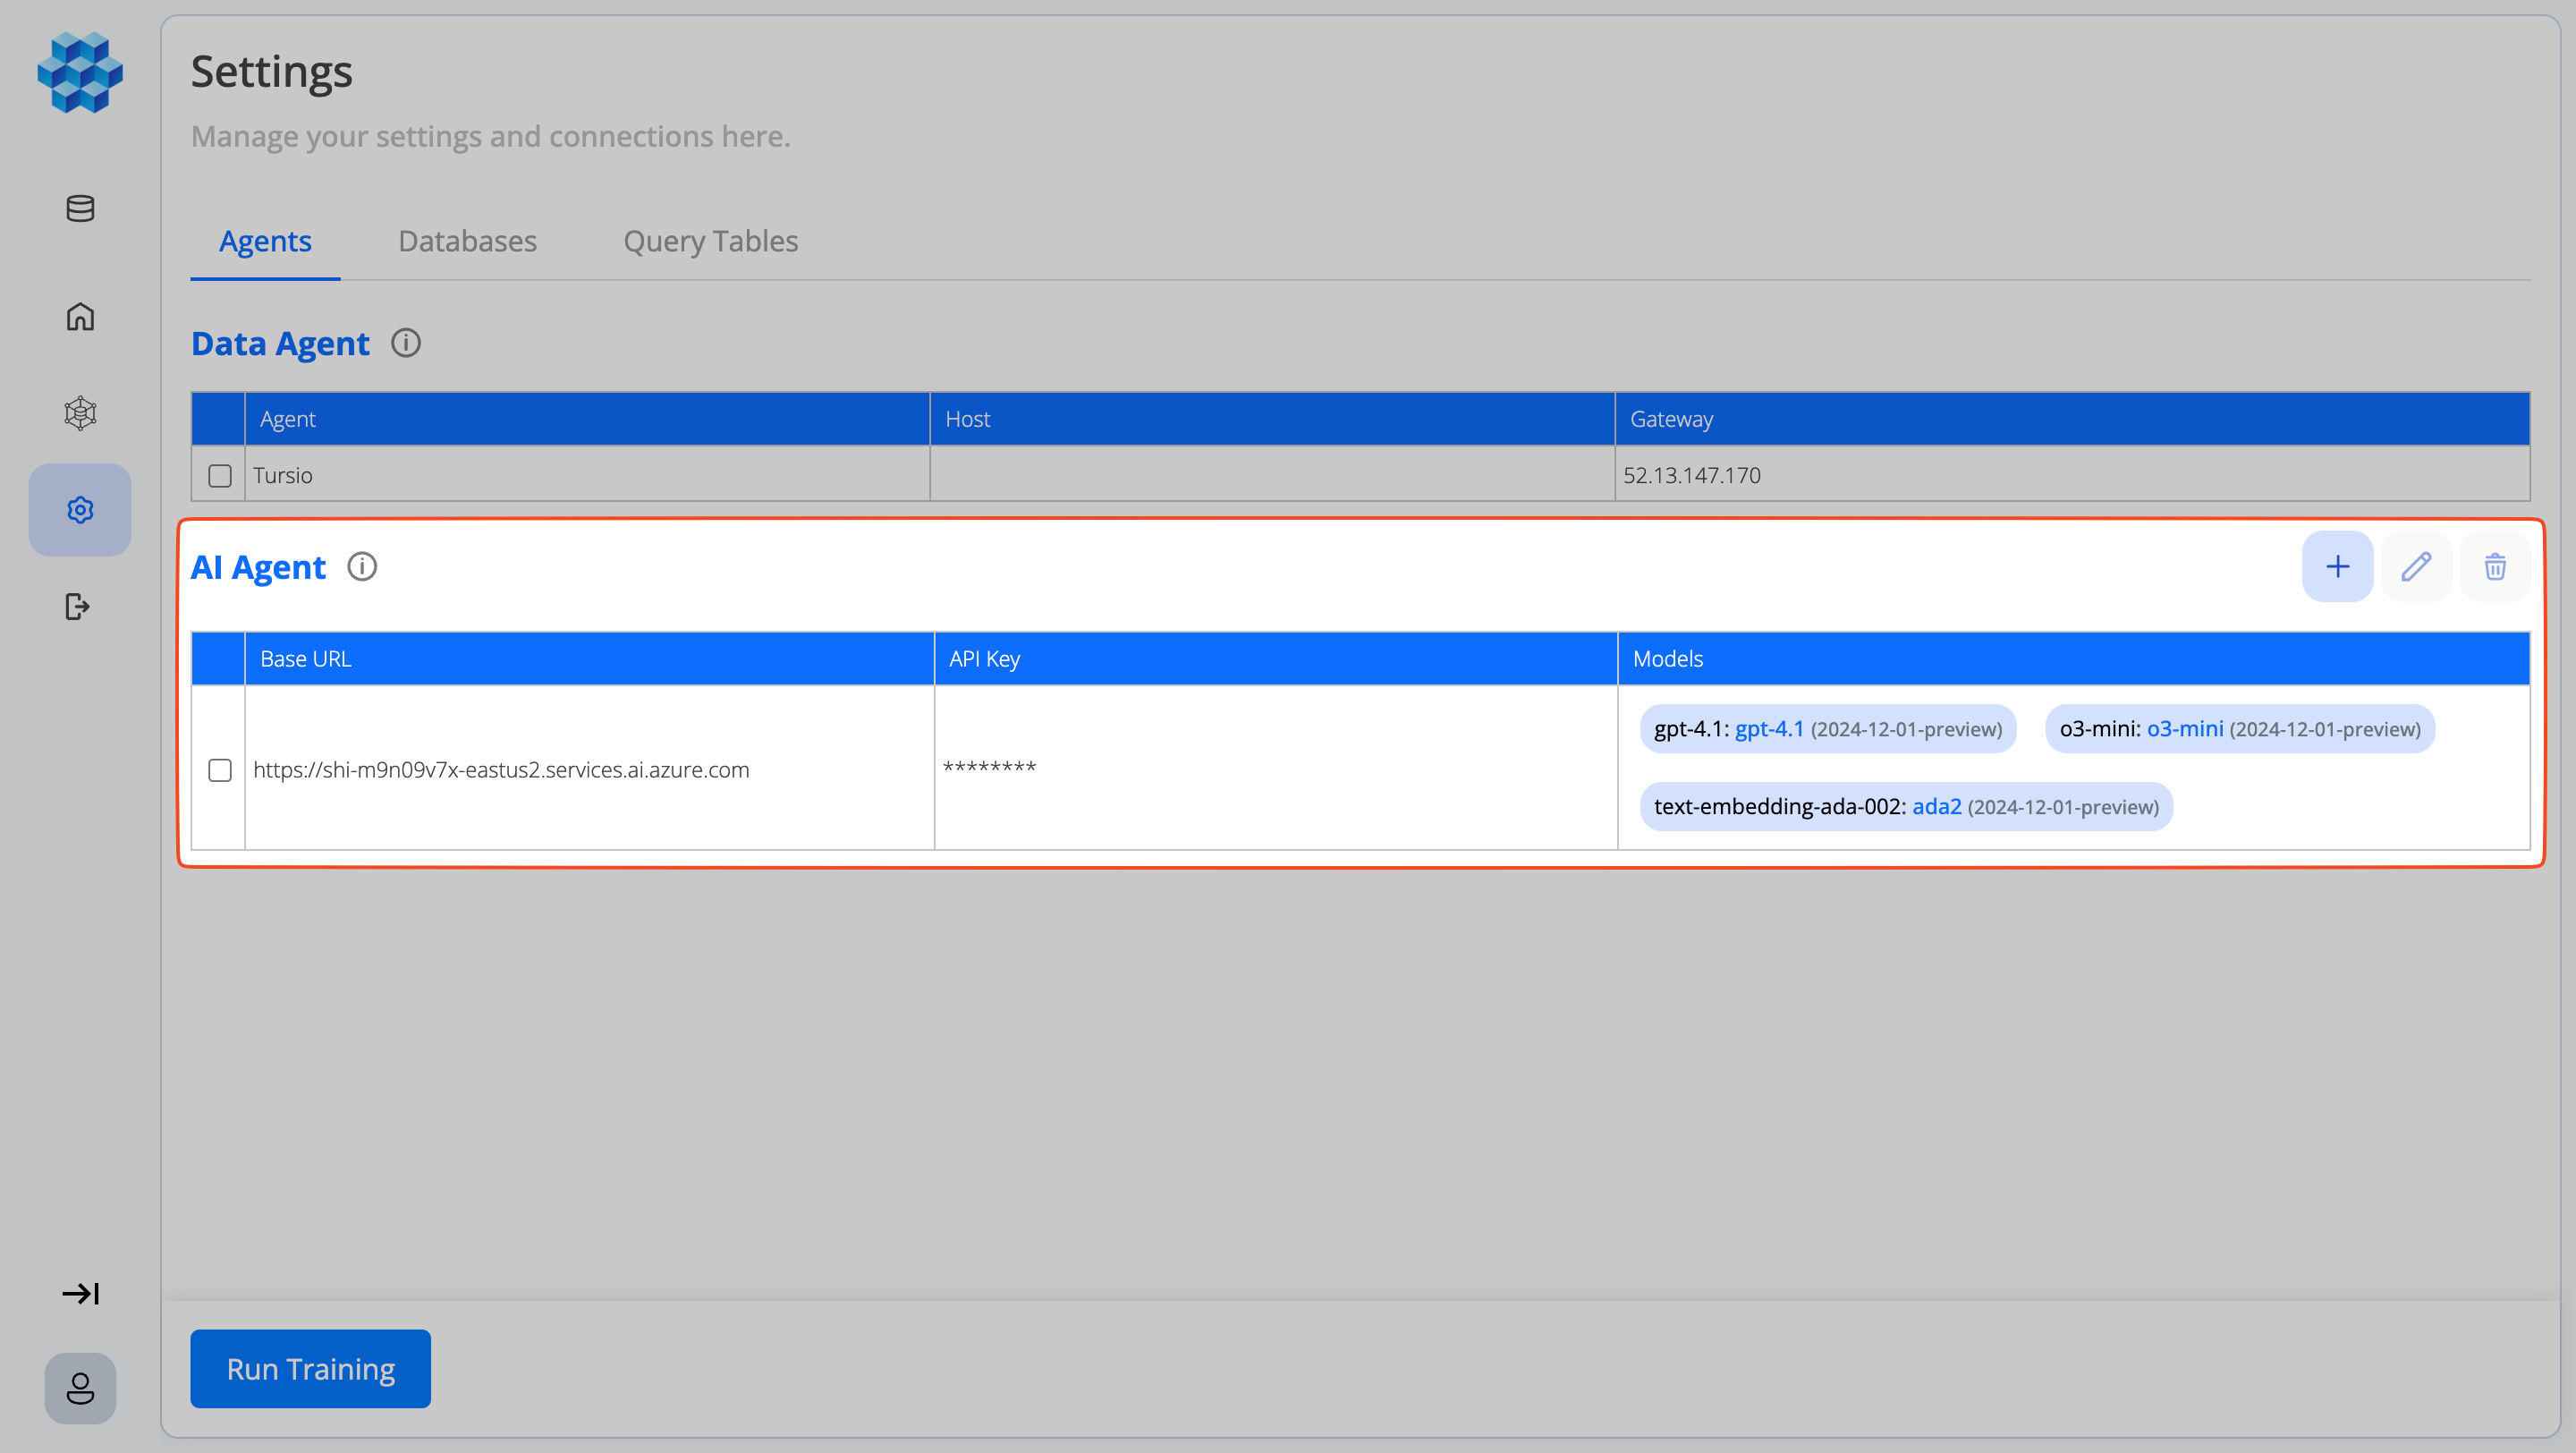
The Models page provides three actions represented by icons: Add, Edit, and Delete.
Add Model
Refer to the Azure OpenAI section for setup instructions.
When adding a model, provide the following details:
- Base URL
- API Key
- Models (select from the supported dropdown options)
Supported Models:
- gpt-4.1 [Required]
- o3-mini [Required]
- text-embedding-ada-002 [Required]
- gpt-4o
Each added model also requires:
- Display Name — the deployment name of the model
- API Version — the version of the model API to use
Edit Model
When editing an existing model configuration, the following rules apply:
- Base URL — cannot be modified once the model has been created.
- API Key — can be updated at any time.
- Models — can be edited or updated.
This ensures that the core endpoint (Base URL) remains consistent while allowing flexibility to rotate credentials (API Key) or adjust the model list as needed.
Fallback
If customer-provided credentials are unavailable or invalid, the system automatically reverts to Tursio's default key. This fallback ensures:
- Continuous access to supported models without interruption.
- Seamless query execution even when customer credentials fail.
- A reliable default configuration for all mandatory models.
Auth Agent
Tursio supports Microsoft Entra ID sign-in for on-premises deployments on Docker (single container, HTTPS) and AKS (single pod, HTTPS). Admins can configure their Entra App credentials (Client ID, Client Secret, Authorization URL, Redirect URI) to enable Login with Microsoft.
Prerequisite
Set the following environment variable during deployment: ENABLE_AUTH_AGENT=true
If not set, the Authorization Agent UI will not appear and the Login with Microsoft button will be hidden.
Register Entra App
Create the app registration
- Sign in to the Azure Portal and search for App registrations in the search bar.
- Click + New registration (or "Register an application").
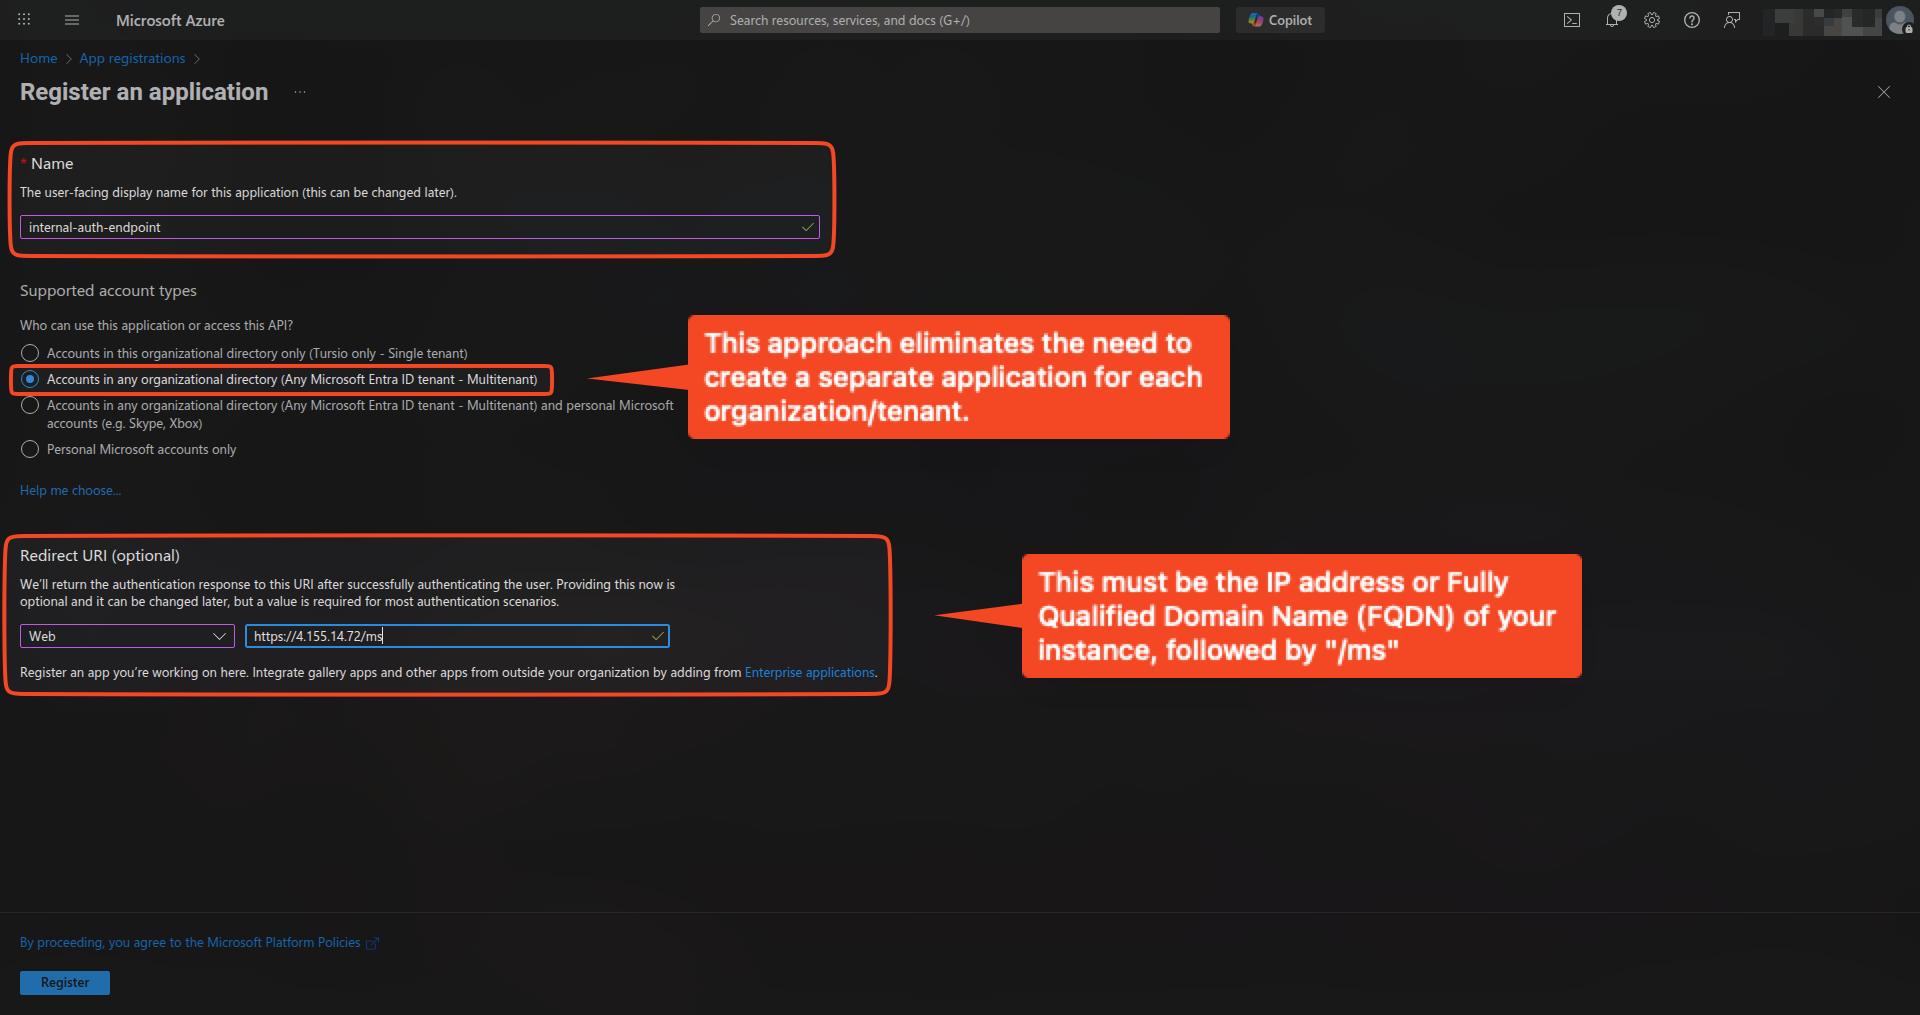
- Fill in the registration form as shown in the screenshot.
- Click Register.
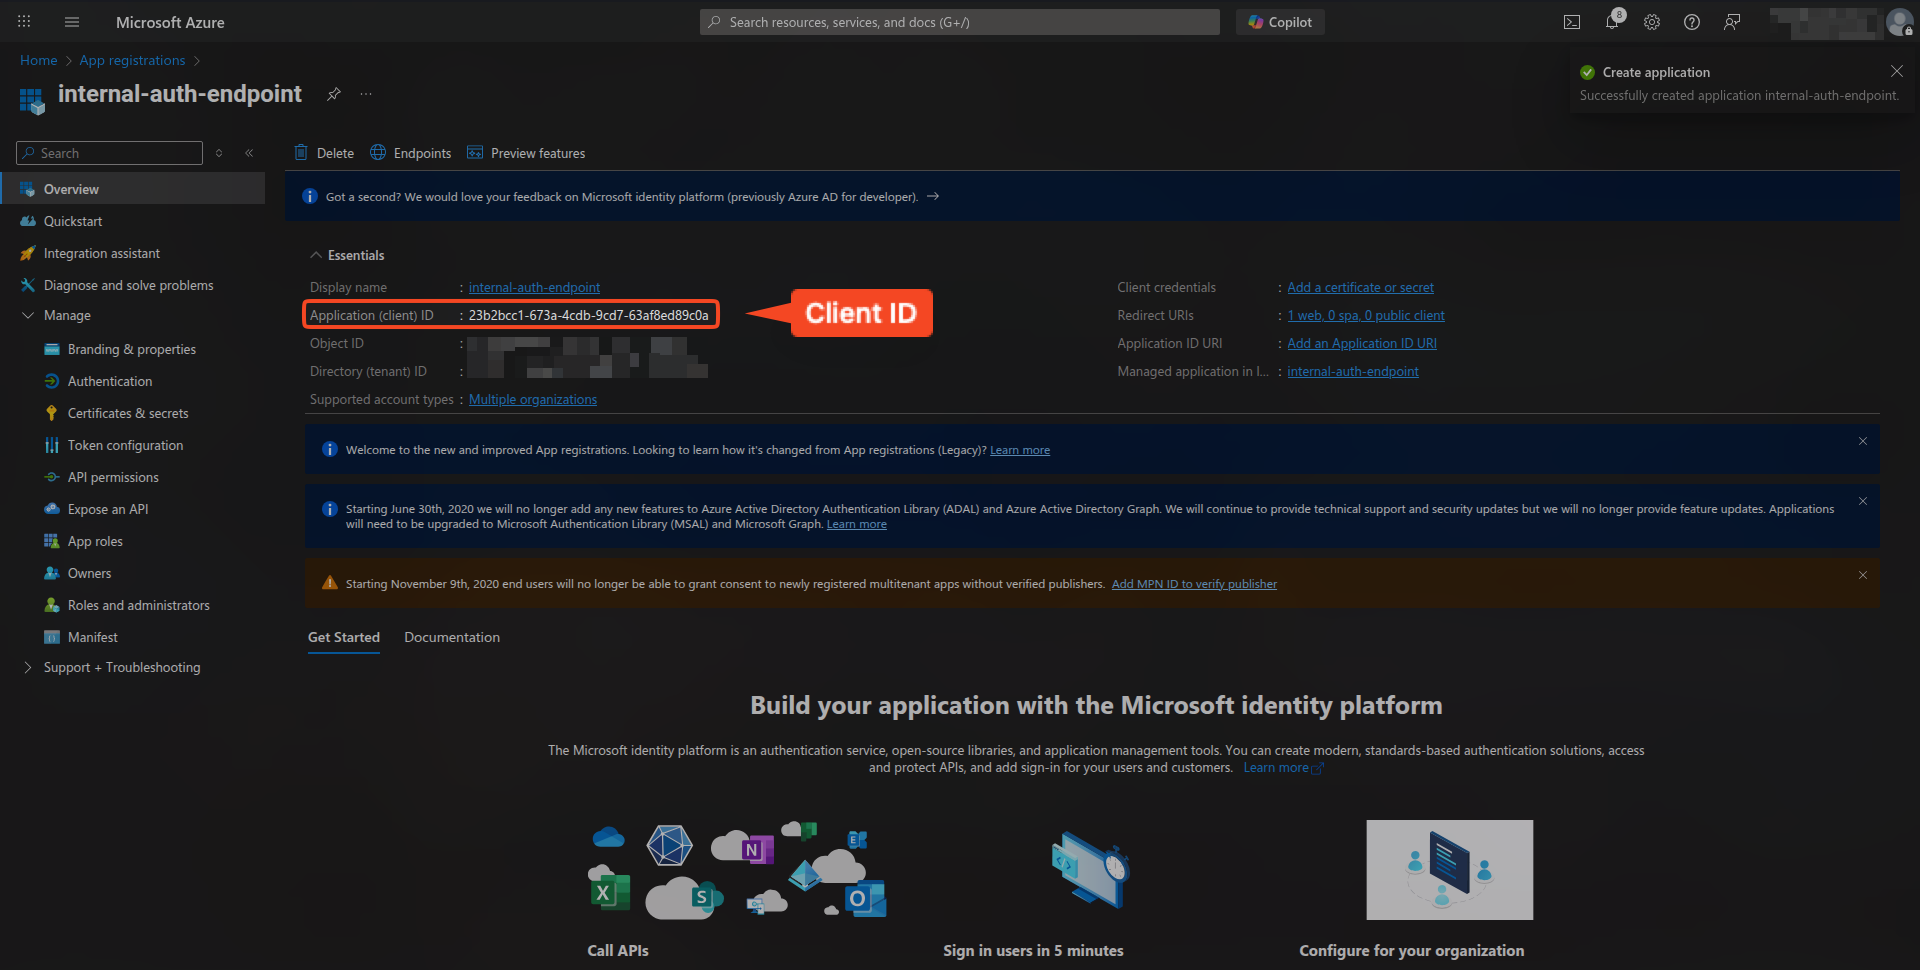
Upon successful registration, the app's Essentials section displays the Application (client) ID. Copy this value — it is needed for the portal authorization agent configuration.
Create a client secret
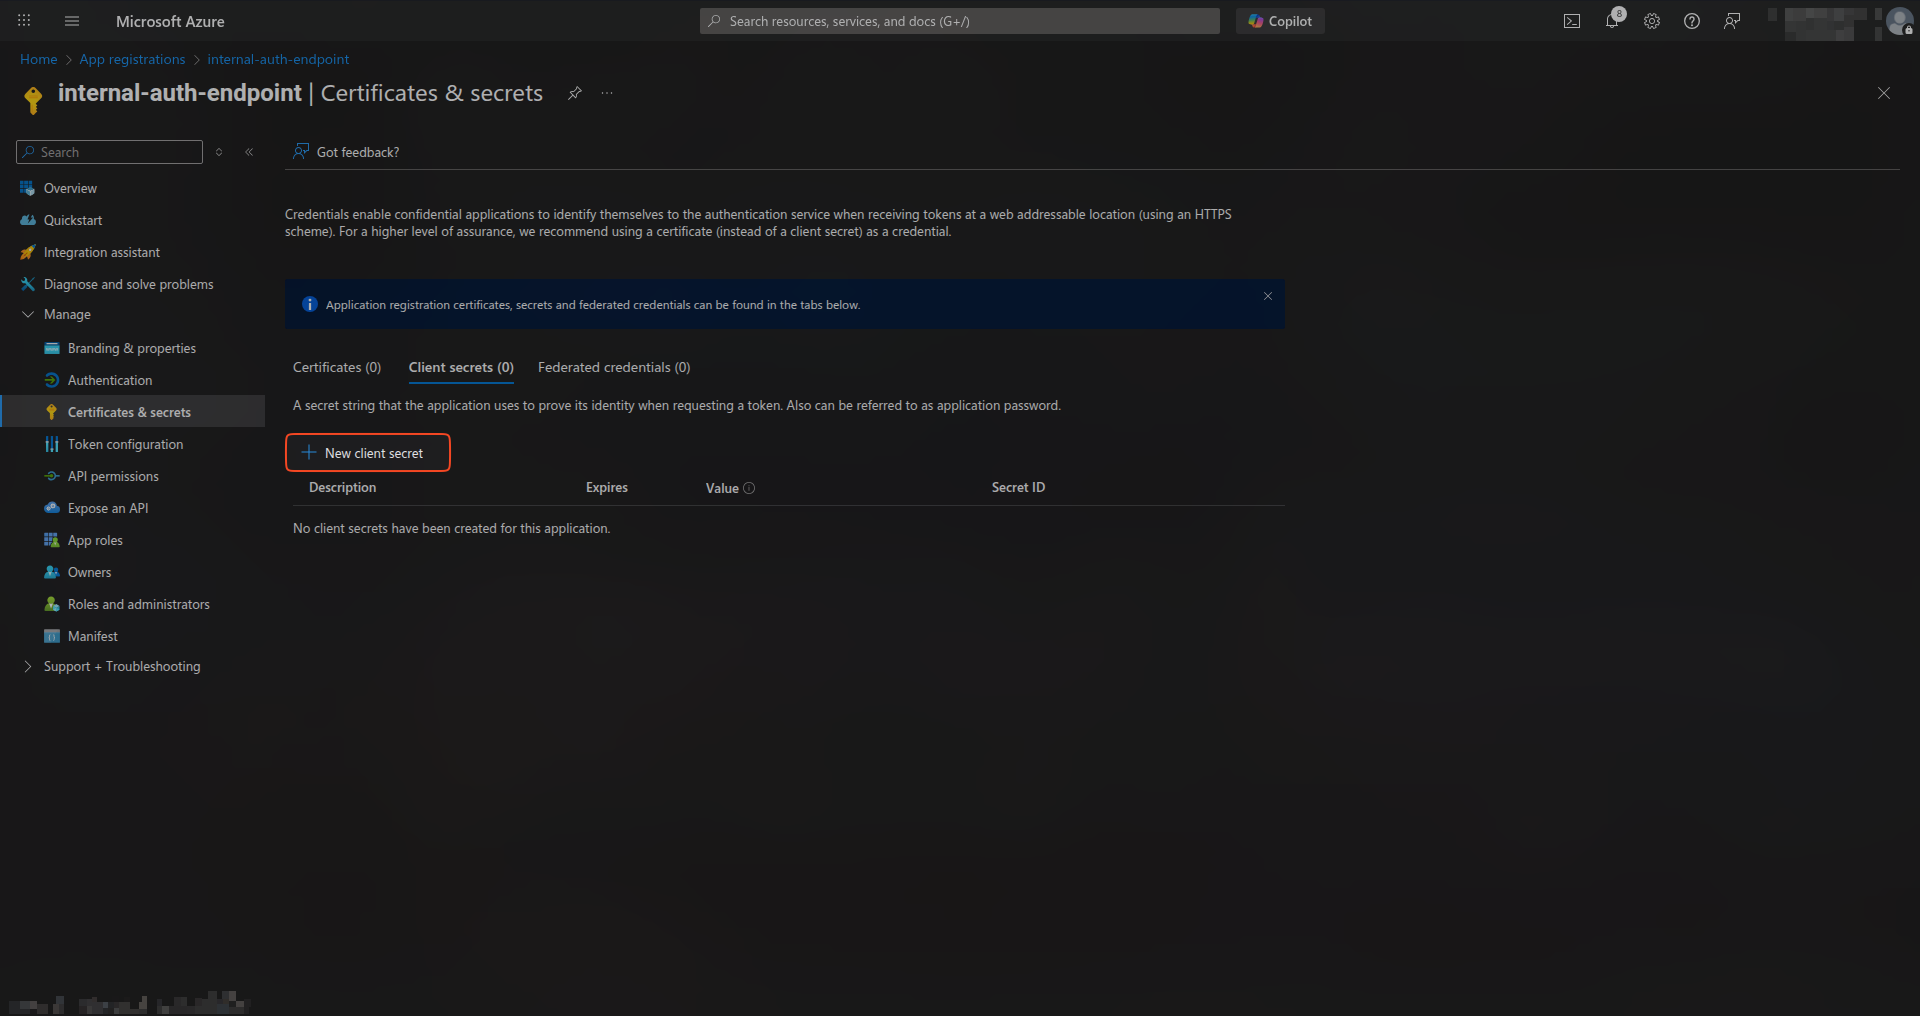
- In the app registration, go to Certificates & secrets → Client secrets.
- Click + New client secret.
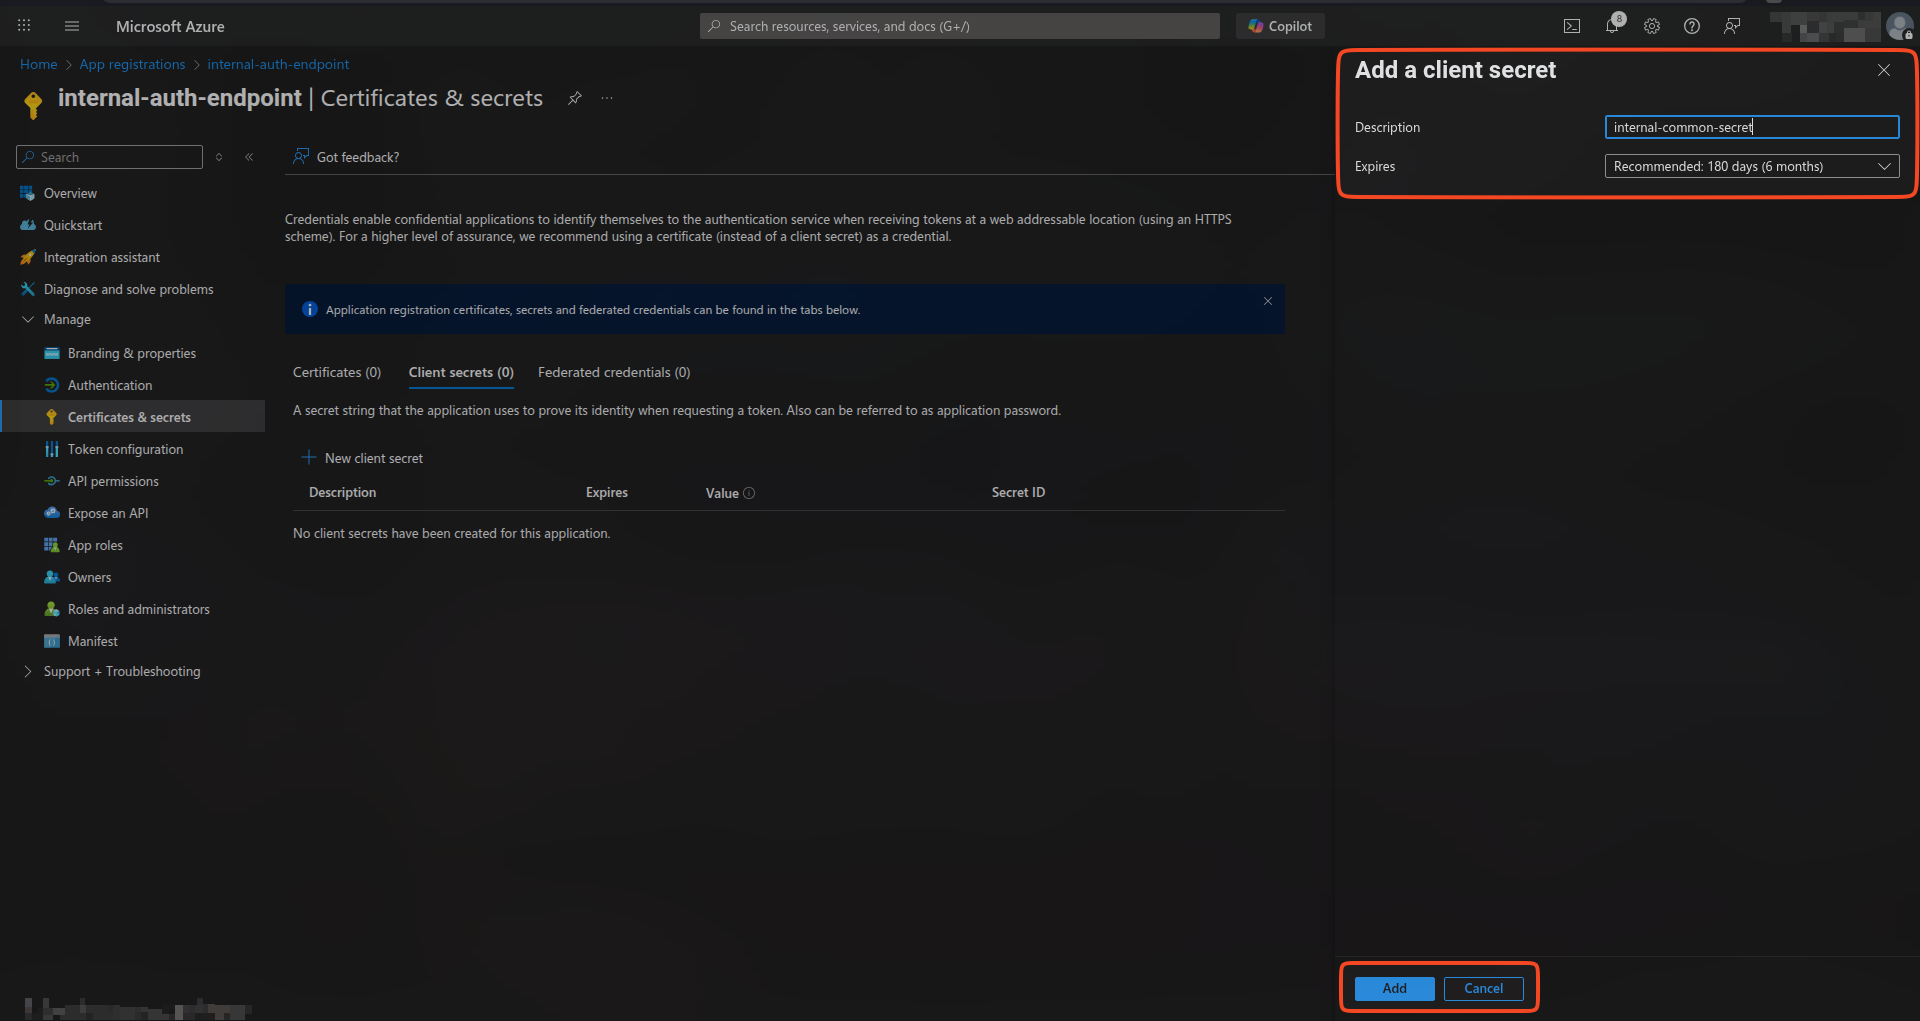
- Provide a description, for example "internal-common-secret".
- Choose a rotation period (e.g., 6–12 months per your policy). Record the expiry date and rotate the secret before it expires.
- Click Add.
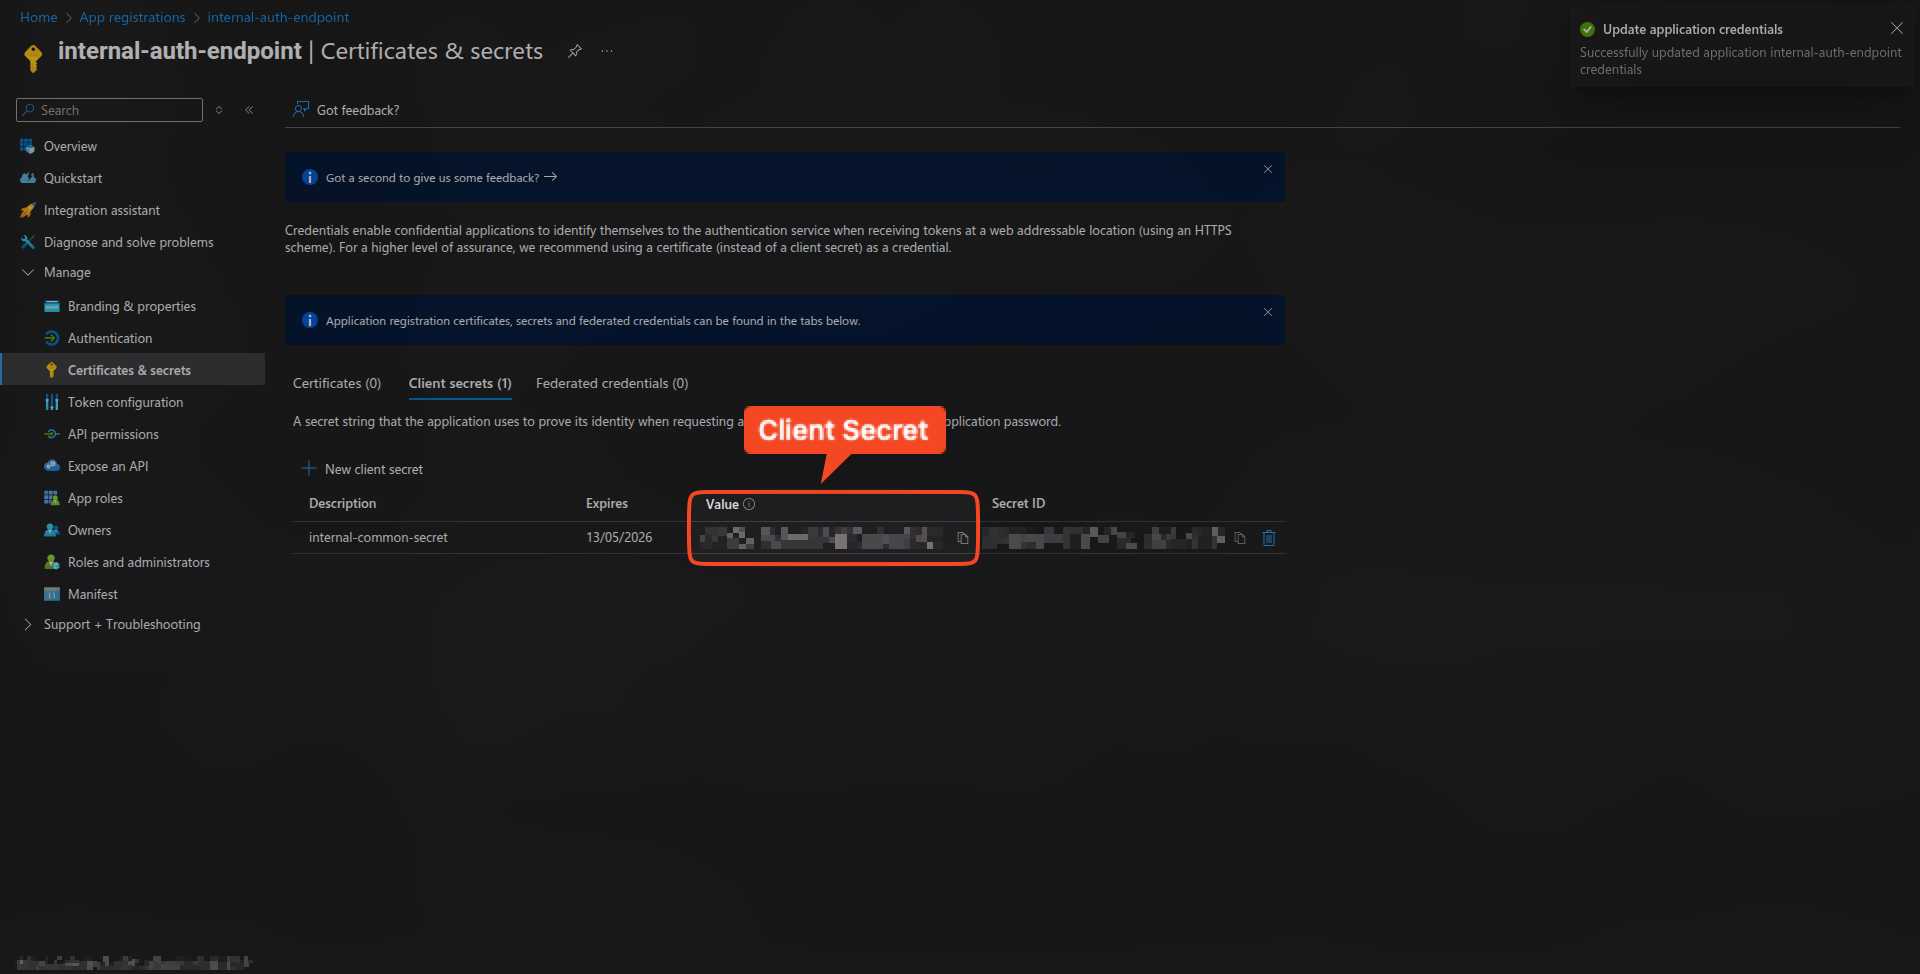
- Important: Copy the Secret Value immediately — it is shown only once after creation. Store it securely (Key Vault, secret manager, or password manager). If lost or expired, create a new secret and update the portal authorization agent configuration.
Configure Agent
Step 1: Open Settings
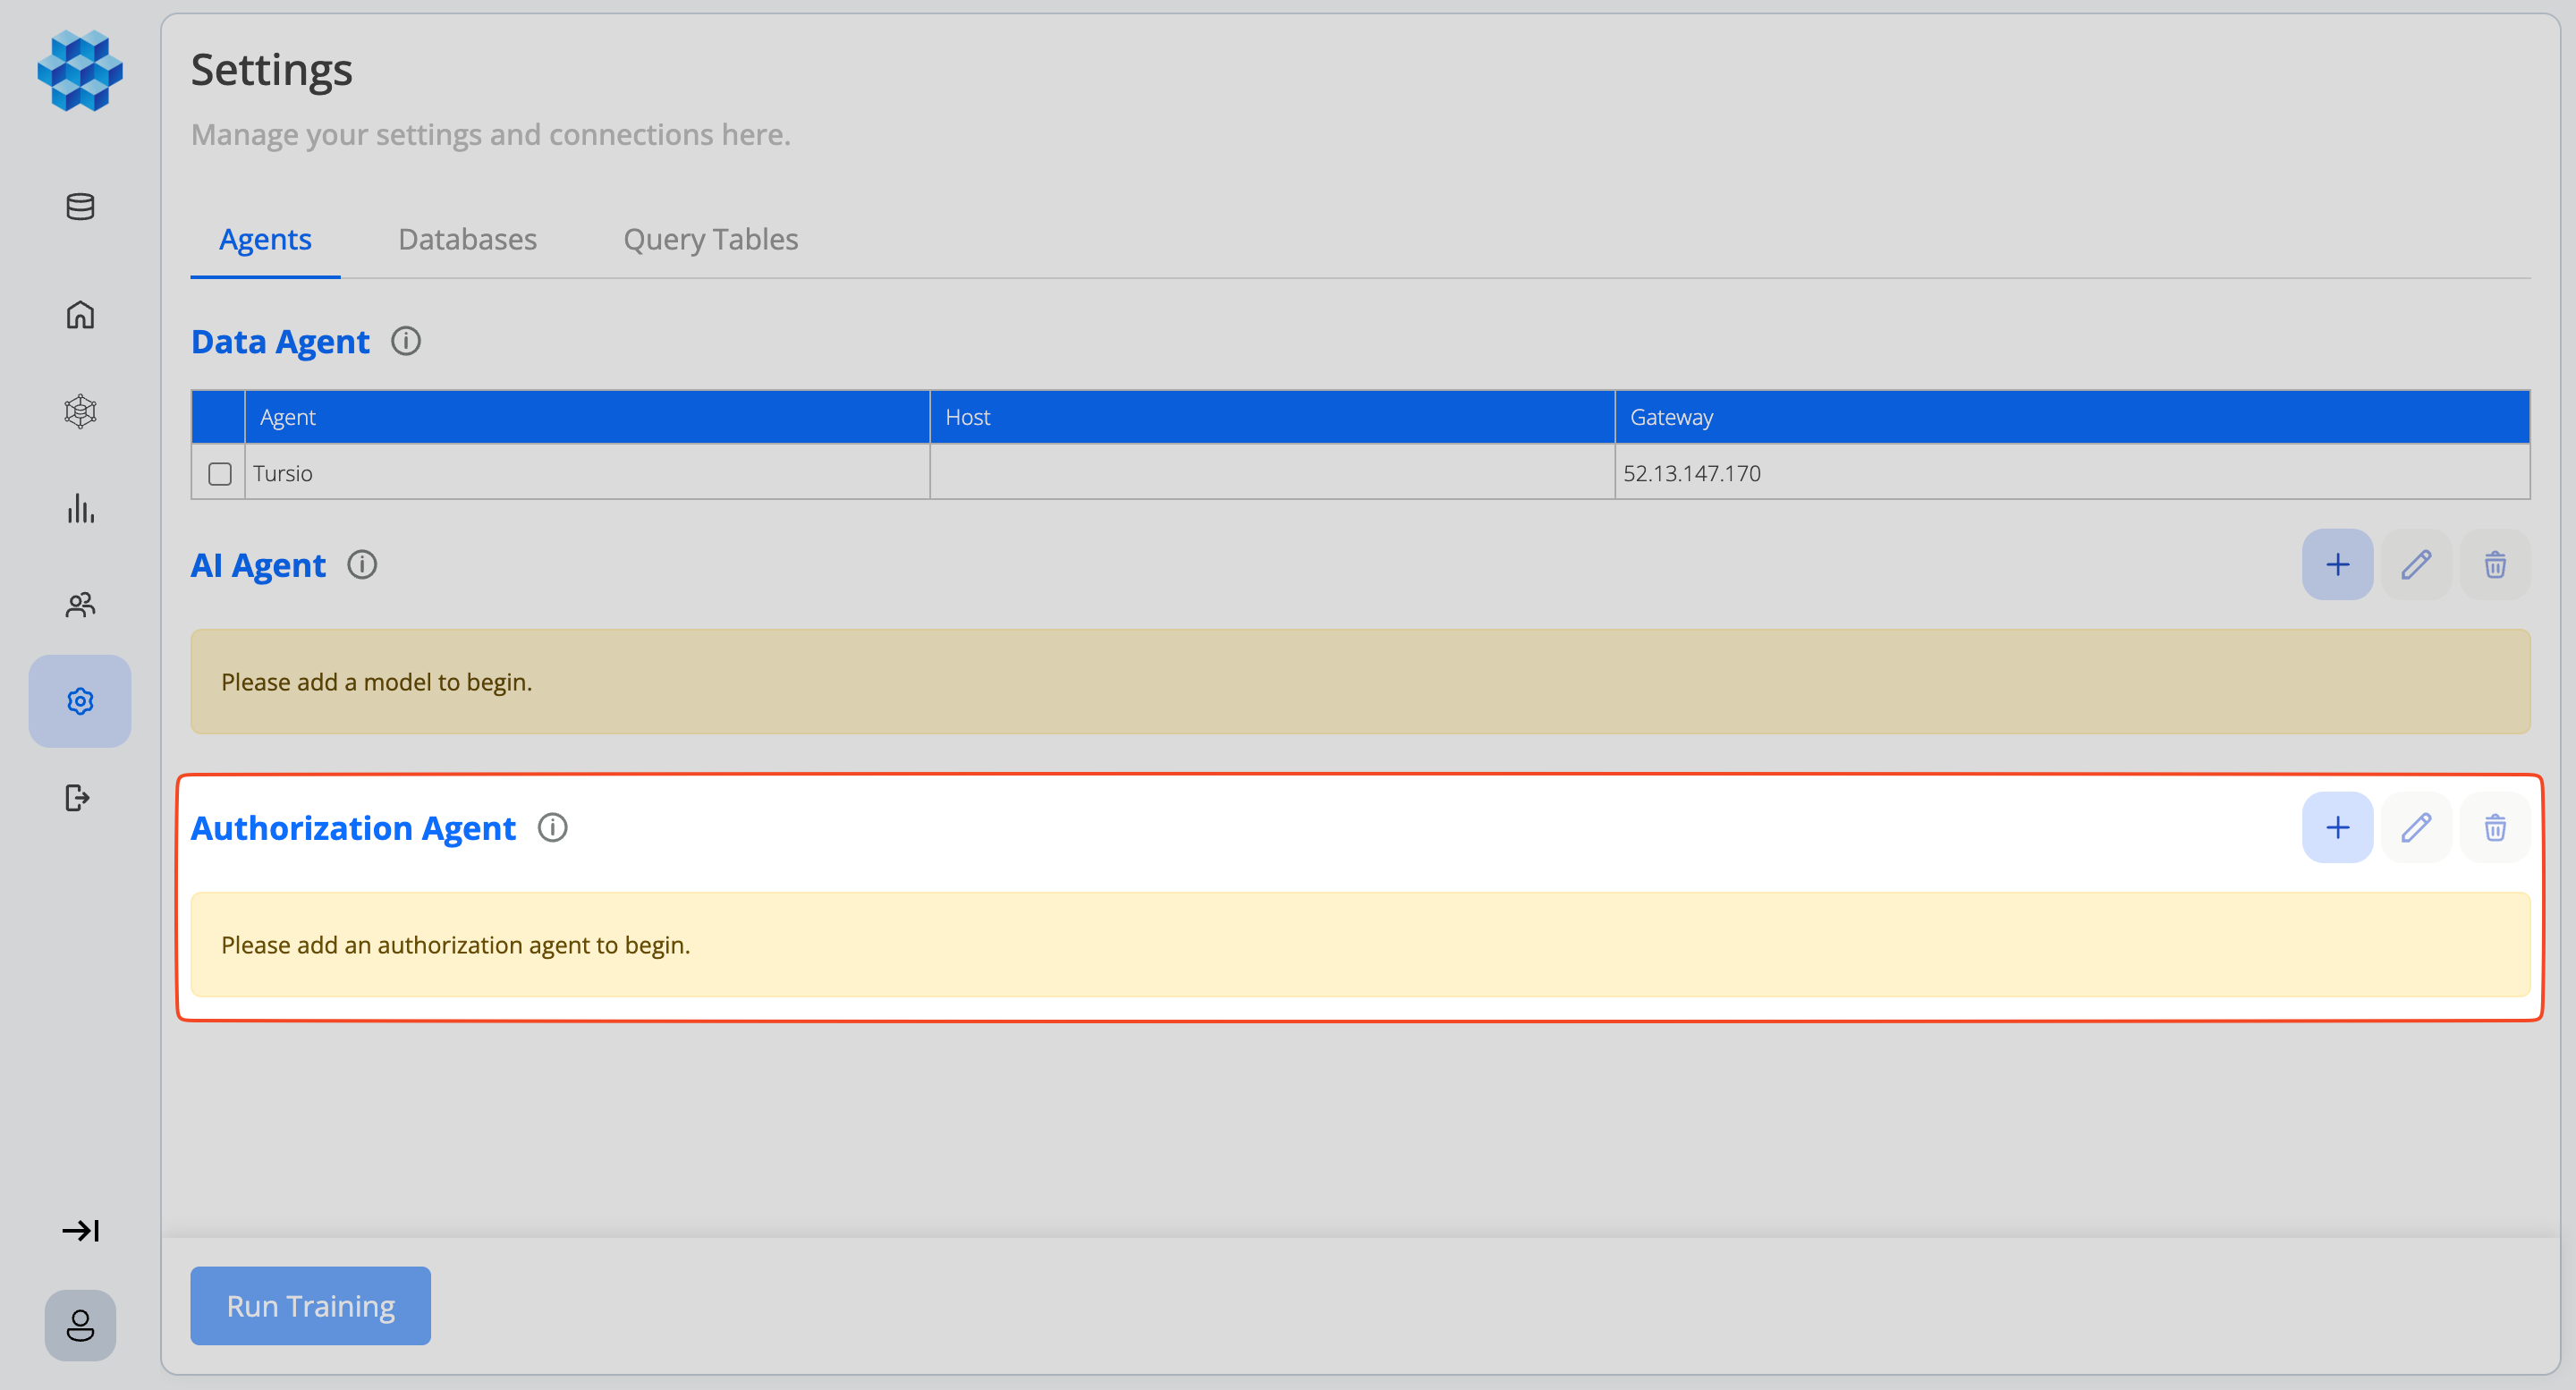
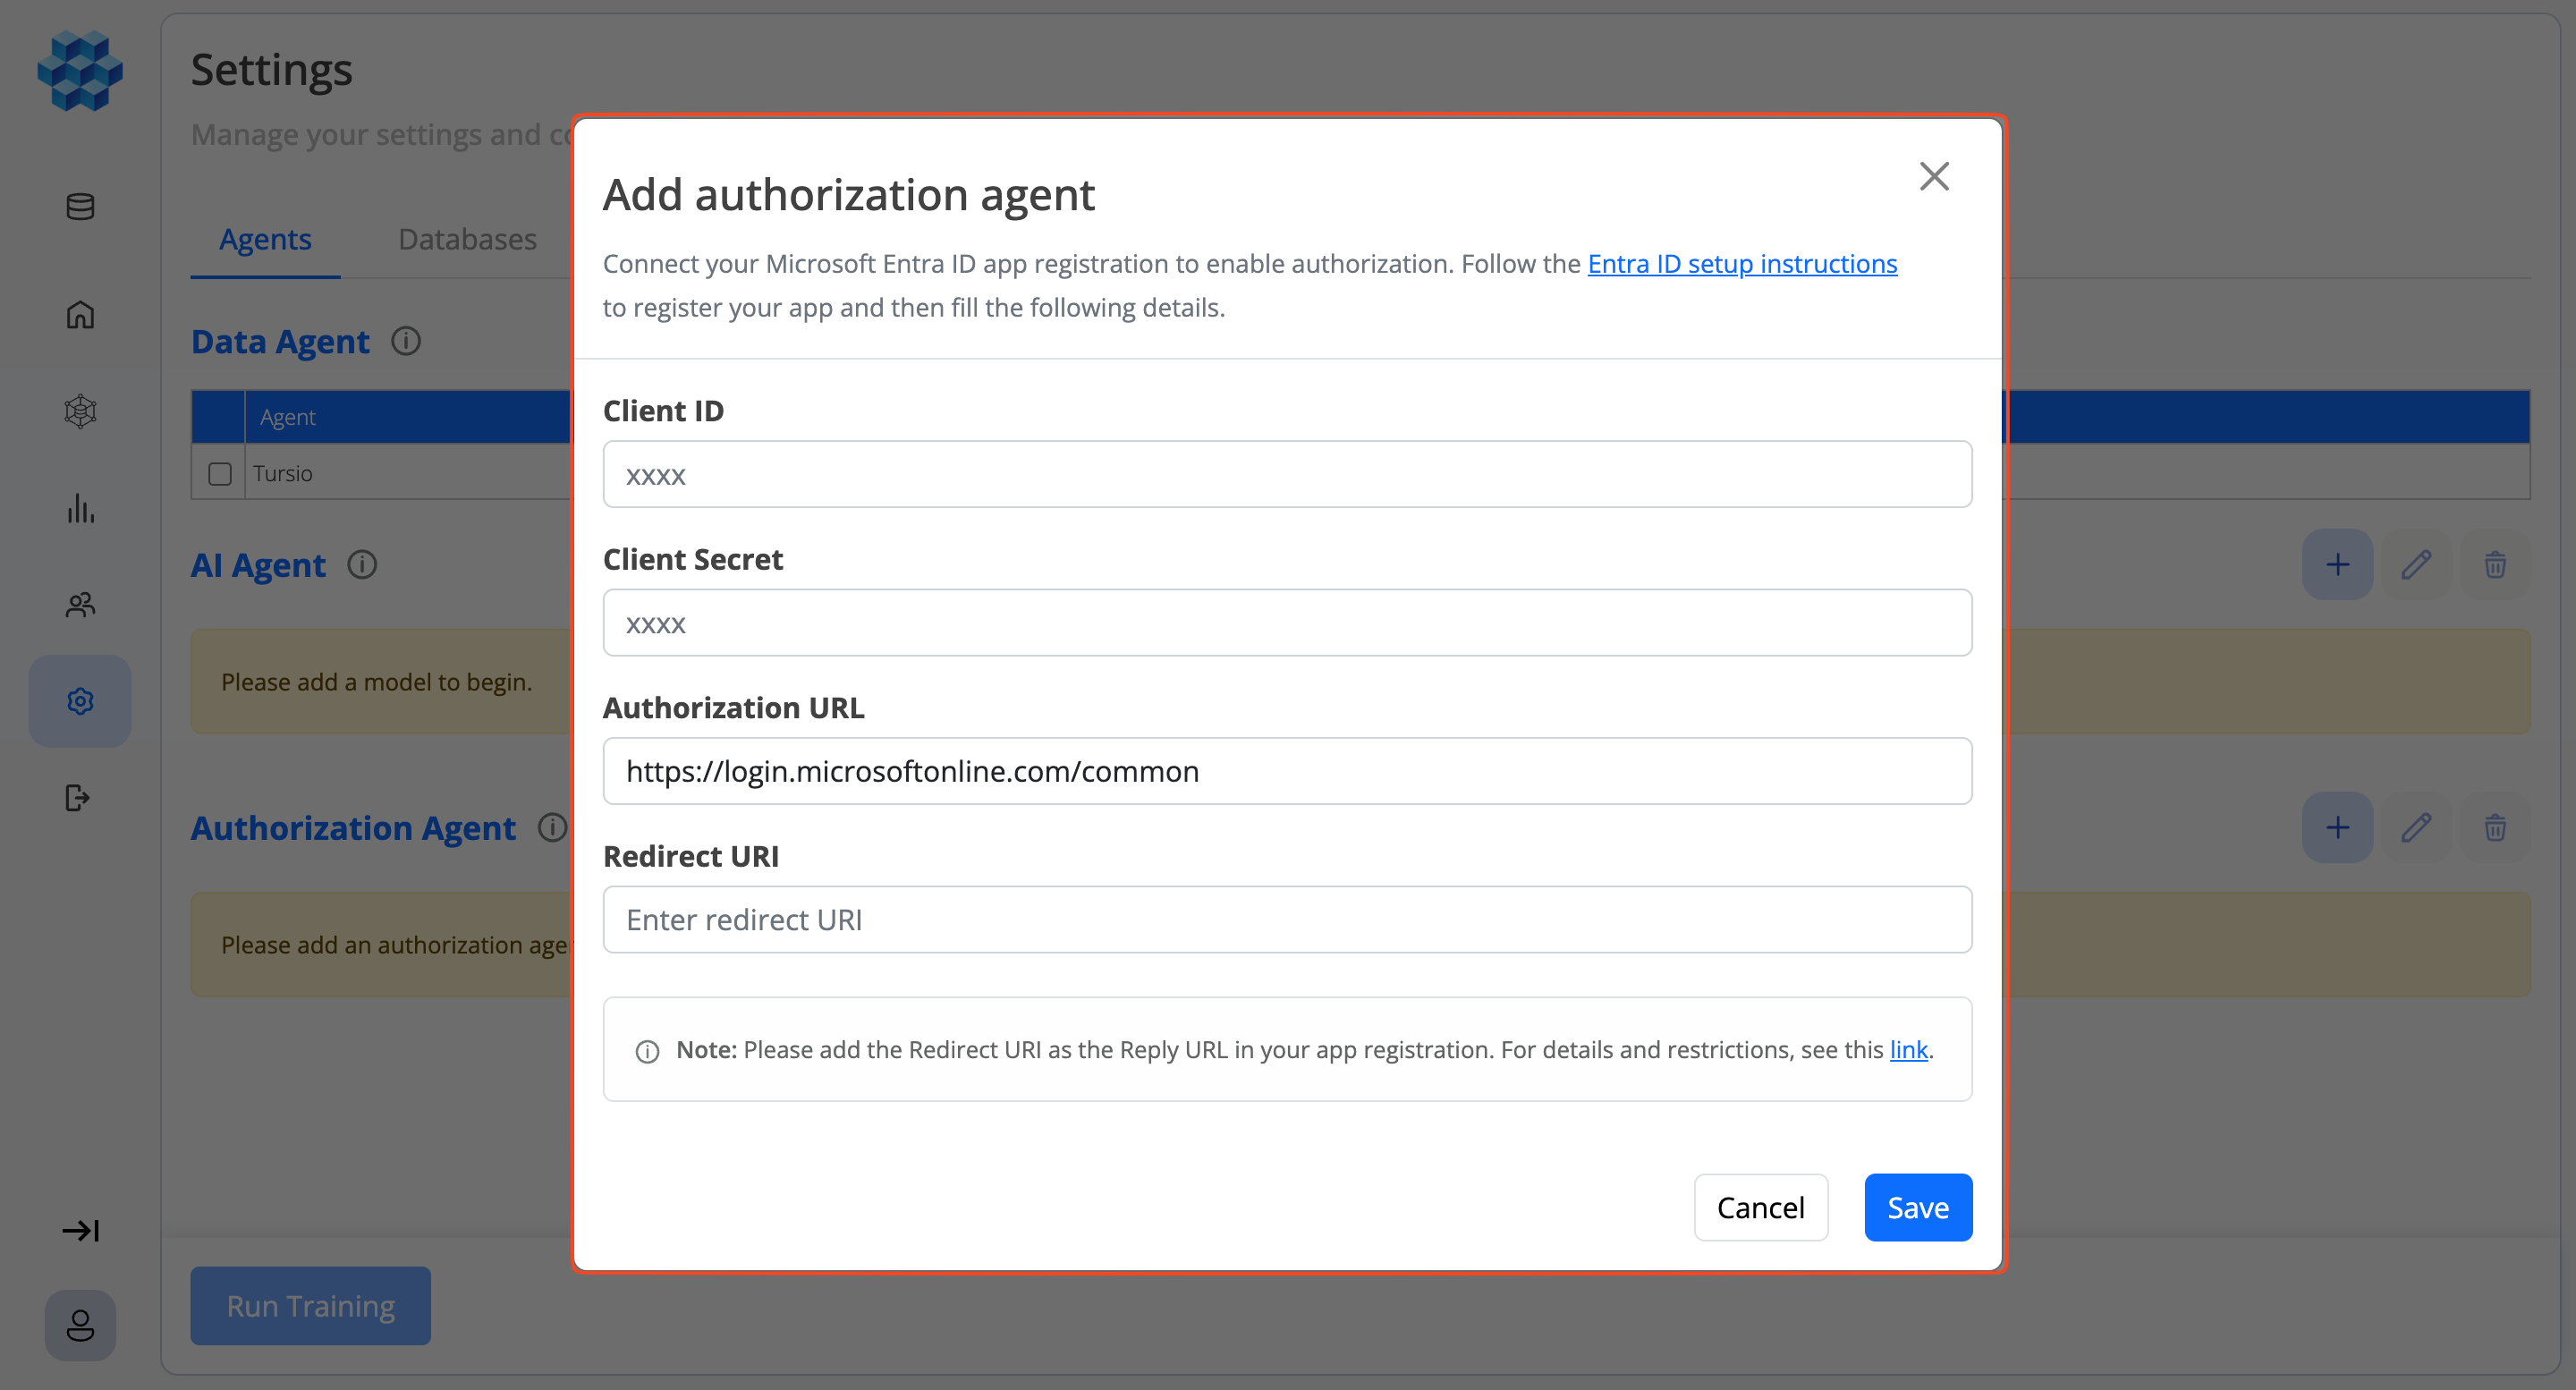
- Navigate to the Agents tab and find the Authorization Agent section.
- Click the Add icon.
Step 2: Add Authorization Agent Details
In the Add Authorization Agent window, provide the following details:
-
Client ID: The Application (Client) ID from your Microsoft Entra ID app registration.
-
Client Secret: The secret value generated in your Microsoft Entra ID app.
-
Authorization URL: Your Microsoft Entra ID authorization endpoint.
-
Redirect URI: Your portal's callback URL. Ensure it:
- Uses HTTPS
- Ends with
/ms(e.g.,https://yourportal.com/ms) - Exactly matches a redirect URI registered in your Microsoft Entra ID app
Step 3: Verify User Accounts
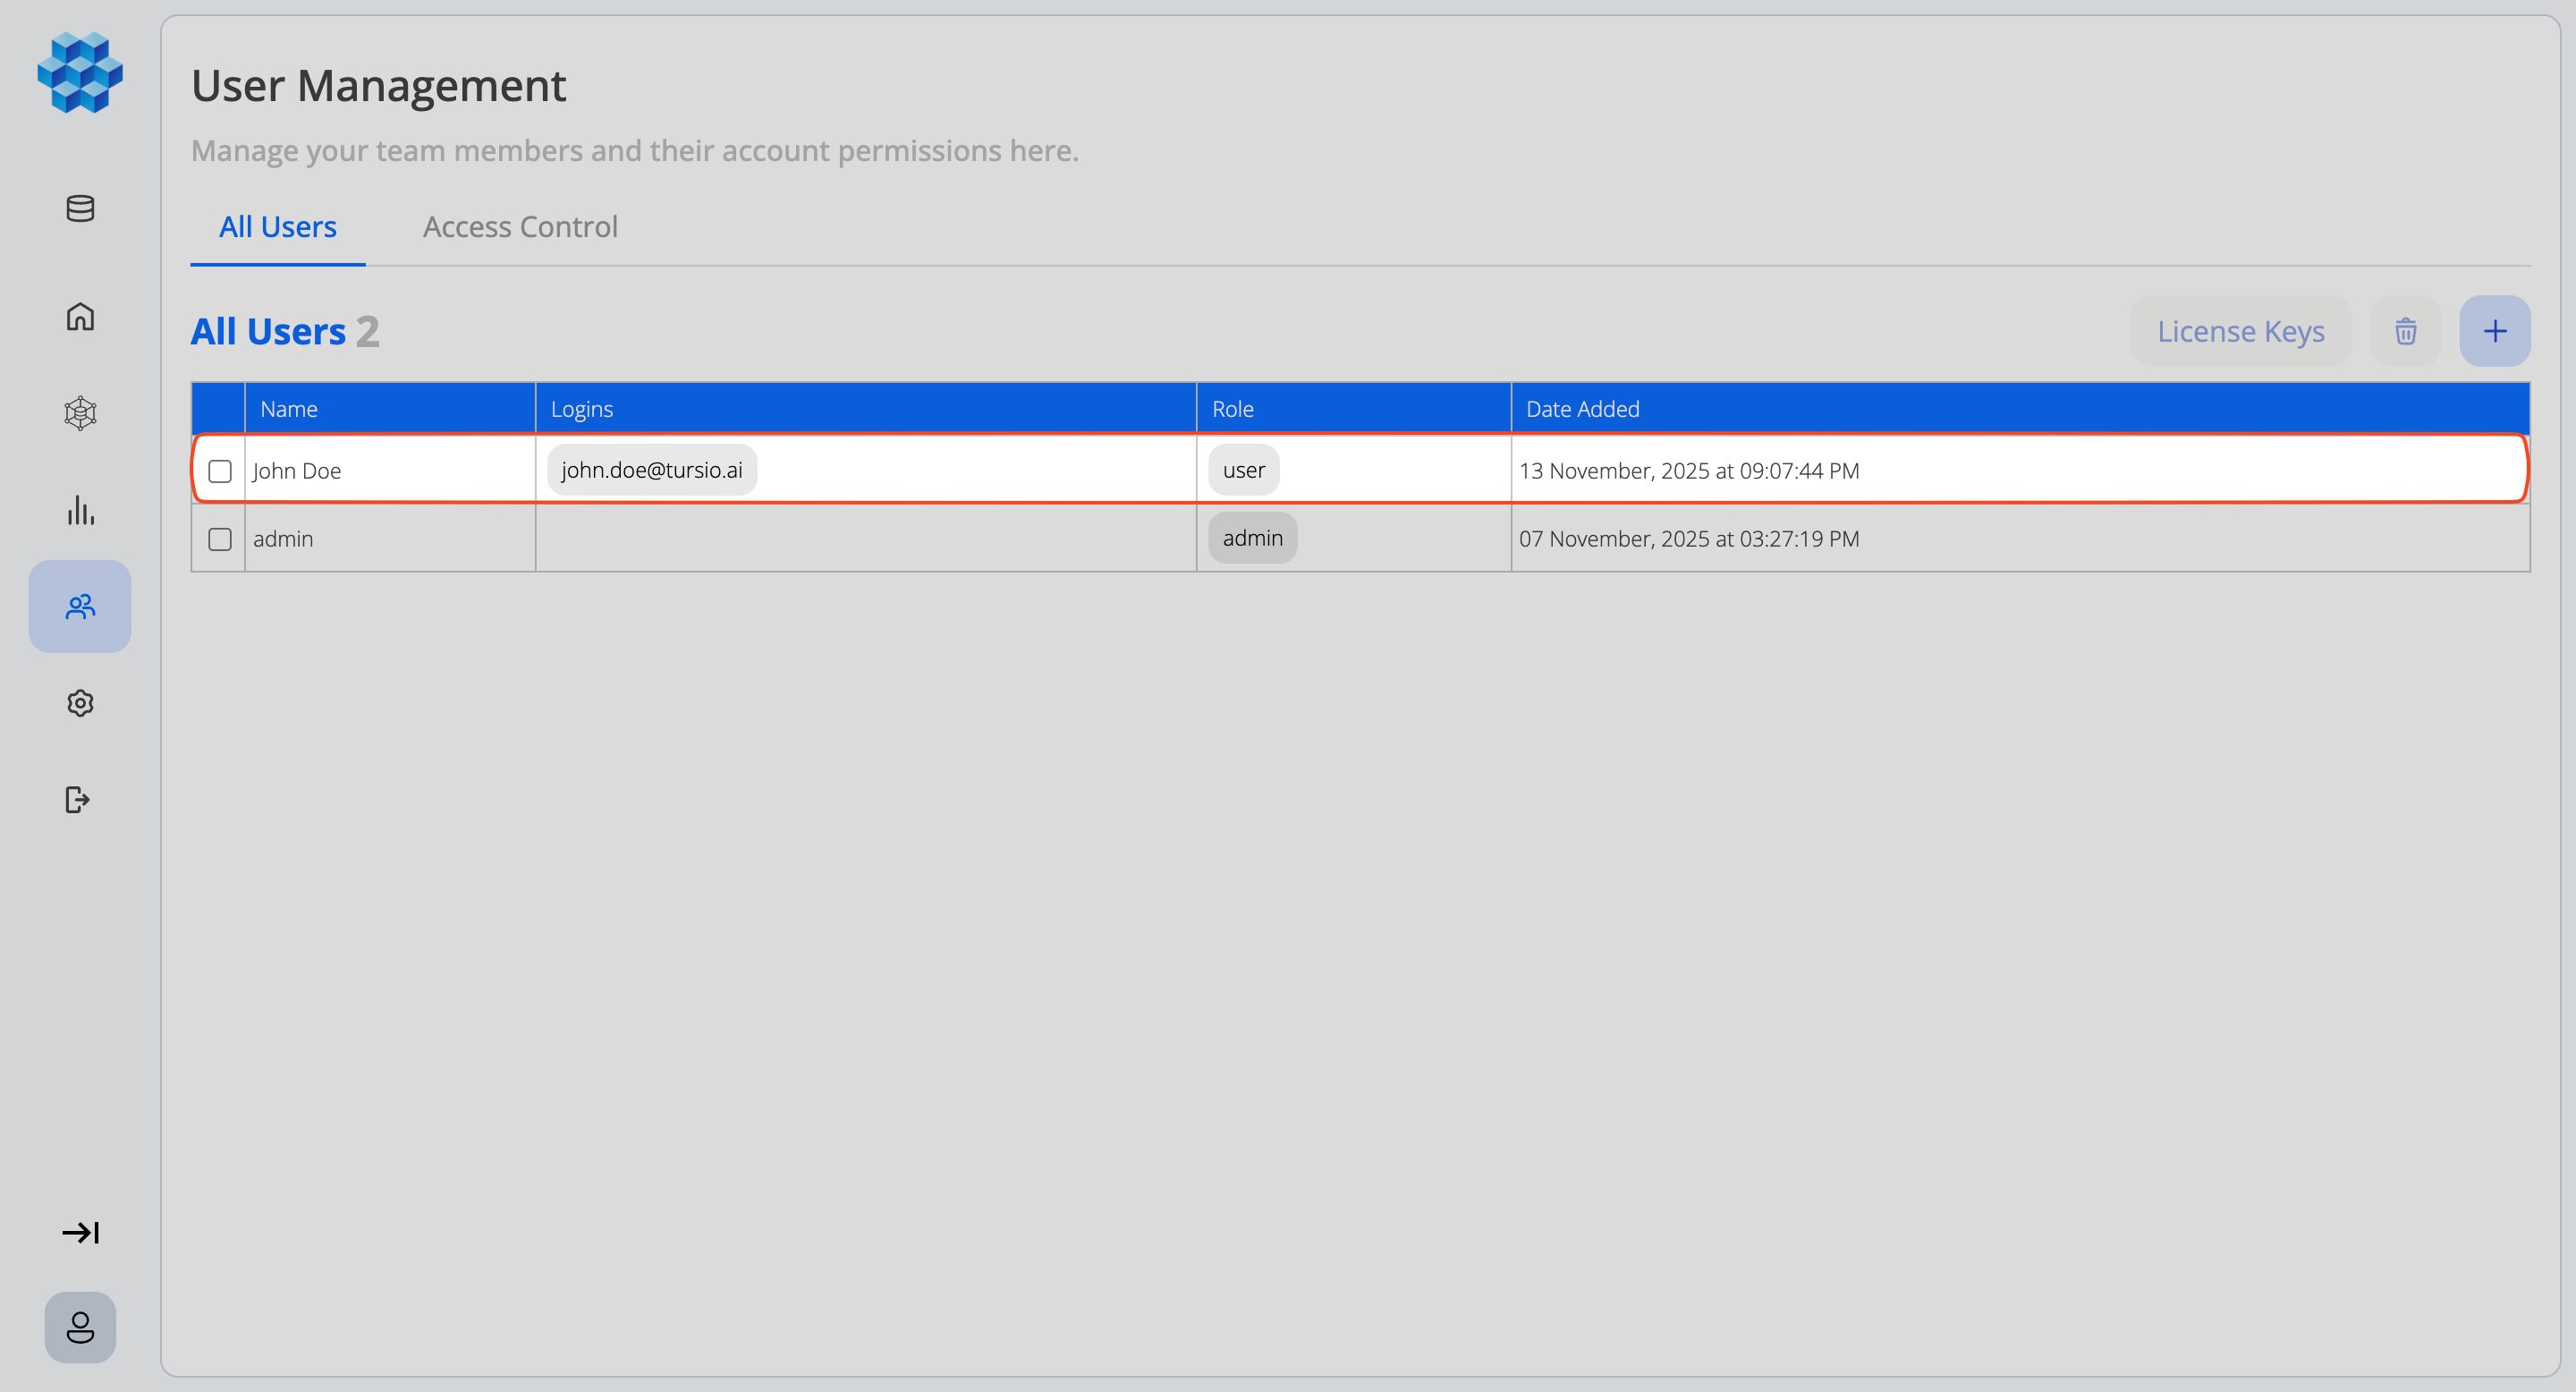
- Open User Management.
- Confirm that each user account exists.
- Ensure each user's email address exactly matches the Microsoft account they will use to sign in.
Note
User deletion is a soft delete. The deleted user record remains in the system database but is no longer visible in the User Management interface. This is implemented for security and audit purposes.
Before creating or deleting users, ensure that user details and role assignments are accurate. Incorrect configurations may cause conflicts during future user recreations, as soft-deleted accounts retain their associated email addresses.
To permanently delete a user record, contact Tursio Support for instructions.
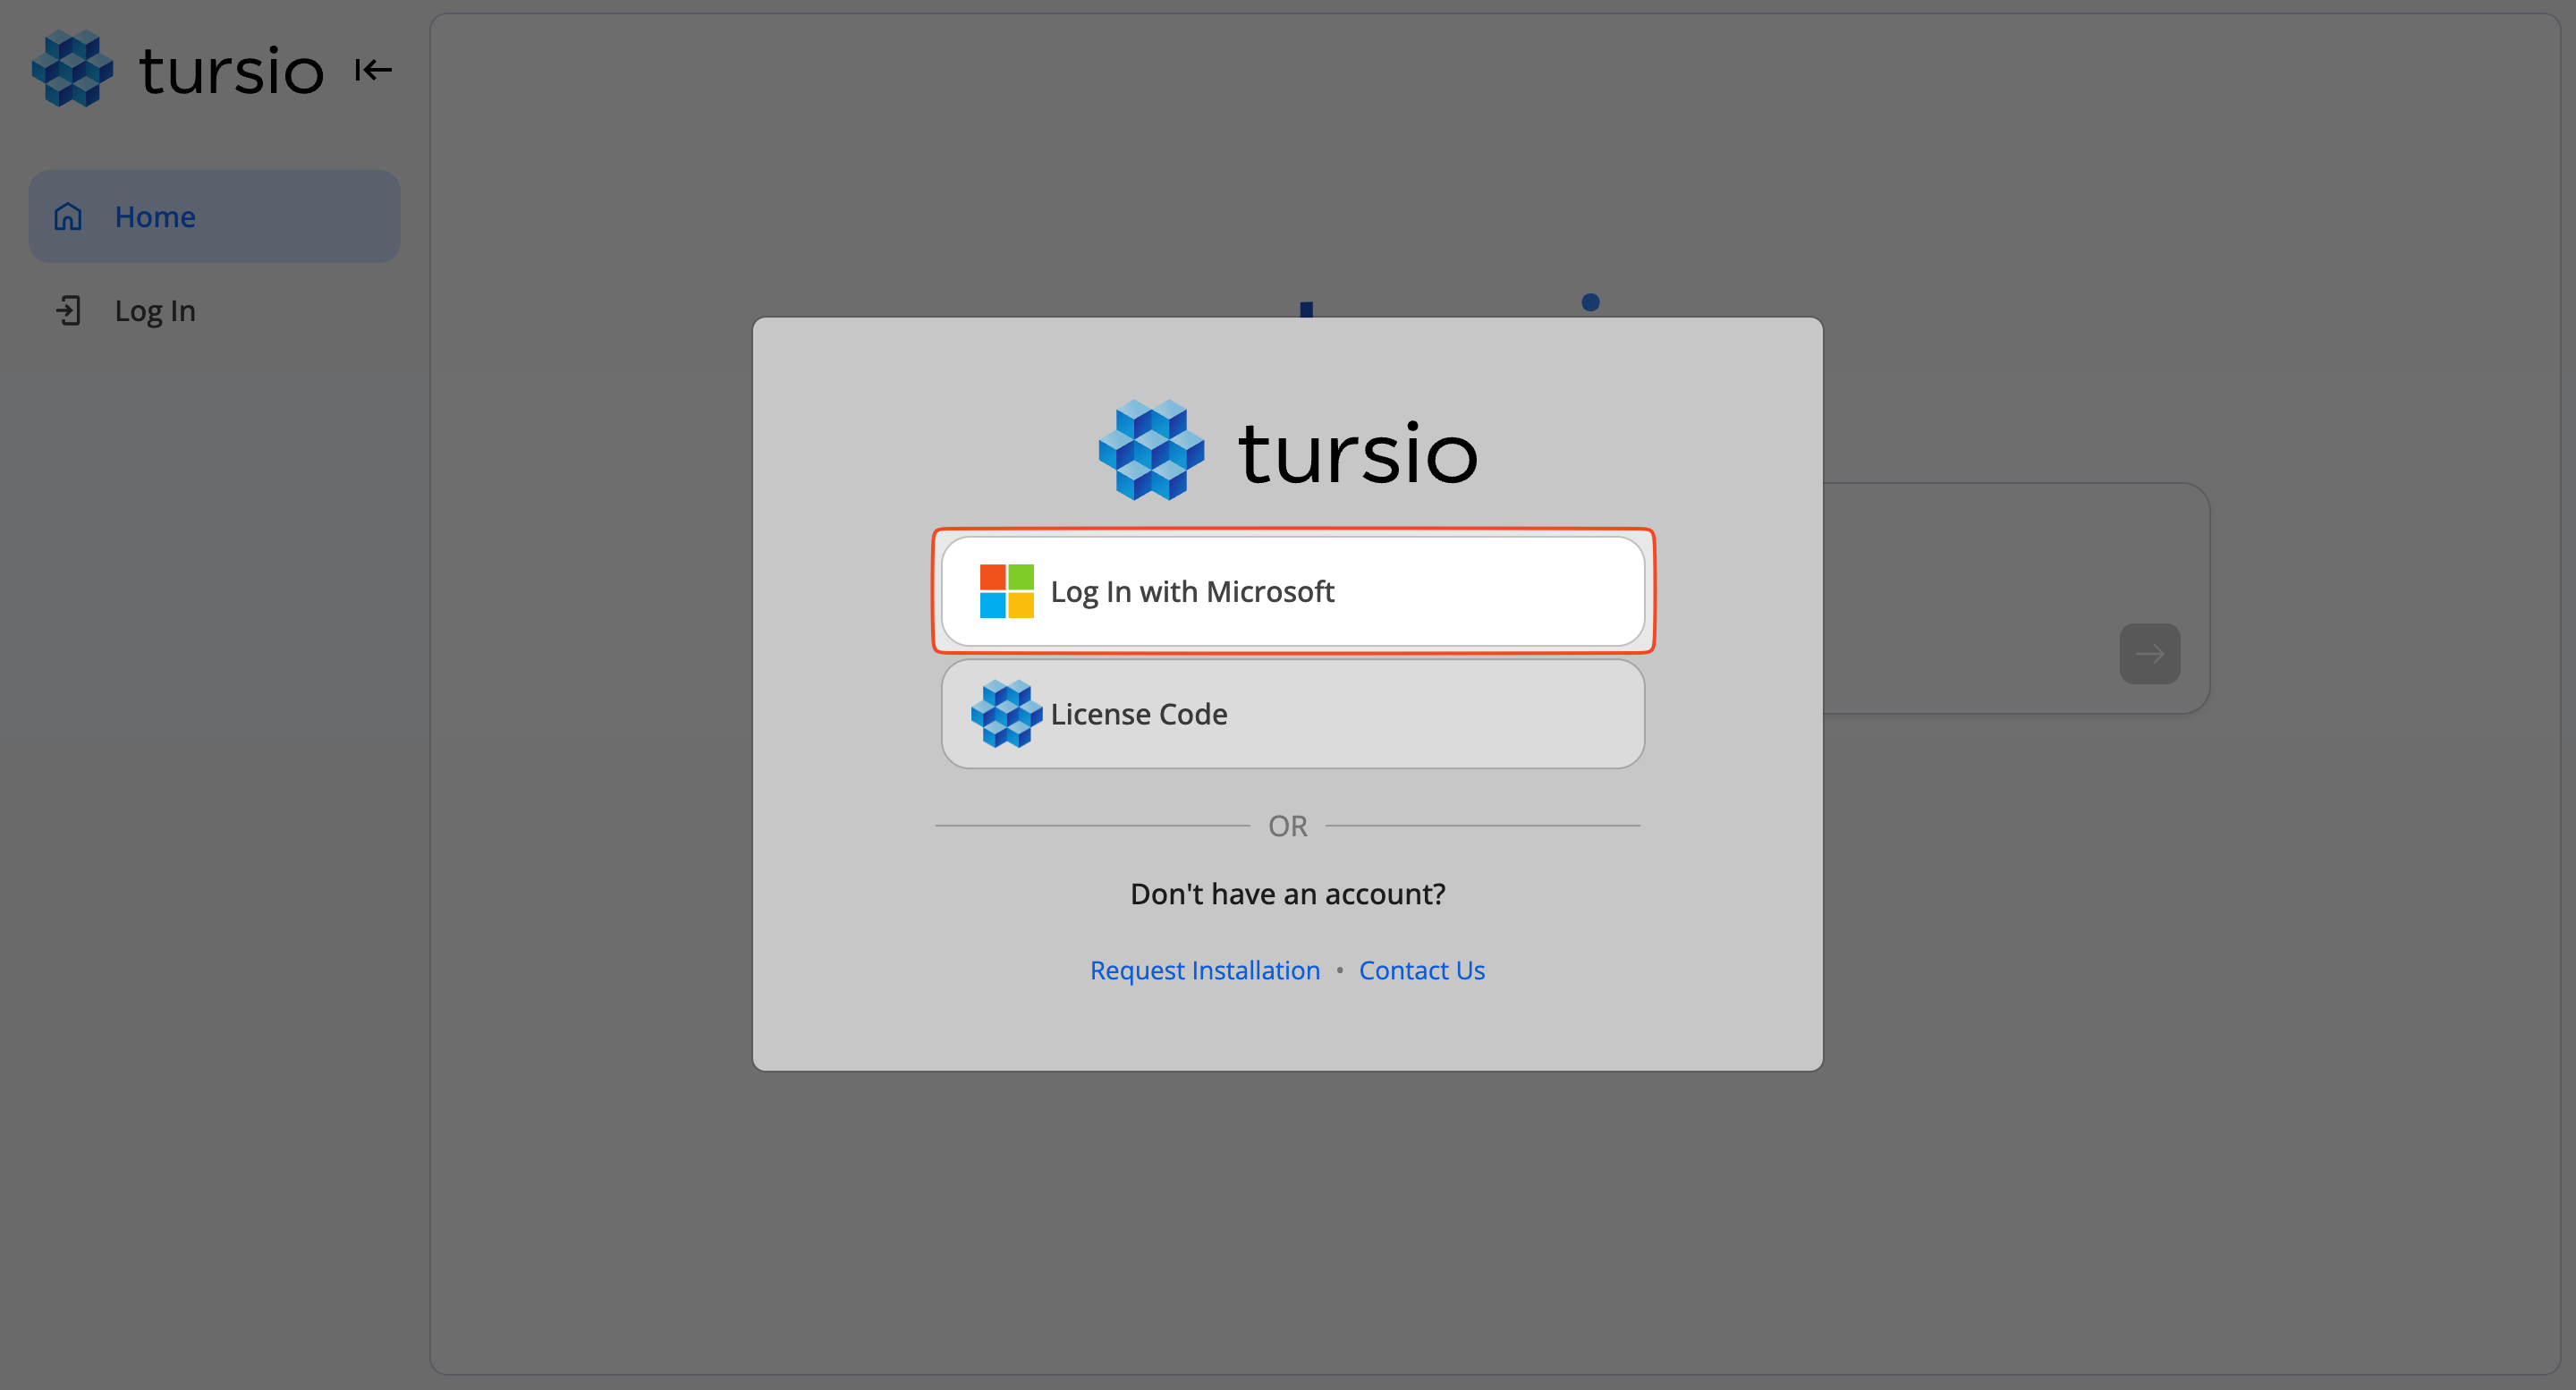
Once the Authorization Agent configuration is saved successfully
- The "Login with Microsoft" button appears on the portal login screen.
- Users can now sign in using their Microsoft account.
API Agent
An API Agent lets external systems and applications authenticate with Tursio to query your data programmatically. Each agent issues one or more access tokens that an external service presents as its credential.
API Agents are managed under the Agents tab on the Settings page, in the API Agent section.
Add an API Agent
- In the API Agent section, click Add API agent.
- Enter an Agent name, then click Create agent.
- The name must be at least 7 characters and contain only letters, numbers, and spaces.
Create and Use a Token
- Open the agent — it opens automatically after creation, or click Edit on the agent's row.
- Click Create token. The new token appears in the tokens table with a copy button and an expiration date (tokens are valid for two years by default).
- Copy the token and configure it as the credential in your external application.
You can create multiple tokens for an agent. Each agent row shows its status as Active, Not active, or No token.
Delete an API Agent
Open the ⋮ menu on an agent's row and select Delete to remove the agent and all of its tokens.
Note
Only admins and owners can create or manage API Agents; read-only users cannot make changes.
Databases
Tursio allows users to connect, manage, and maintain multiple databases for natural language querying. You can onboard new databases, edit connection details, refresh metadata, or remove databases as needed. Tursio currently supports the following database backends: SQL Server, Azure SQL, Fabric Warehouse, Snowflake, Databricks, PostgreSQL, Supabase, MySQL, Oracle, SAP HANA, ClickHouse, Cassandra, DynamoDB, Salesforce, Symitar Export, and Microsoft Excel.
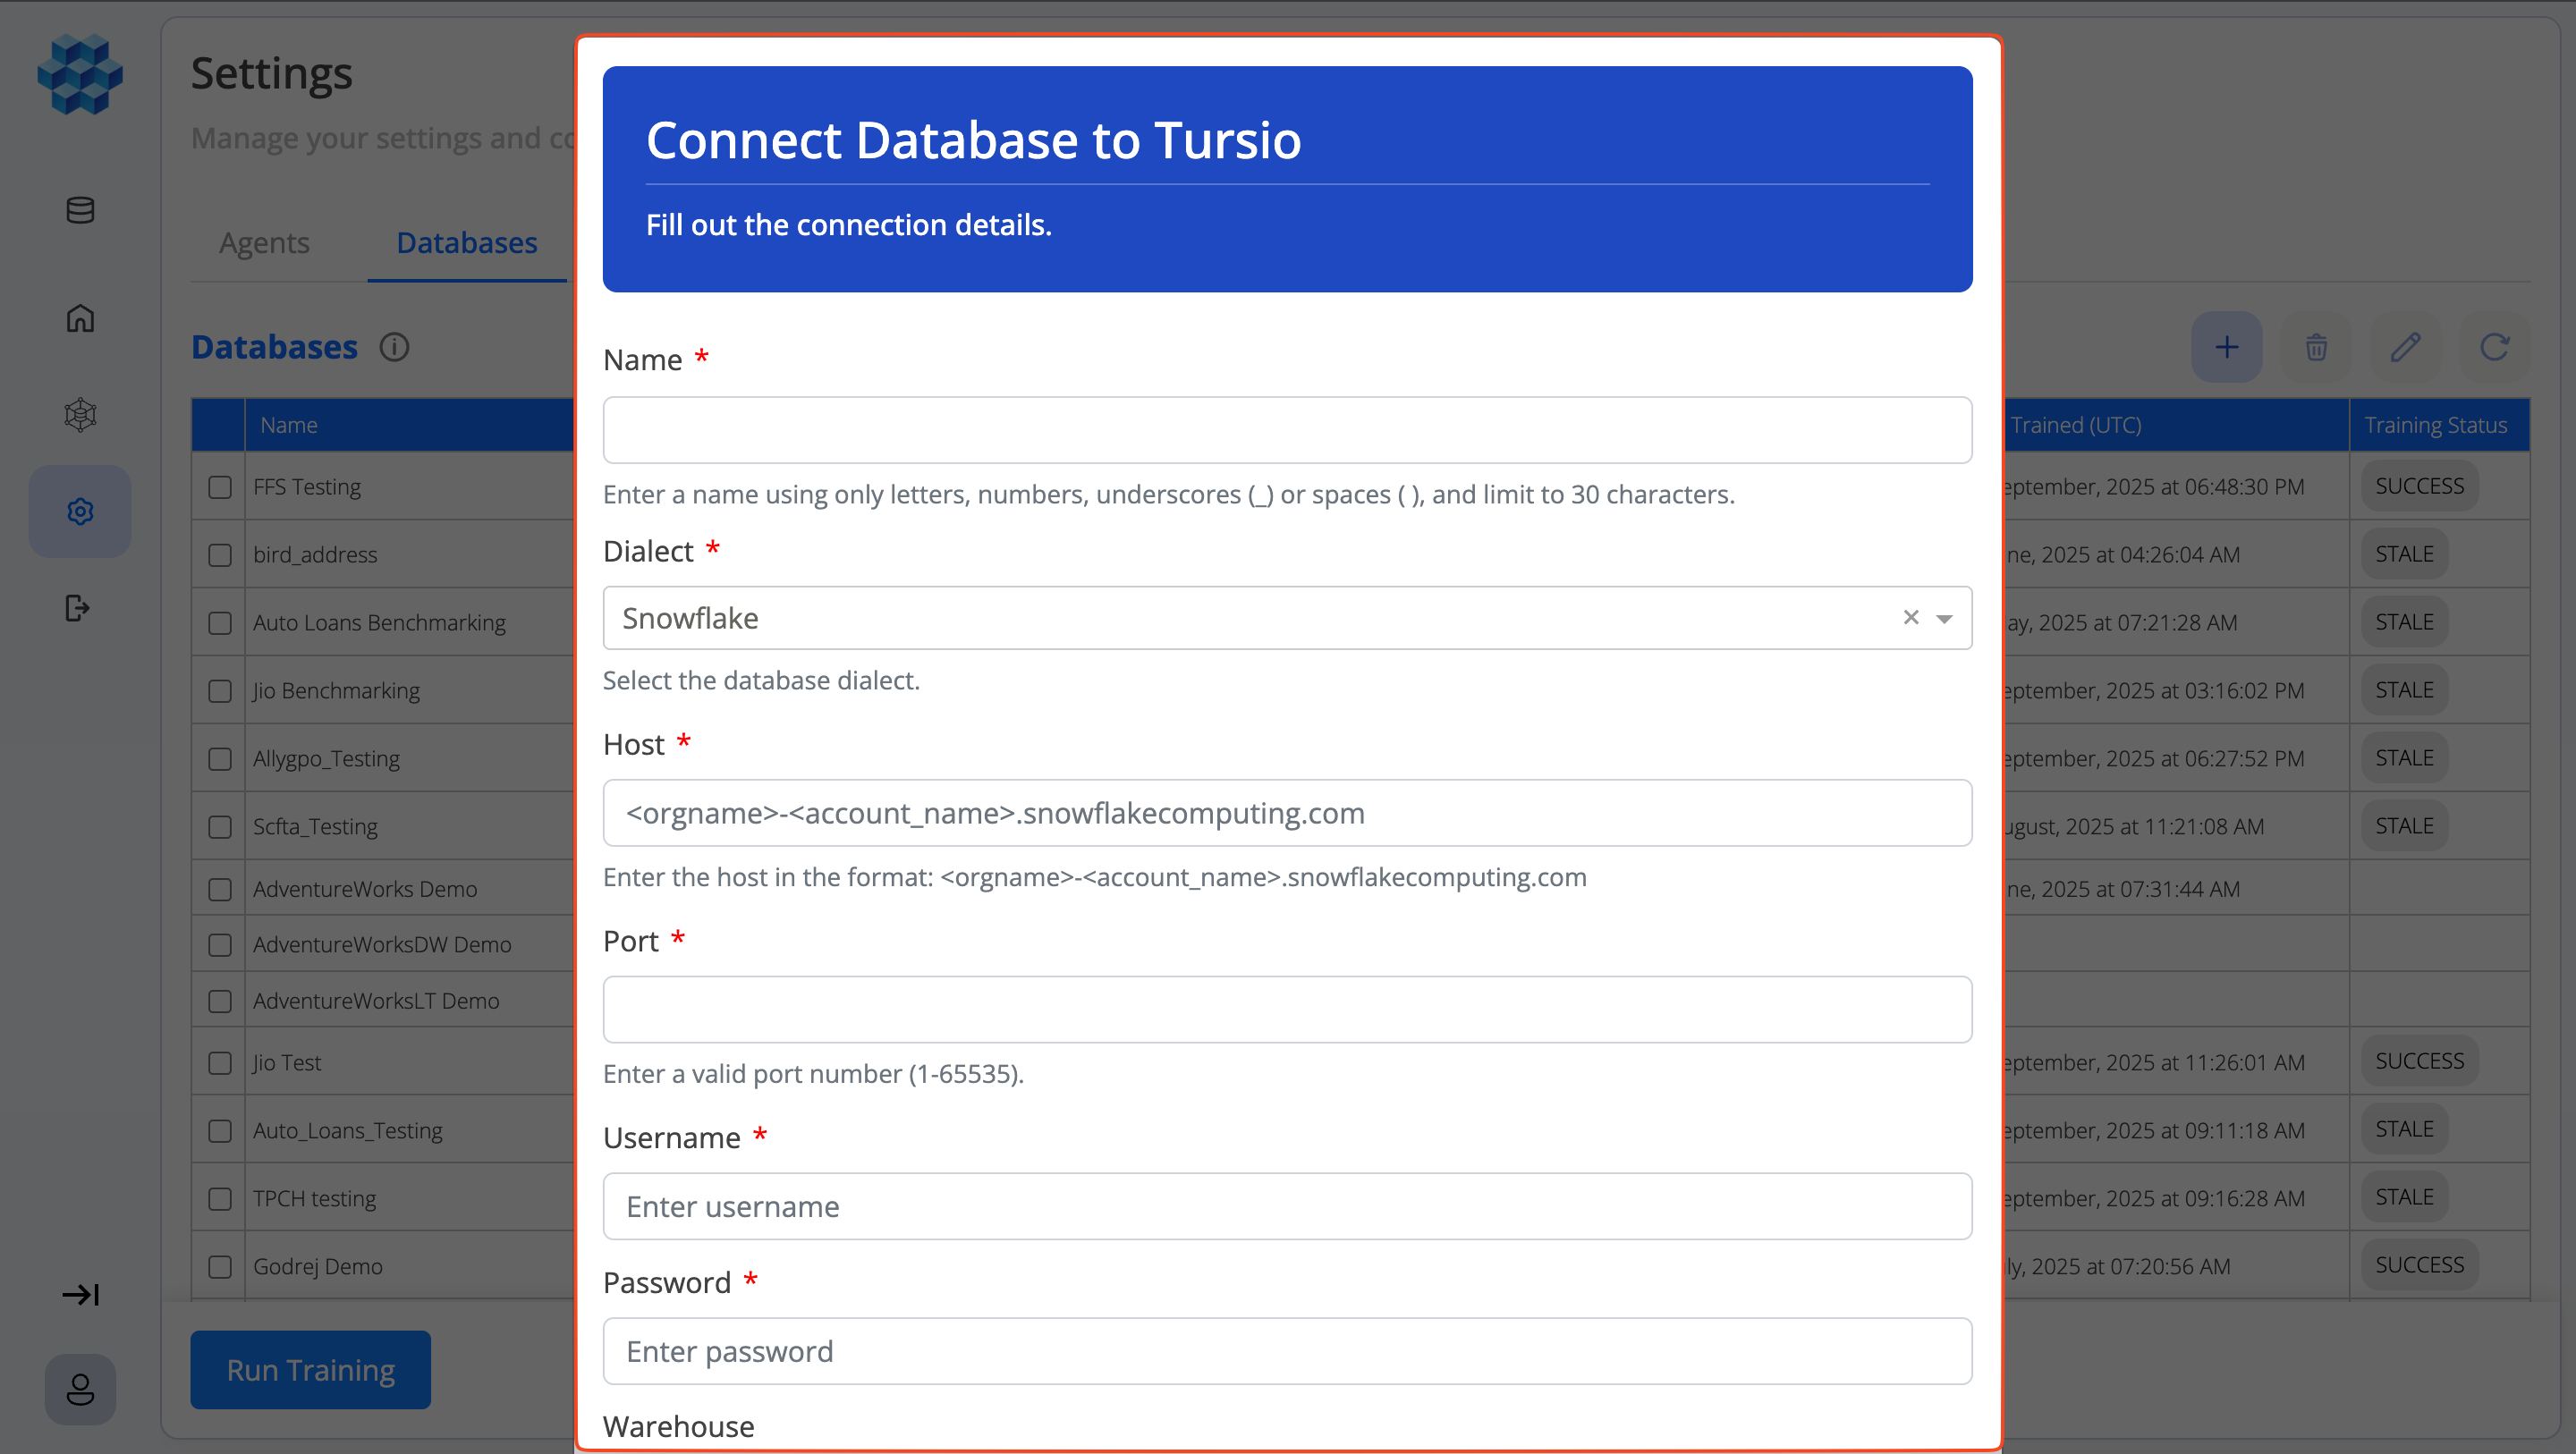
The following screenshot shows the database connection panel. Once connected, you can query all supported databases from a single place, regardless of the underlying dialect. Users can add multiple connections with different roles to the same database and control access of different connections for different users.
Add Database
To add a new database, click Add Database in the Database section and fill in the following details.
Basic Information
- Name — A display name for your database connection.
- Dialect — The database type from the dropdown list (e.g., Snowflake, Databricks, SQL Server, Azure SQL, Fabric Warehouse, Microsoft Excel, Cassandra, etc.).
Credentials & Connection Details
- The fields vary depending on the selected dialect. Common examples include:
- Snowflake / SQL Connections: Hostname, Username, Password.
- SQL Server / Azure SQL: Client ID, Client Secret, Hostname.
- Warehouse-based dialects: Warehouse name (if applicable).
- General: Database name (used for training and querying).
- Whitelist IPs — Optionally whitelist the platform IPs on your database firewall for secure connectivity.
- Additional Parameters — Optional connection parameters in comma-separated key-value format.
- Example:
authentication=serviceprincipal, trustservercertificate=yes
- Example:
Validation & Save
- After entering all required fields, click Validate.
- If credentials are correct, a success message appears.
- If incorrect, an error message guides you to correct the details.
- Once validated, click Accept to save and connect the database.
Edit Database
You can edit an existing database if:
- The name needs to be updated.
- Credentials (e.g., password, client secret) have changed.
- Additional parameters or connection properties need to be modified.
Note
To edit a database, go to the database entry, click Edit, update the fields, and re-validate the connection before saving.
Delete Database
If a database connection is no longer needed, it can be safely deleted:
- Select the database from the list.
- Click Delete and confirm the action.
- Once deleted, queries will no longer run against this database.
Refresh Metadata
If new tables, columns, or schema changes have been made in the database, you can refresh the metadata to keep the system up to date.
- Go to the connected database entry.
- Click Refresh to sync the latest structure.
- This ensures that natural language queries recognize newly added objects.
Tip
Always validate credentials before saving to ensure smooth connectivity.
Security Note
Passwords and secrets are encrypted and stored securely.
Schema Change Detection
Tursio periodically checks each connection's live schema against the tables and columns you have onboarded as Query Tables. If onboarded tables or columns no longer exist — or the database can't be reached — a banner appears on the Settings and Semantics pages.
- Schema changed: "Schema changes detected in the
connection. Some onboarded tables or columns may no longer exist in the database." The banner lists the specific missing tables and missing columns. - Unreachable: "Unable to connect to the
database. Please verify your connection credentials and network access."
When you see a schema-change banner, verify that the referenced tables and columns still exist, refresh metadata, and either re-add the changed objects or remove them from your Query Tables — then re-train the connection.
Note
Schema checks are cached and refreshed about once per hour per connection, so a banner may take up to an hour to clear after you fix the underlying change.
Dev Connections
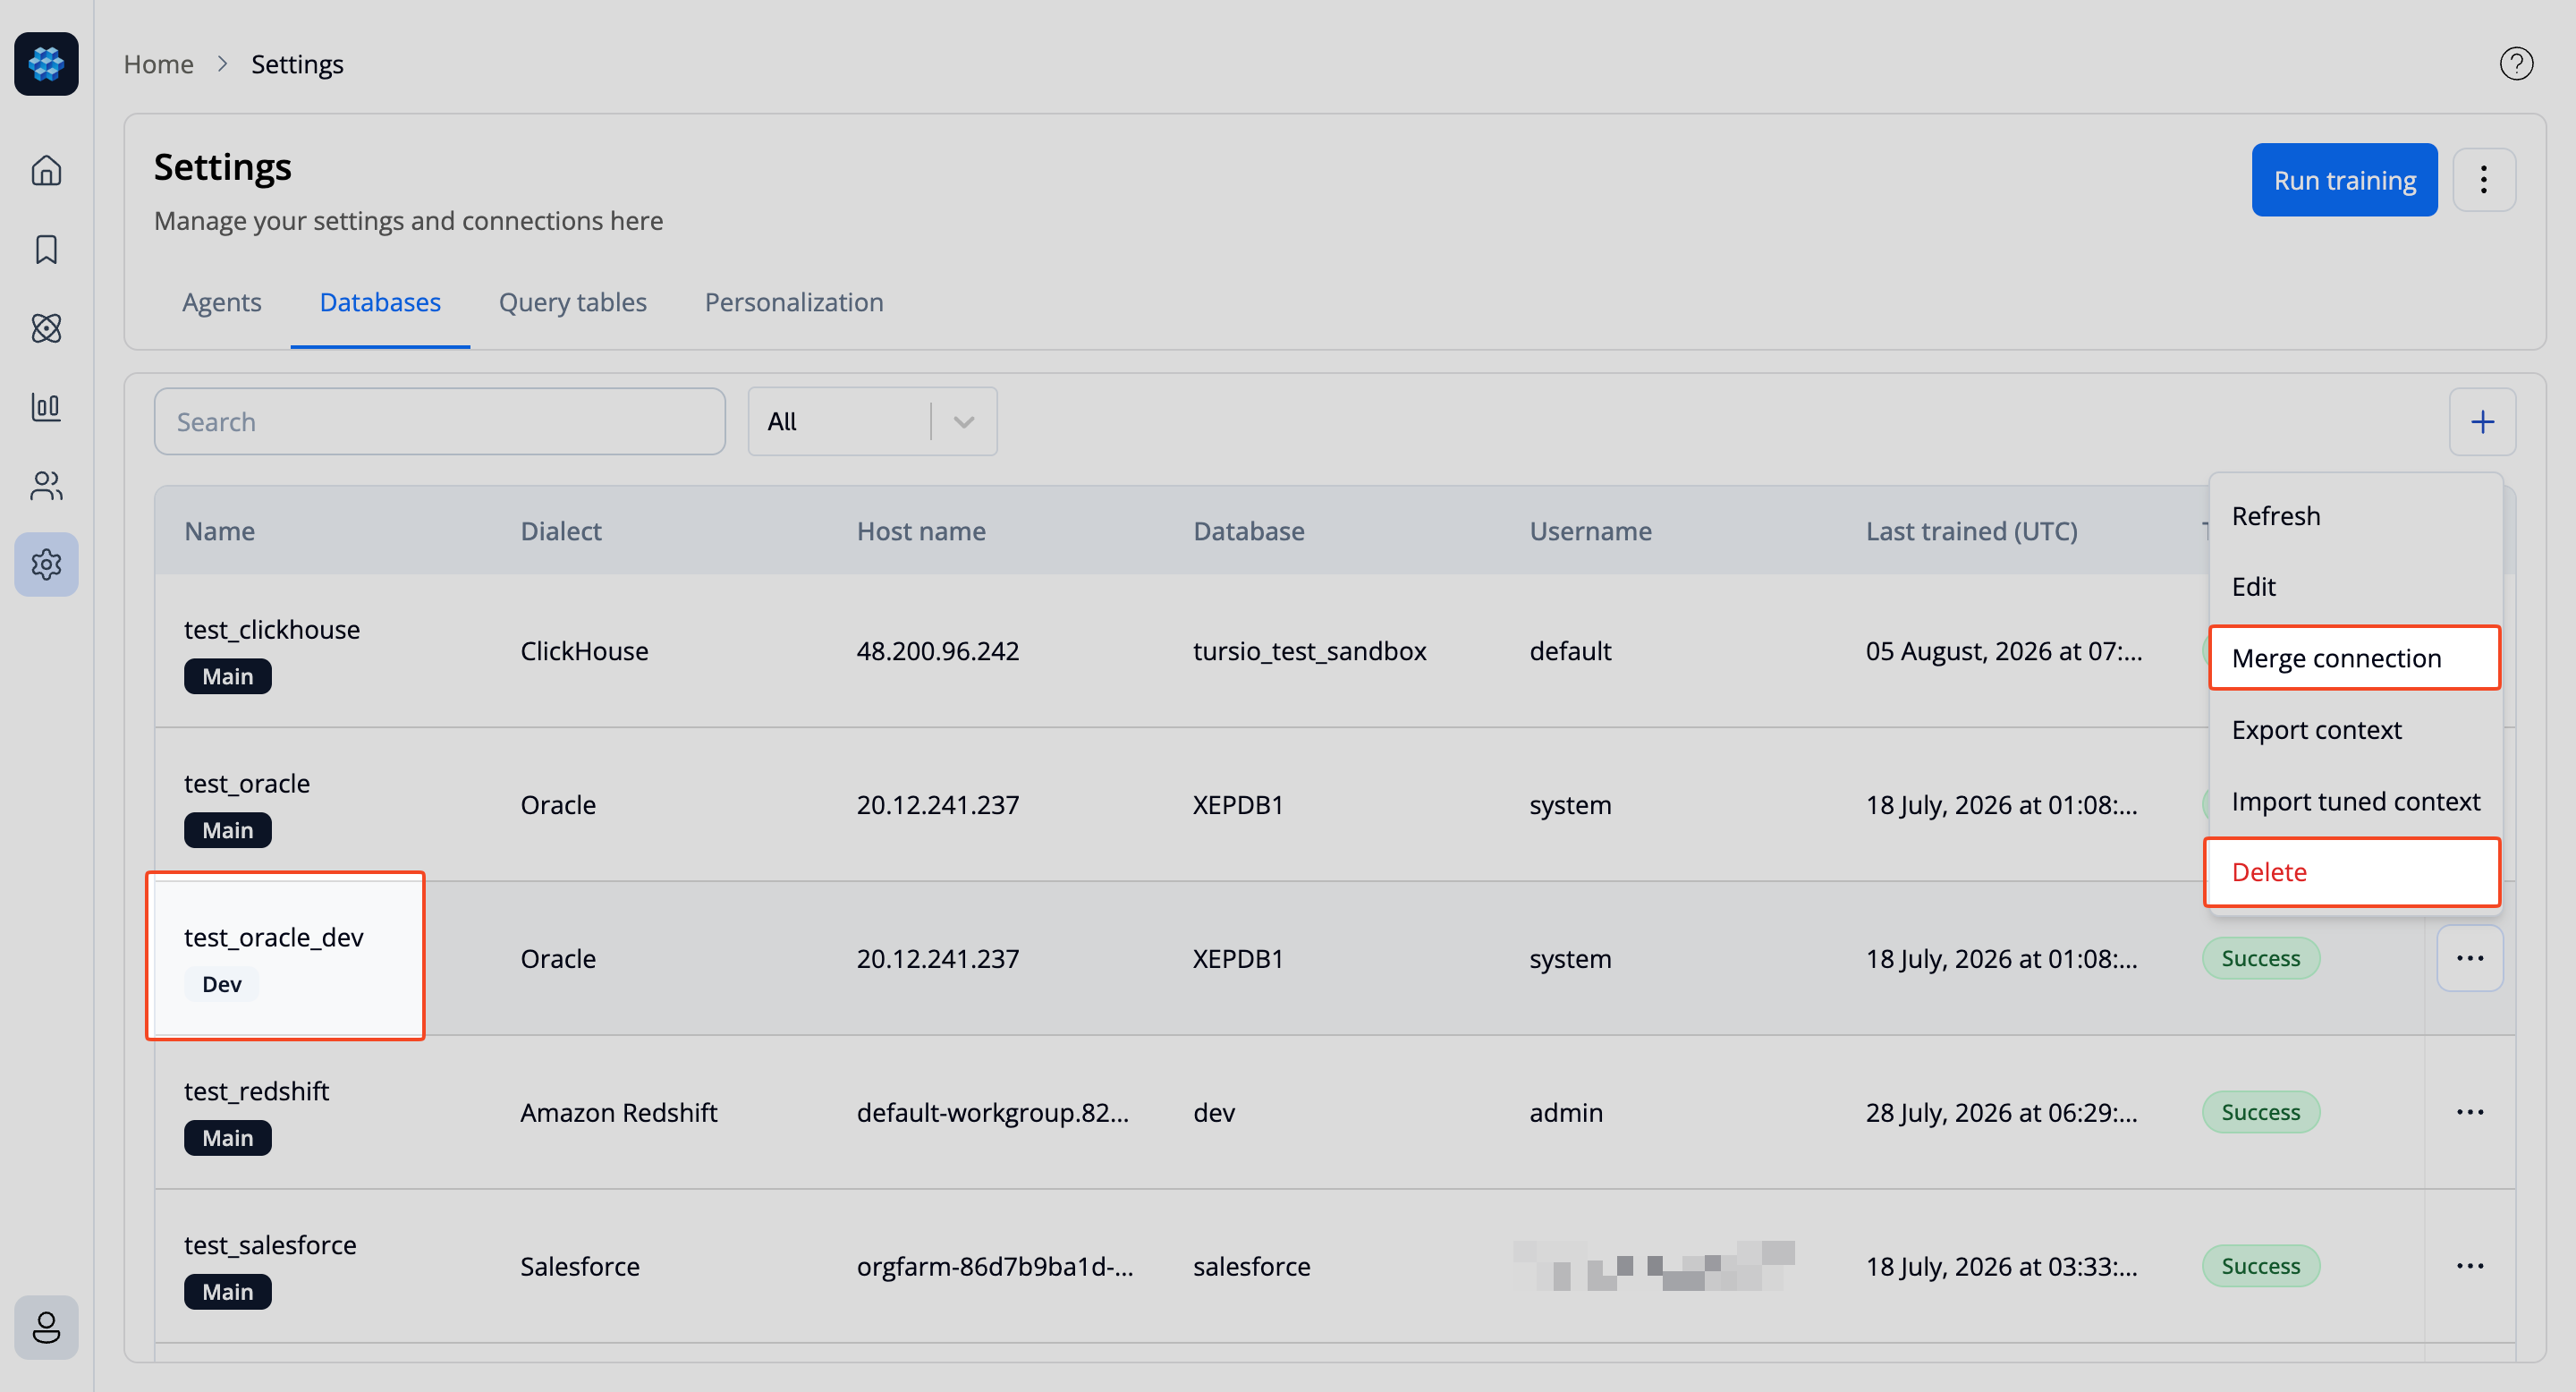
A dev connection is an isolated copy of an existing database connection, so you can test configuration and training changes without affecting your live queries. Each connection in the Databases table is labelled with a Main or Dev pill.
To create a dev connection:
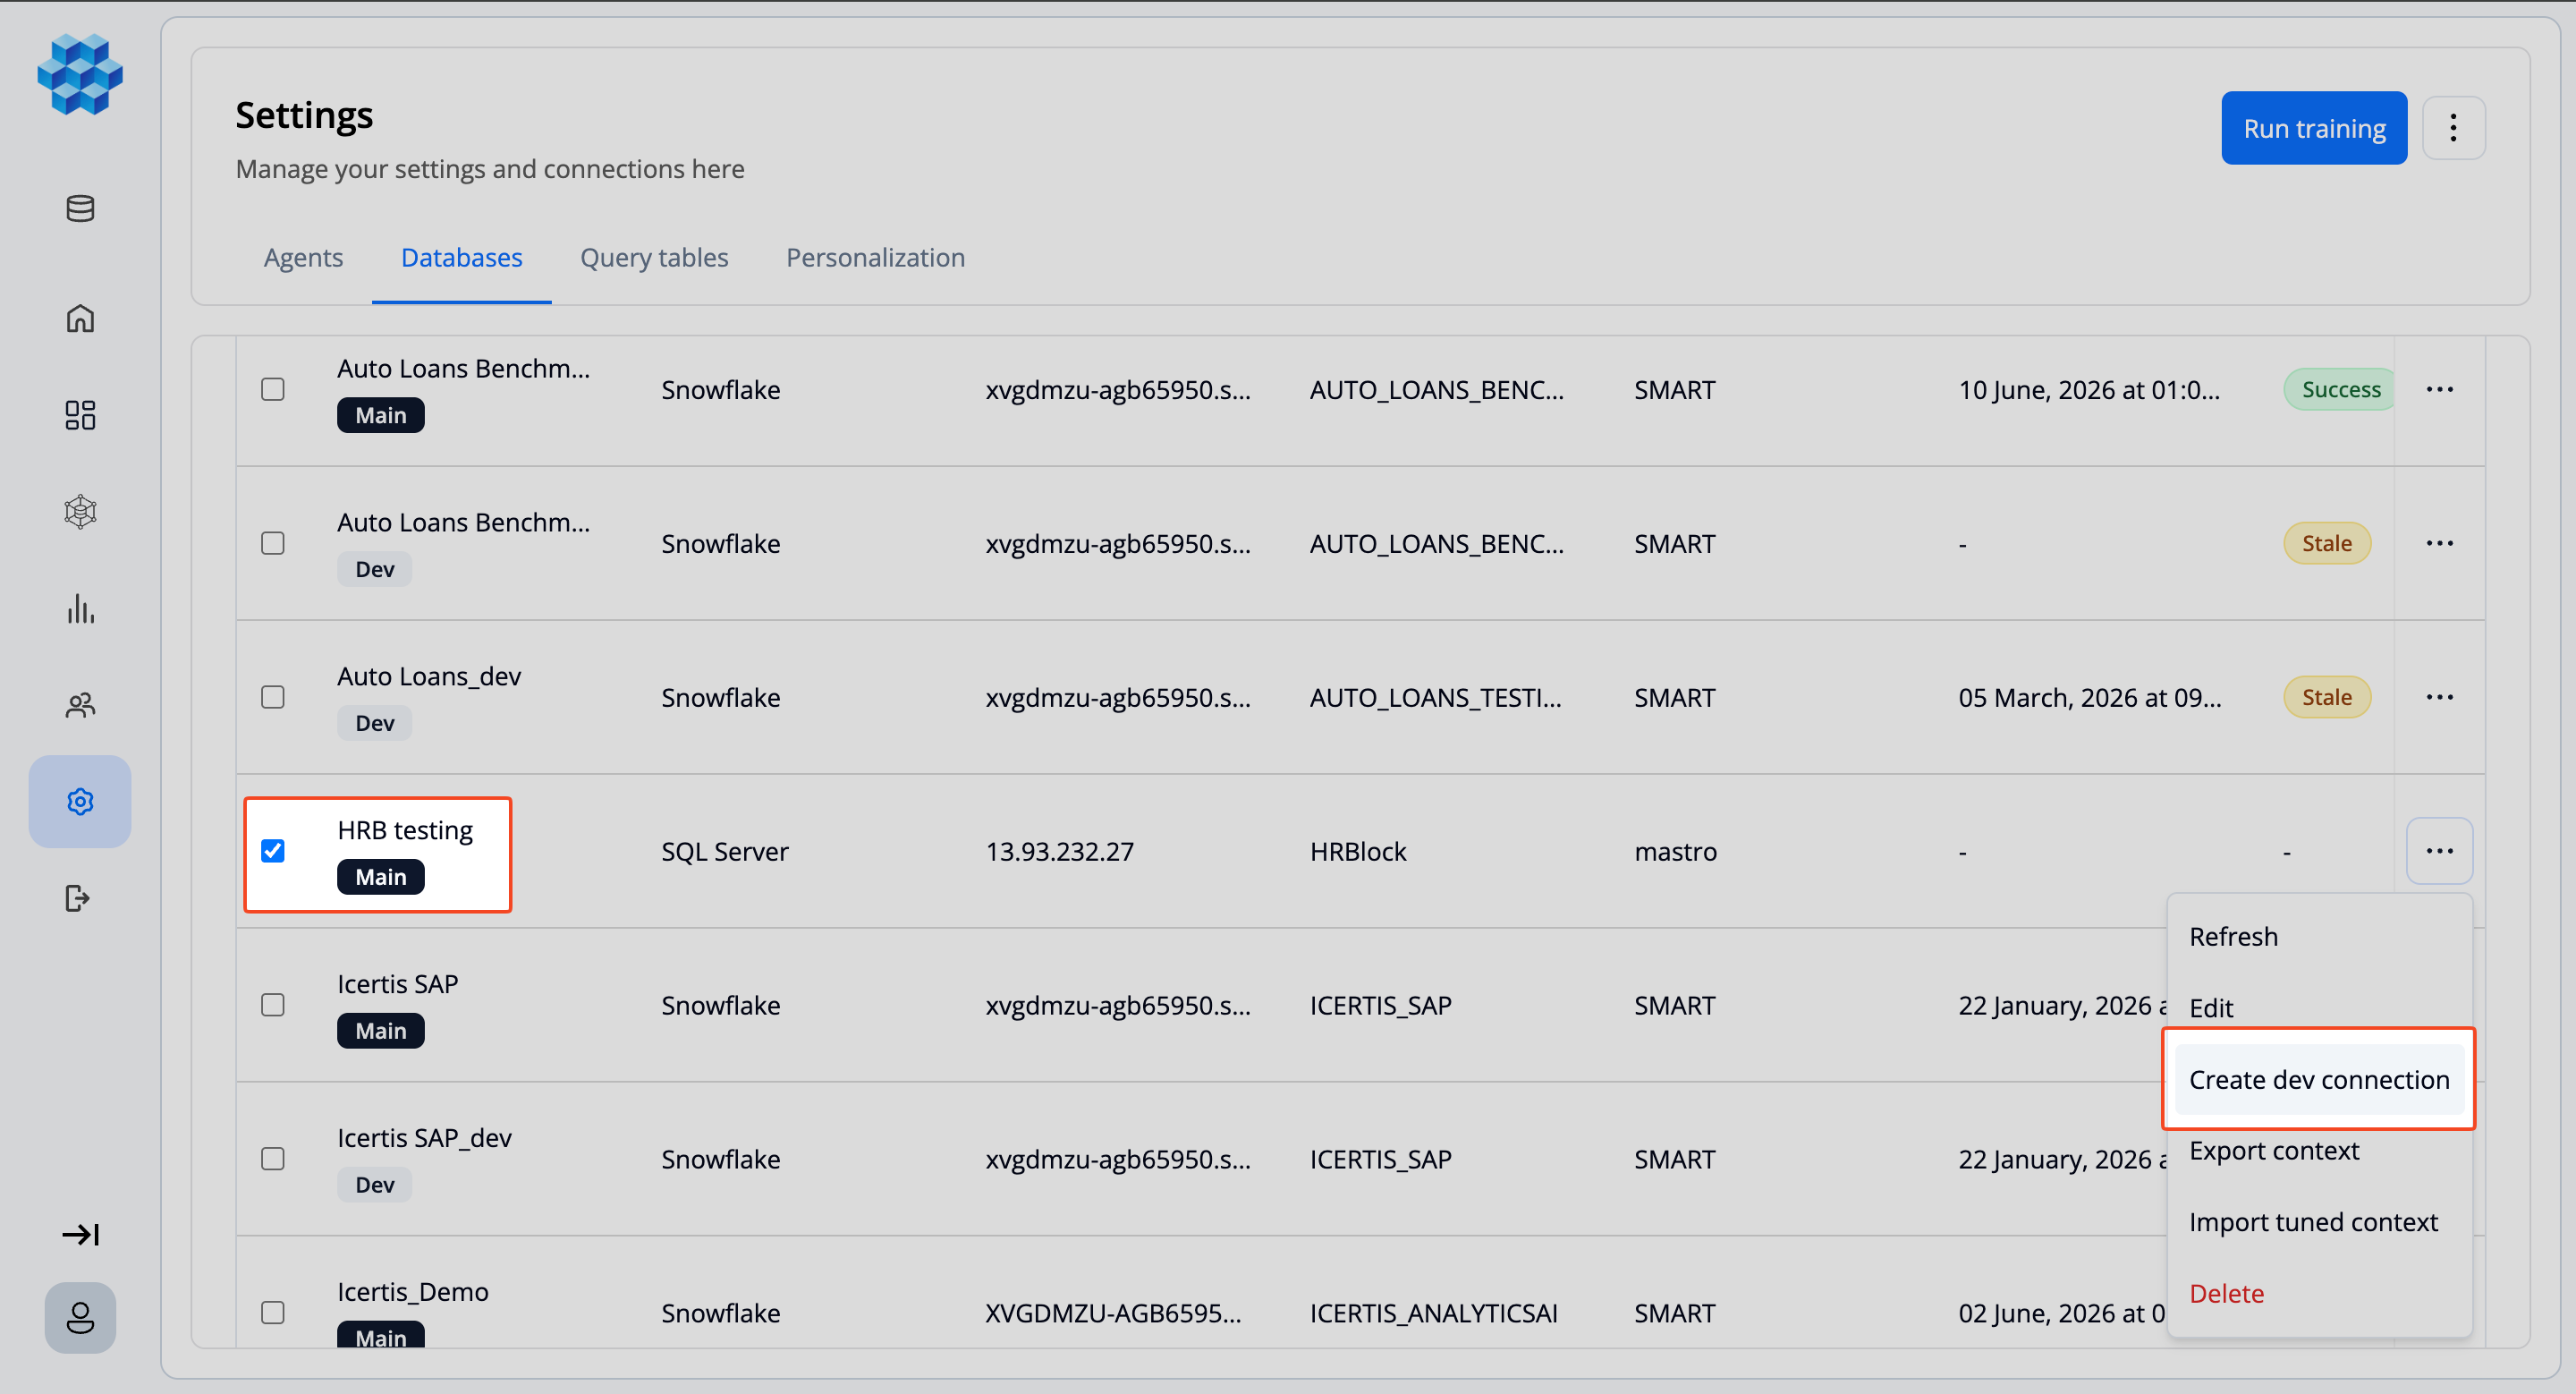
- In the Databases table, open the row's action menu (the ⋮ icon) on the connection you want to copy.
- Select Create dev connection.
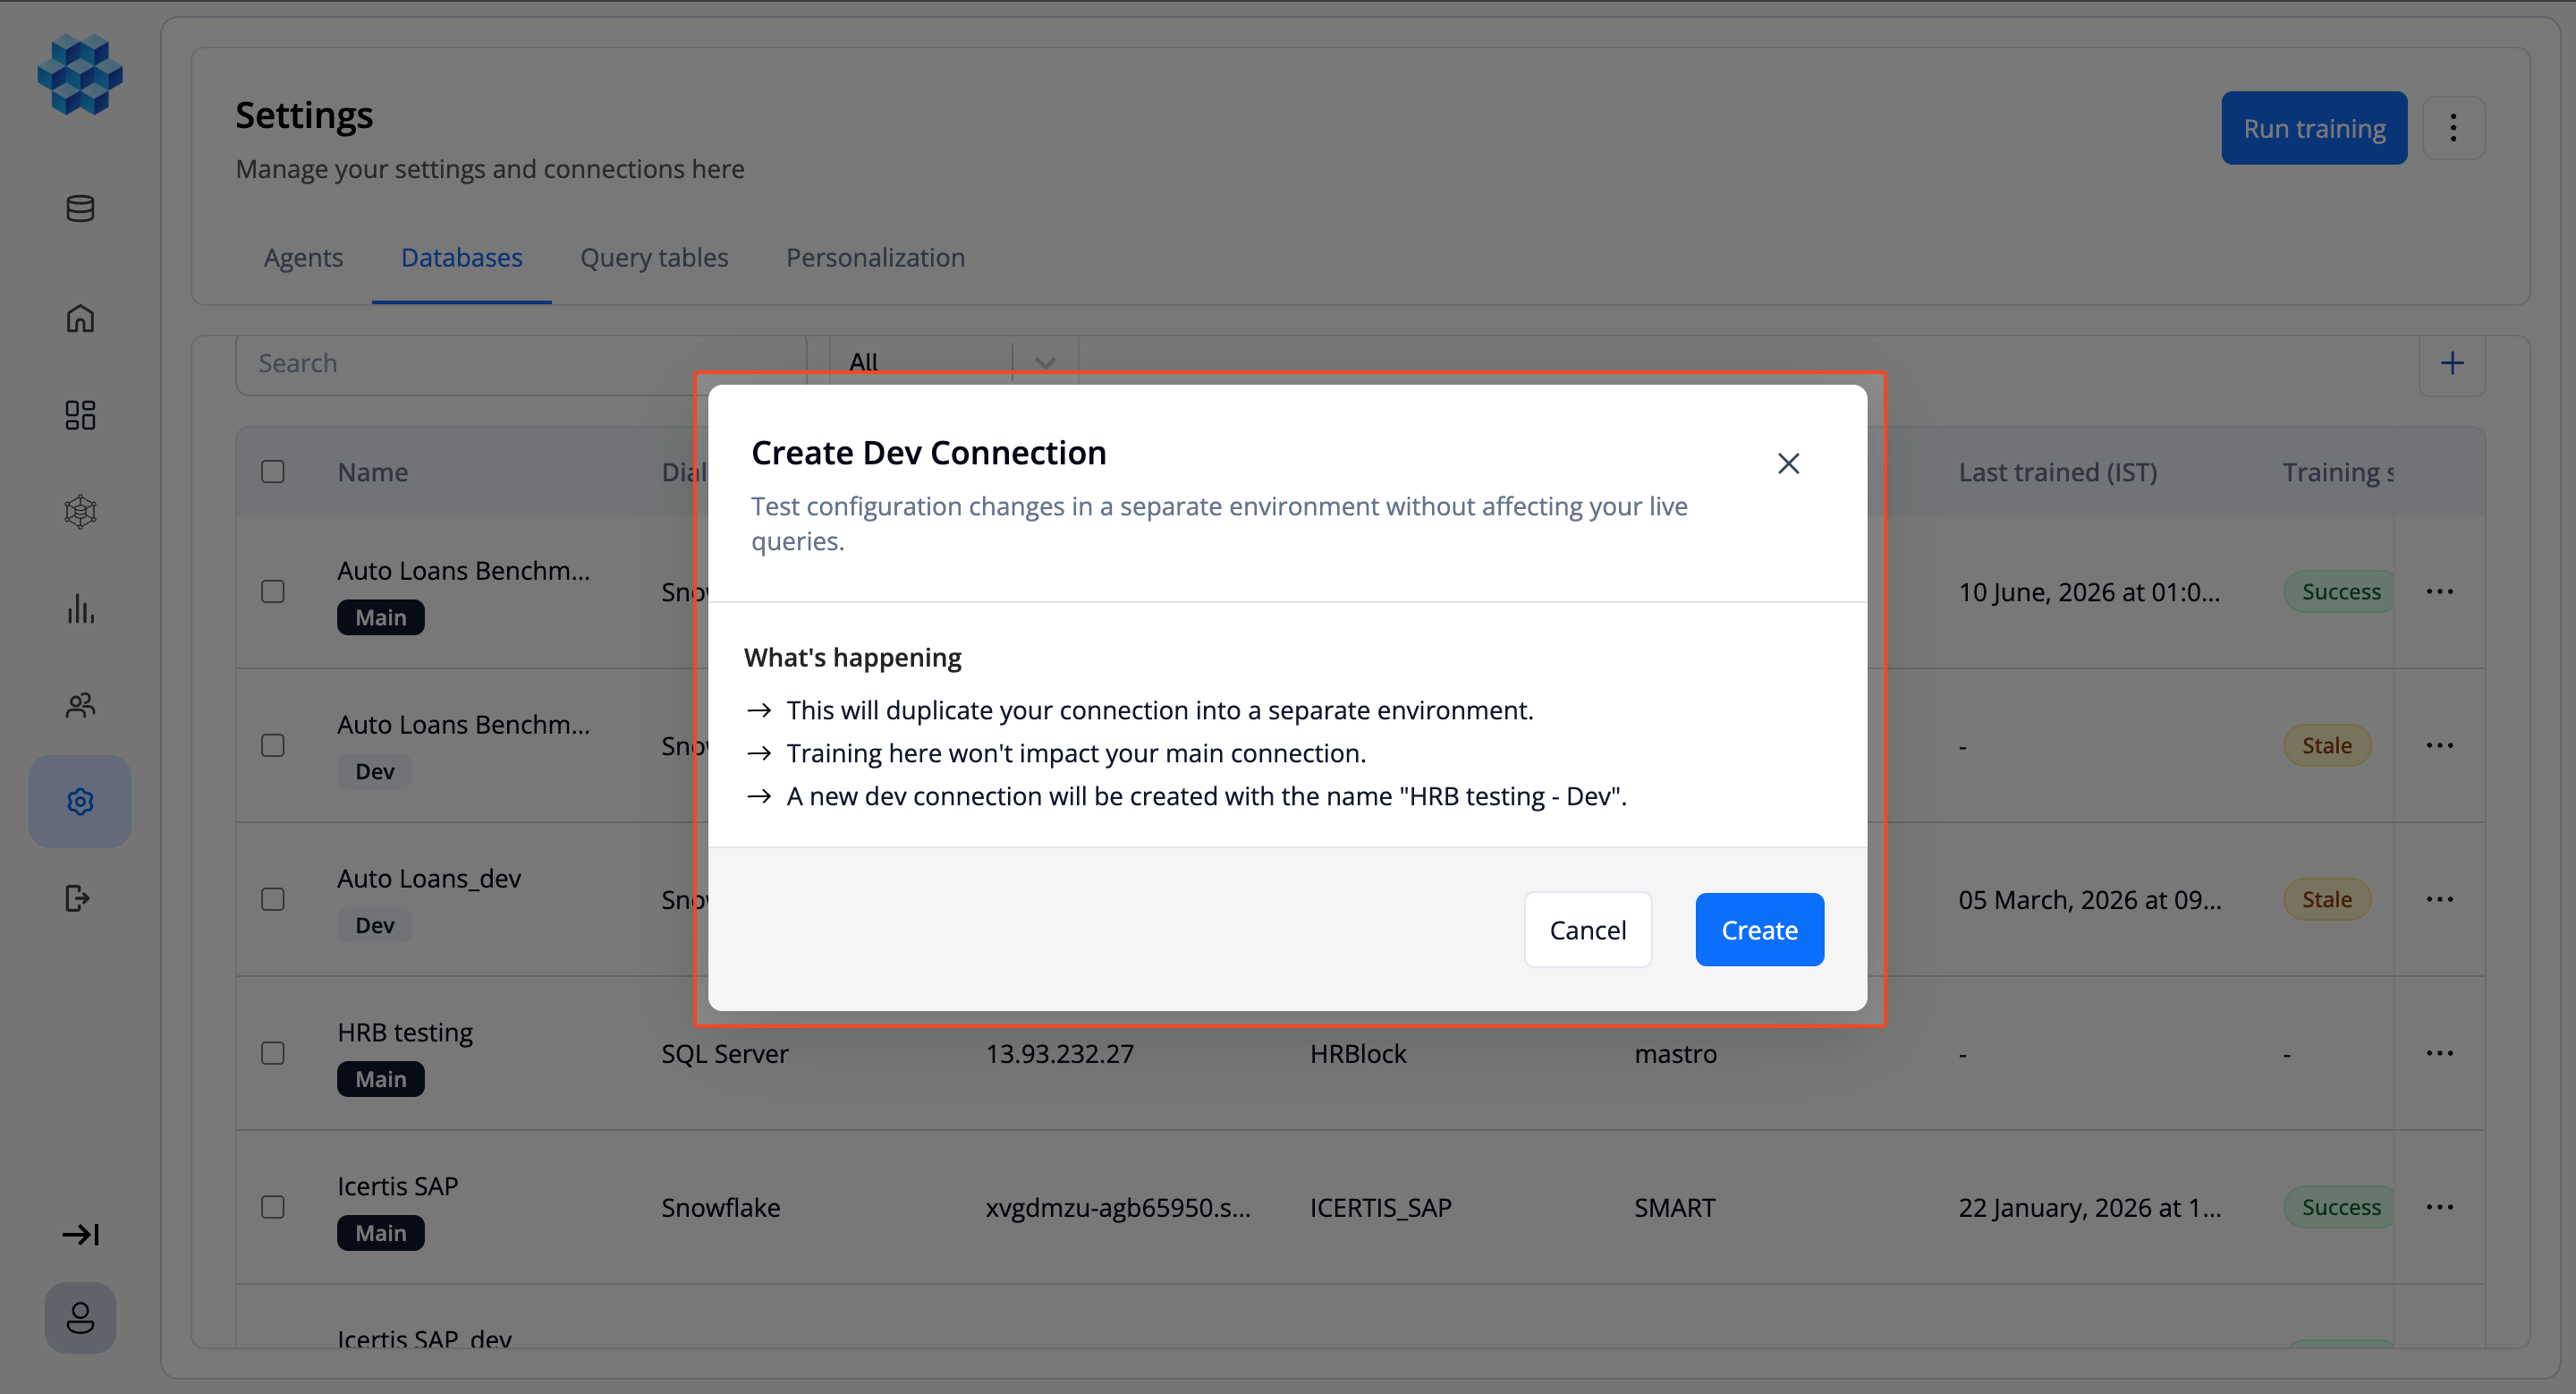
- In the Create Dev Connection dialog, confirm and click Create.
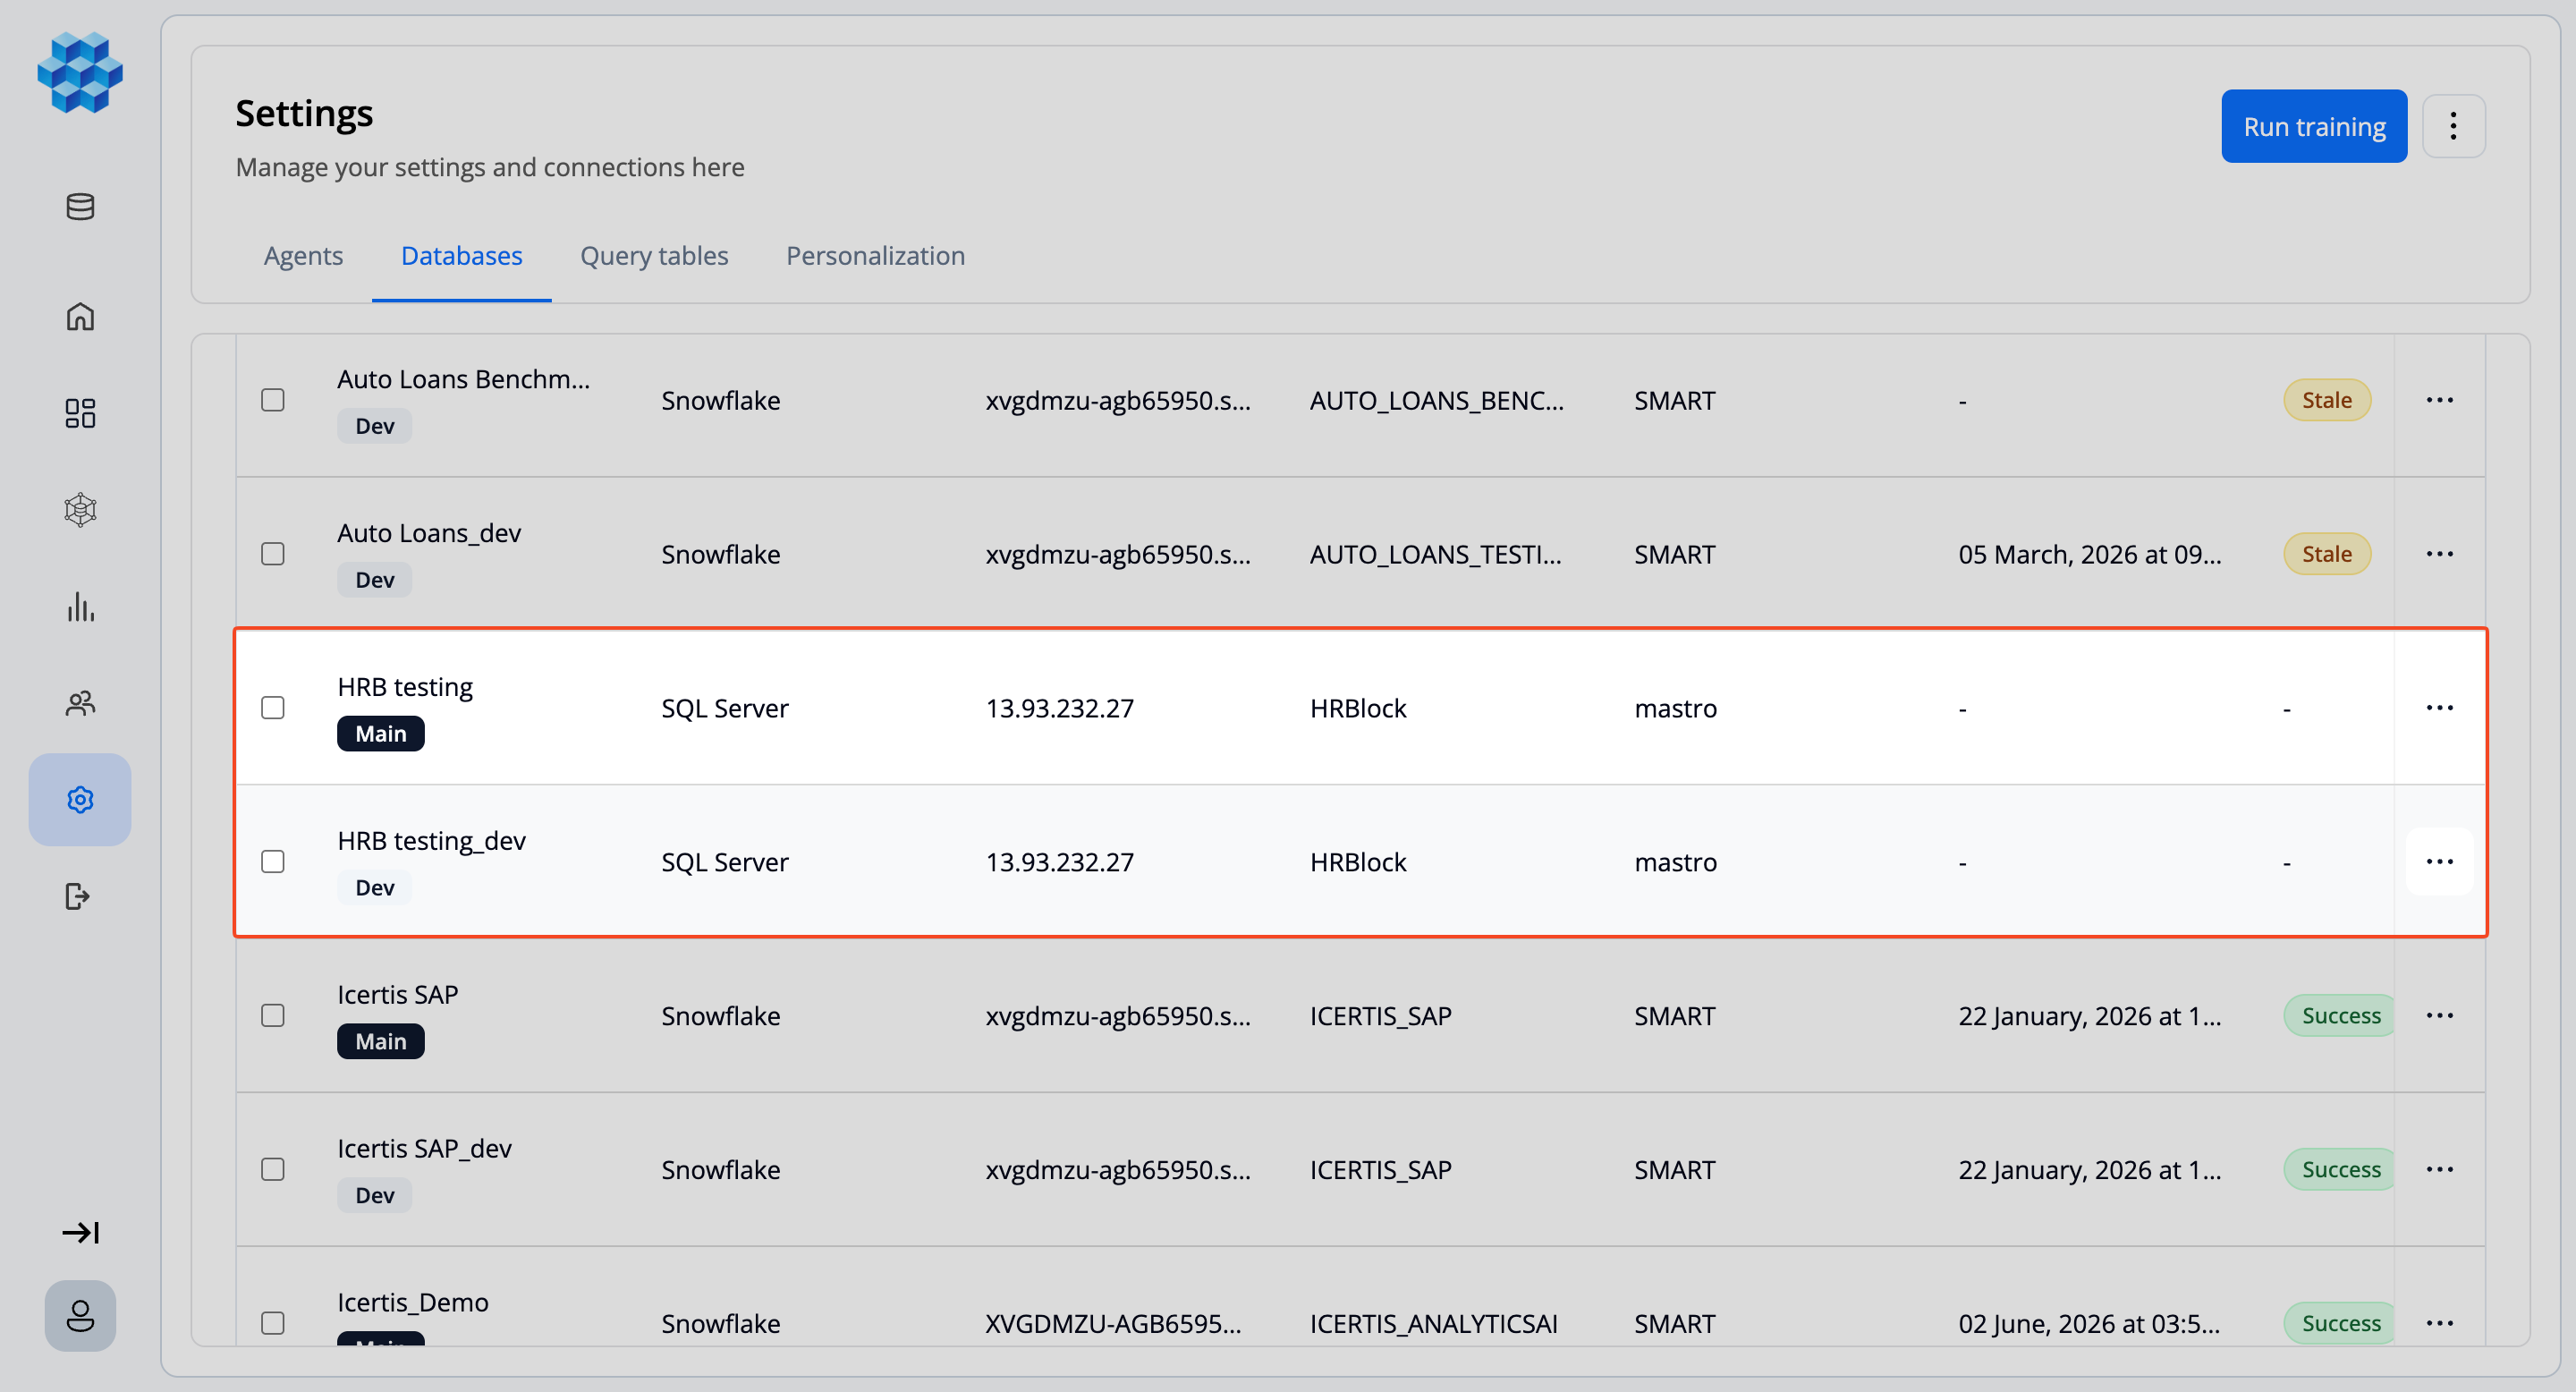
Tursio duplicates the connection — including its training artifacts, if it was already trained — into a new connection named <original>_dev. The dev connection appears with a Dev pill and is immediately queryable if the original was trained. You can now run training on it without affecting the main connection.
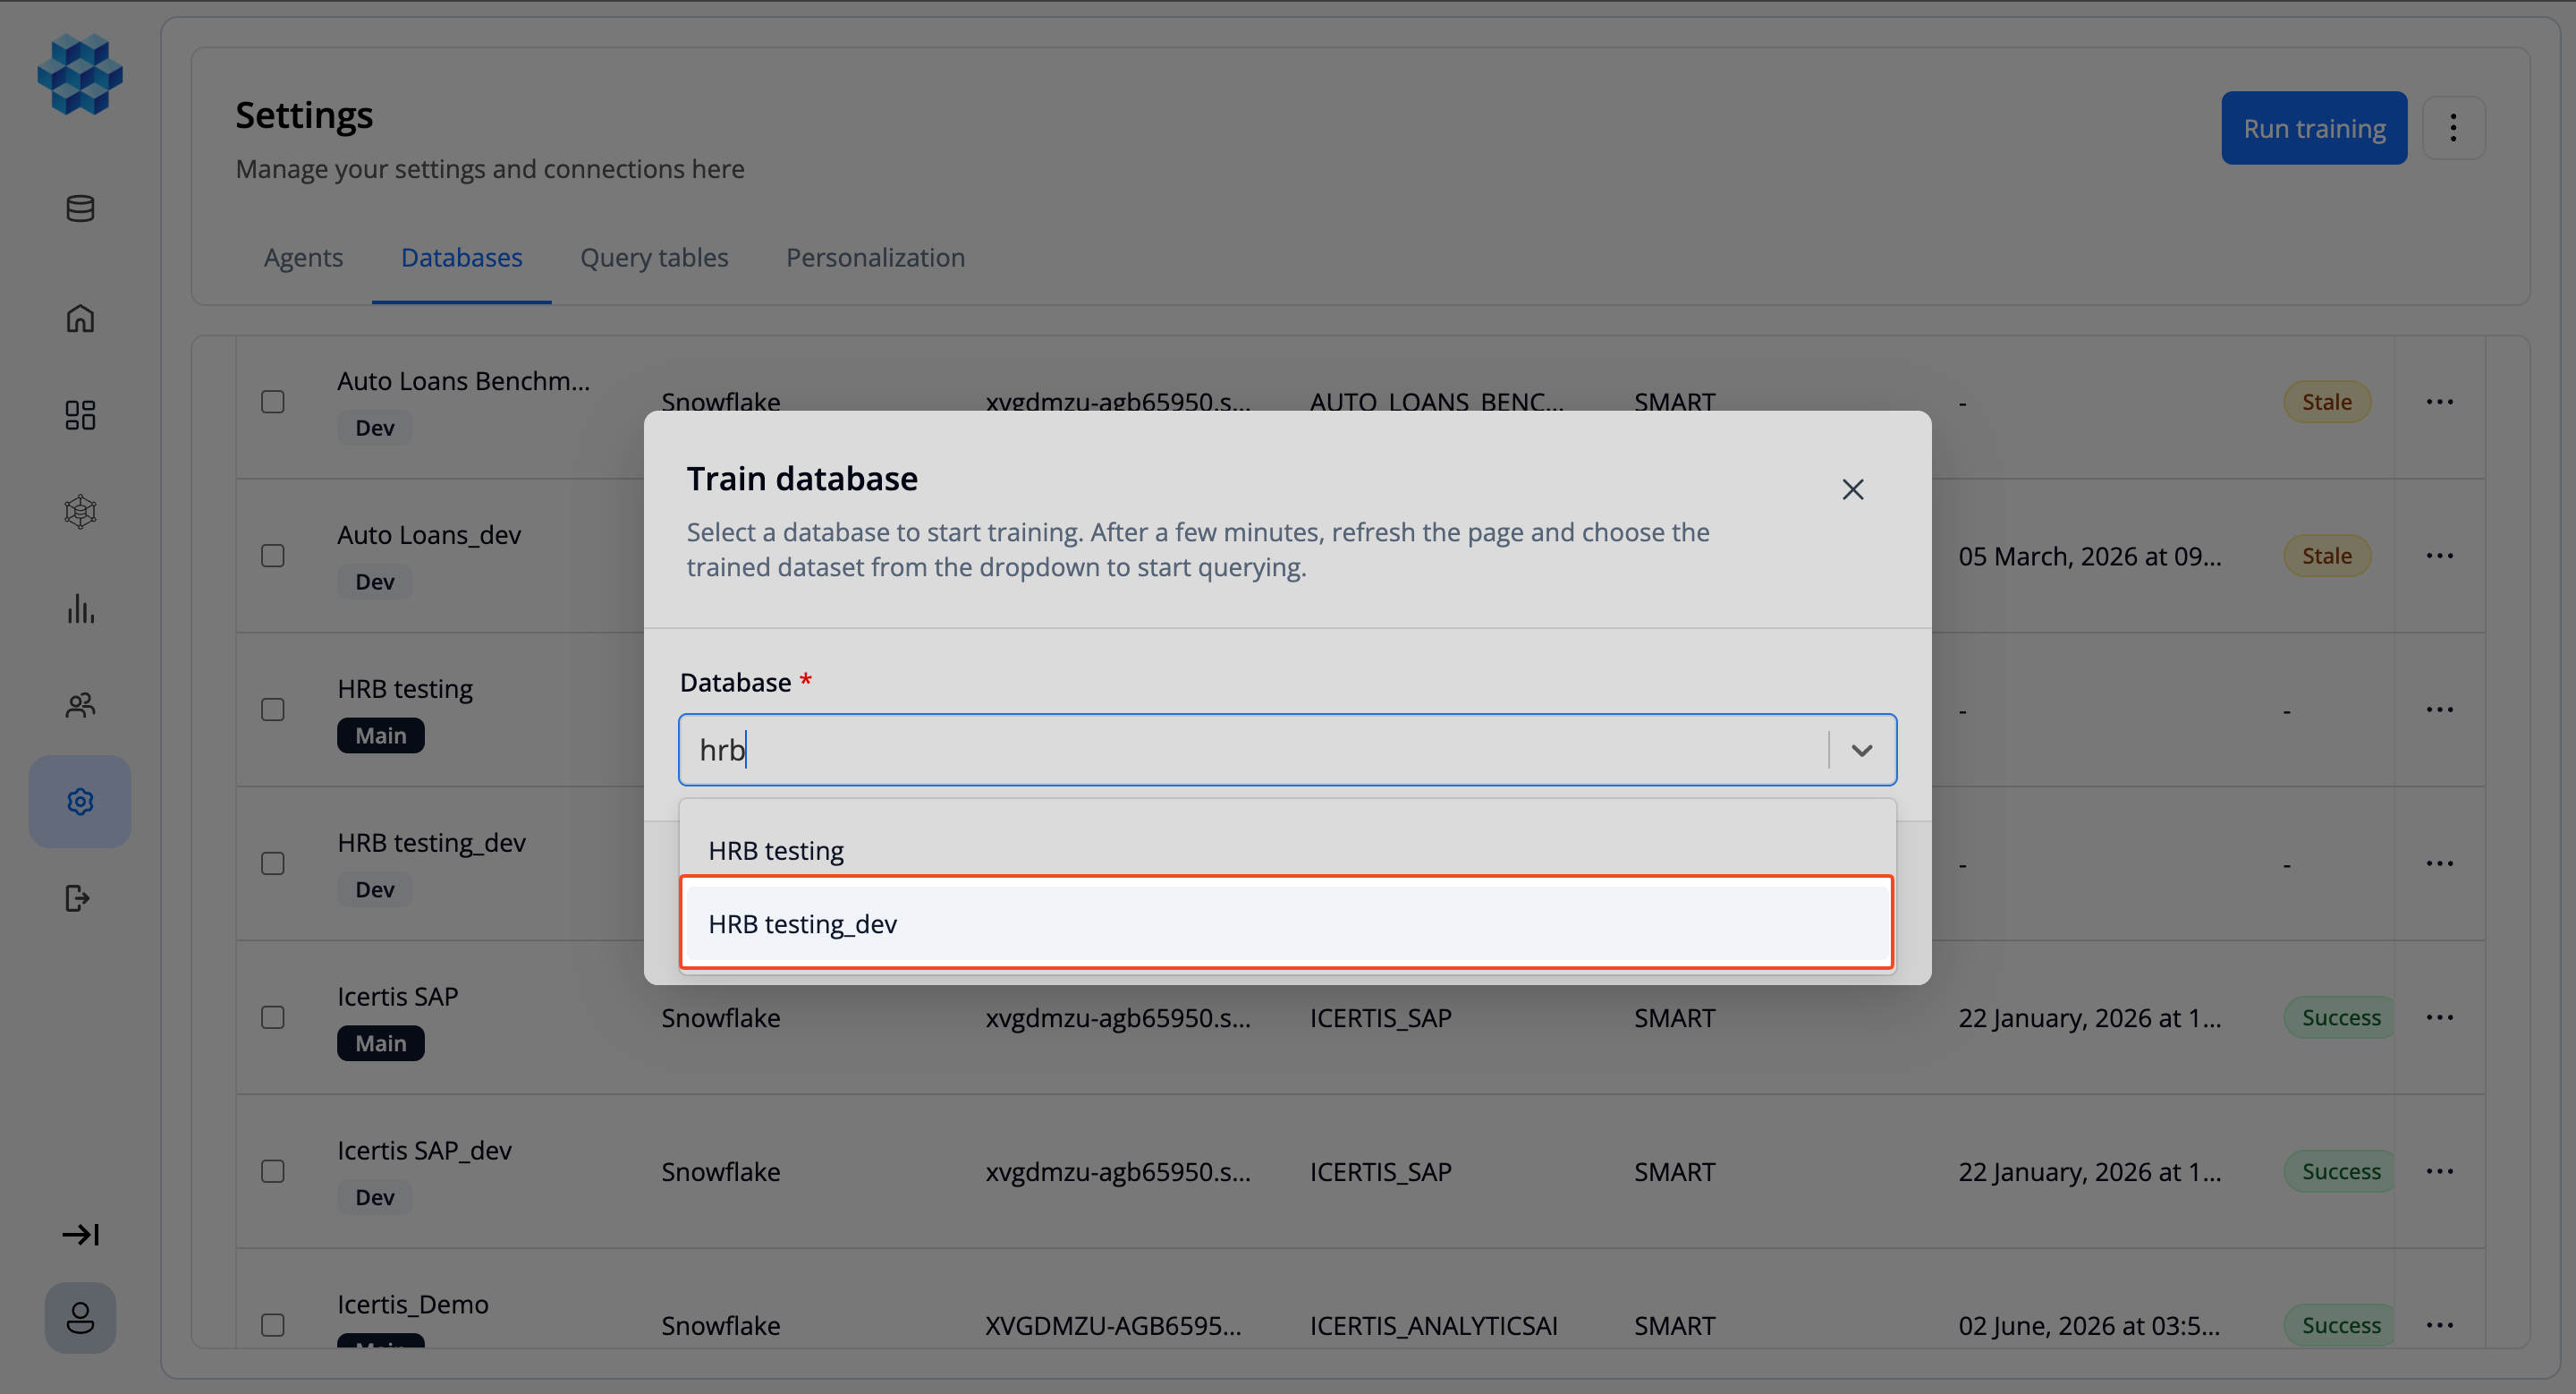
To promote your changes back, open the dev connection's action menu and select Merge connection. This overwrites the main connection with the dev connection's configuration and training, then removes the dev copy. To discard a dev connection instead, select it and choose Delete.
Note
- Only one dev copy can exist per main connection — Create dev connection is disabled ("Dev connection already exists") once one is present.
- A dev connection can only be merged after its training status is Success, and not while the main connection is training.
Export and Import Tuned Context
You can export a connection's semantic tuning — its dimensions, measures, and query-builder configuration — to a file, review and edit it offline (or with the Tursio team), and import it back.
Export
- Open the connection's action menu (⋮) in the Databases table and select Export context.
- In the Export context dialog, click Export. A
<connection>.zipfile downloads, bundling the query-table definitions and training outputs.
Import
- Open the connection's action menu and select Import tuned context.
- Upload the edited ZIP file and click Validate. Tursio checks the file structure and shows a summary of the differences (for example, "1 dimension added · 2 measures modified"), or lists any issues to fix.
- If validation succeeds, click Apply changes to update the connection.
Training Required
After a successful import, the connection is marked stale and must be re-trained for the new tuning to take effect. You cannot import while the connection is training.
Azure OpenAI
Create Resource
-
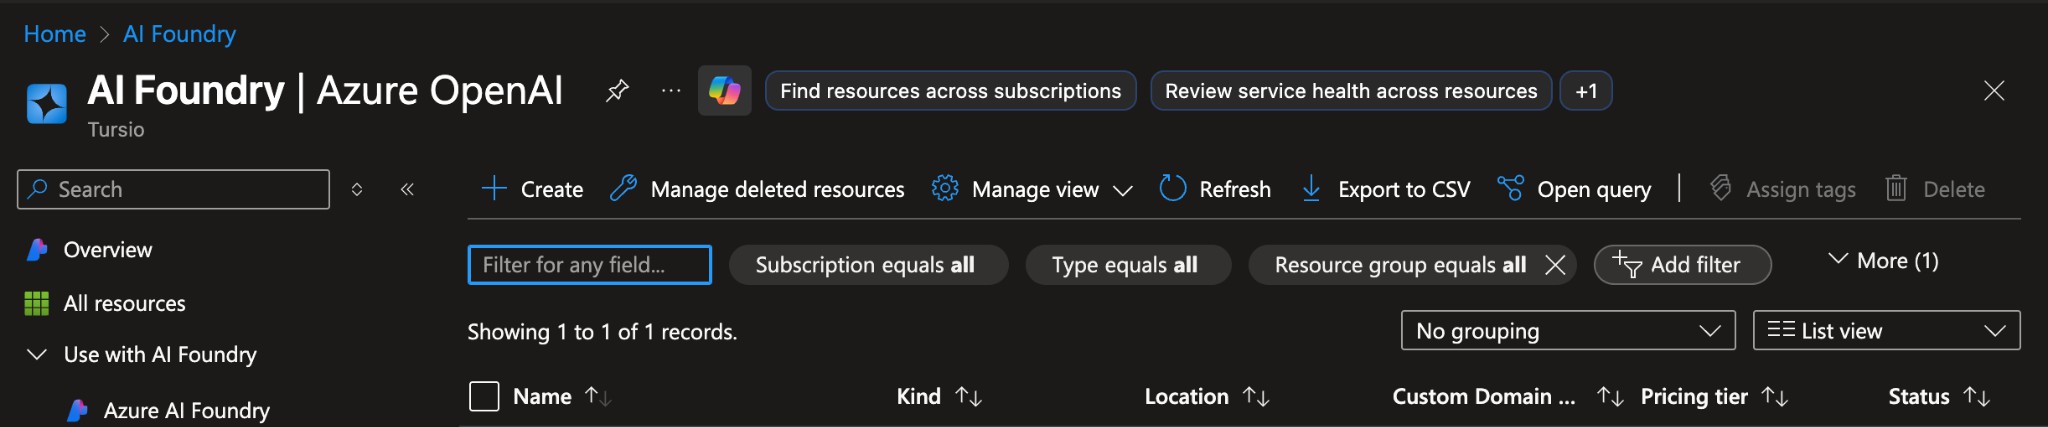
Go to the Azure AI Studio portal and start creating a new Azure OpenAI resource.
-
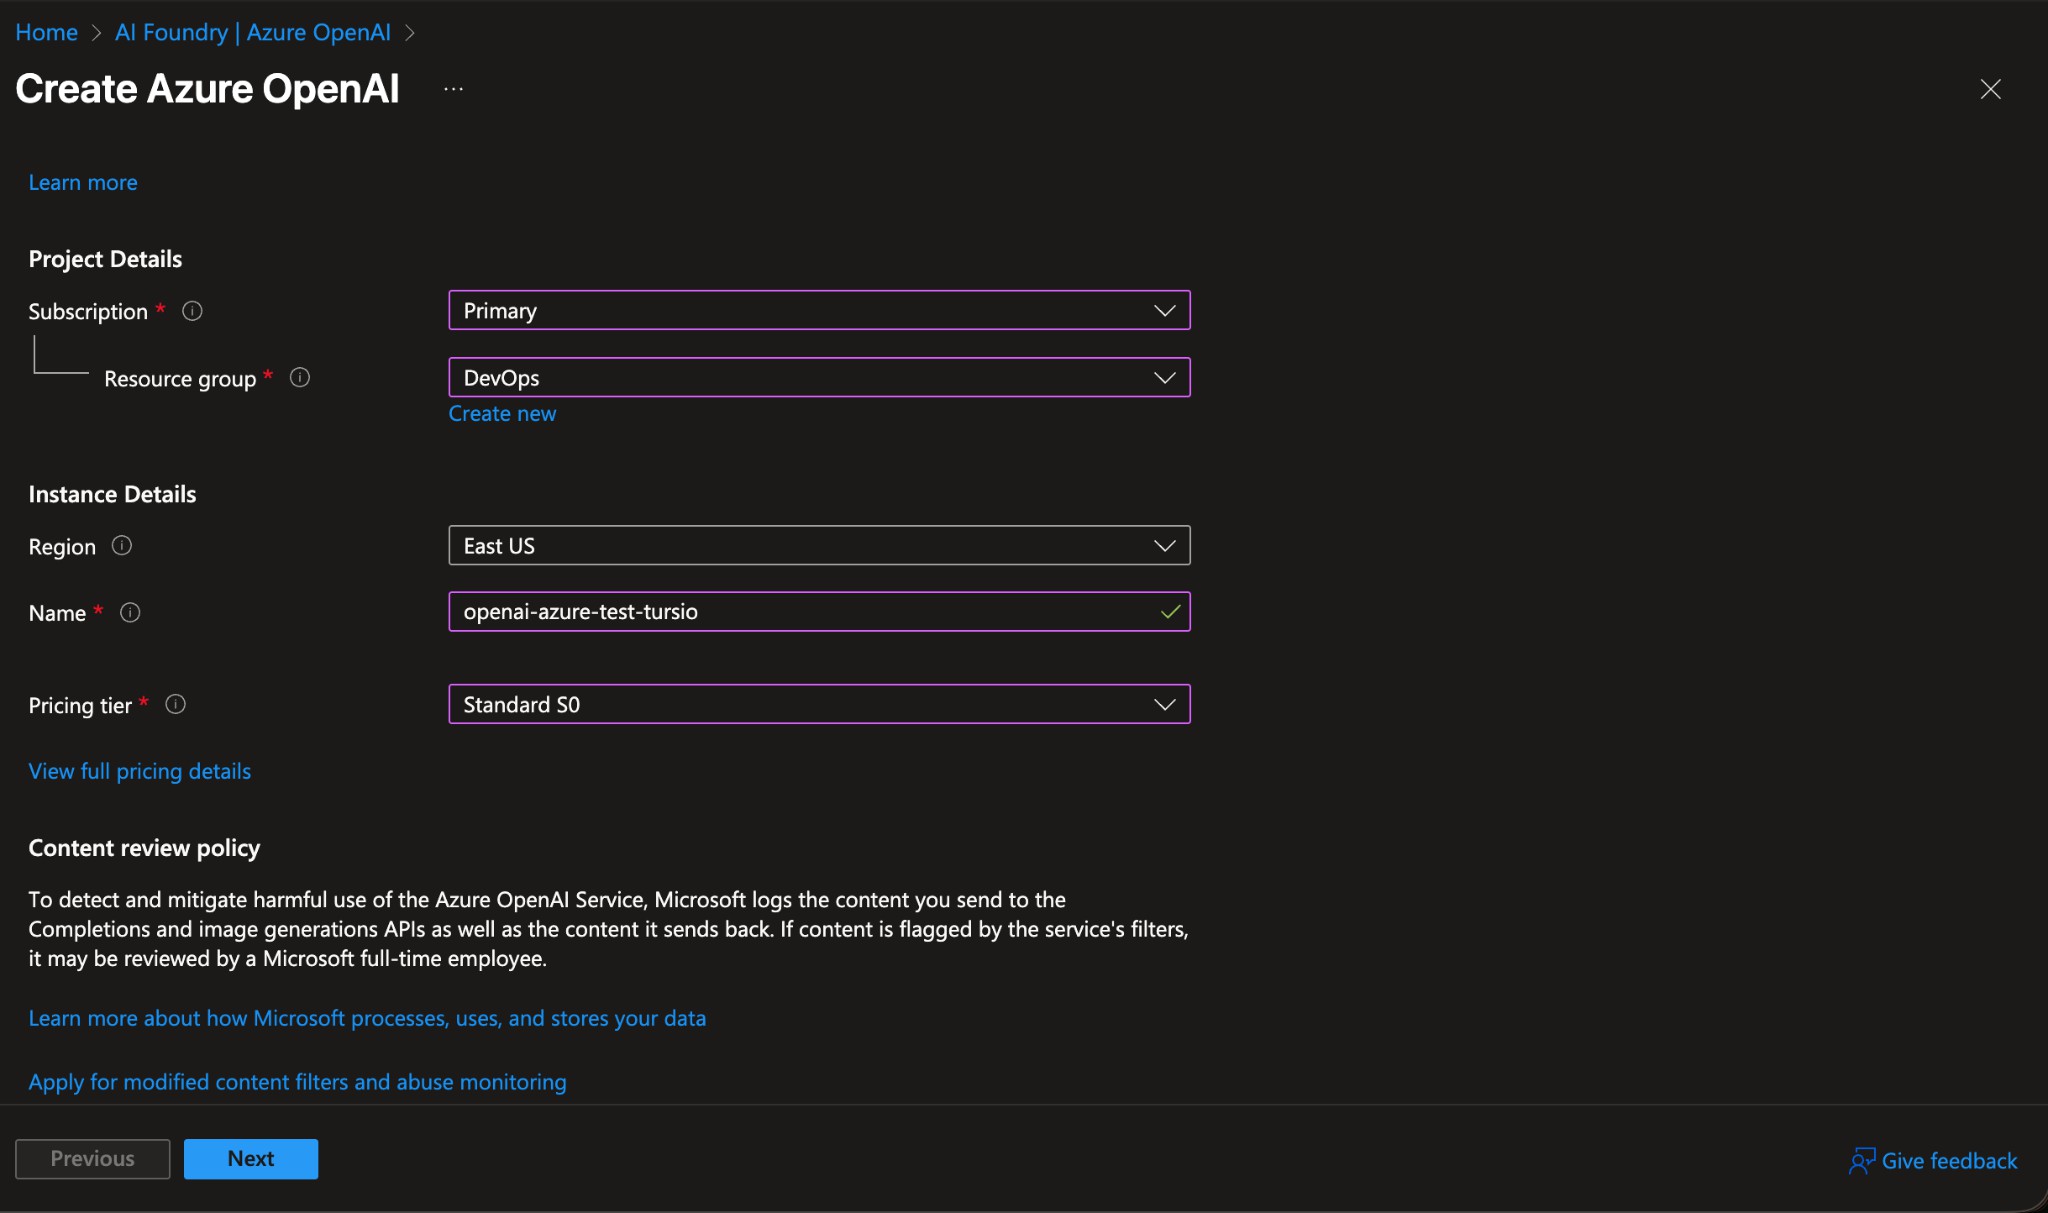
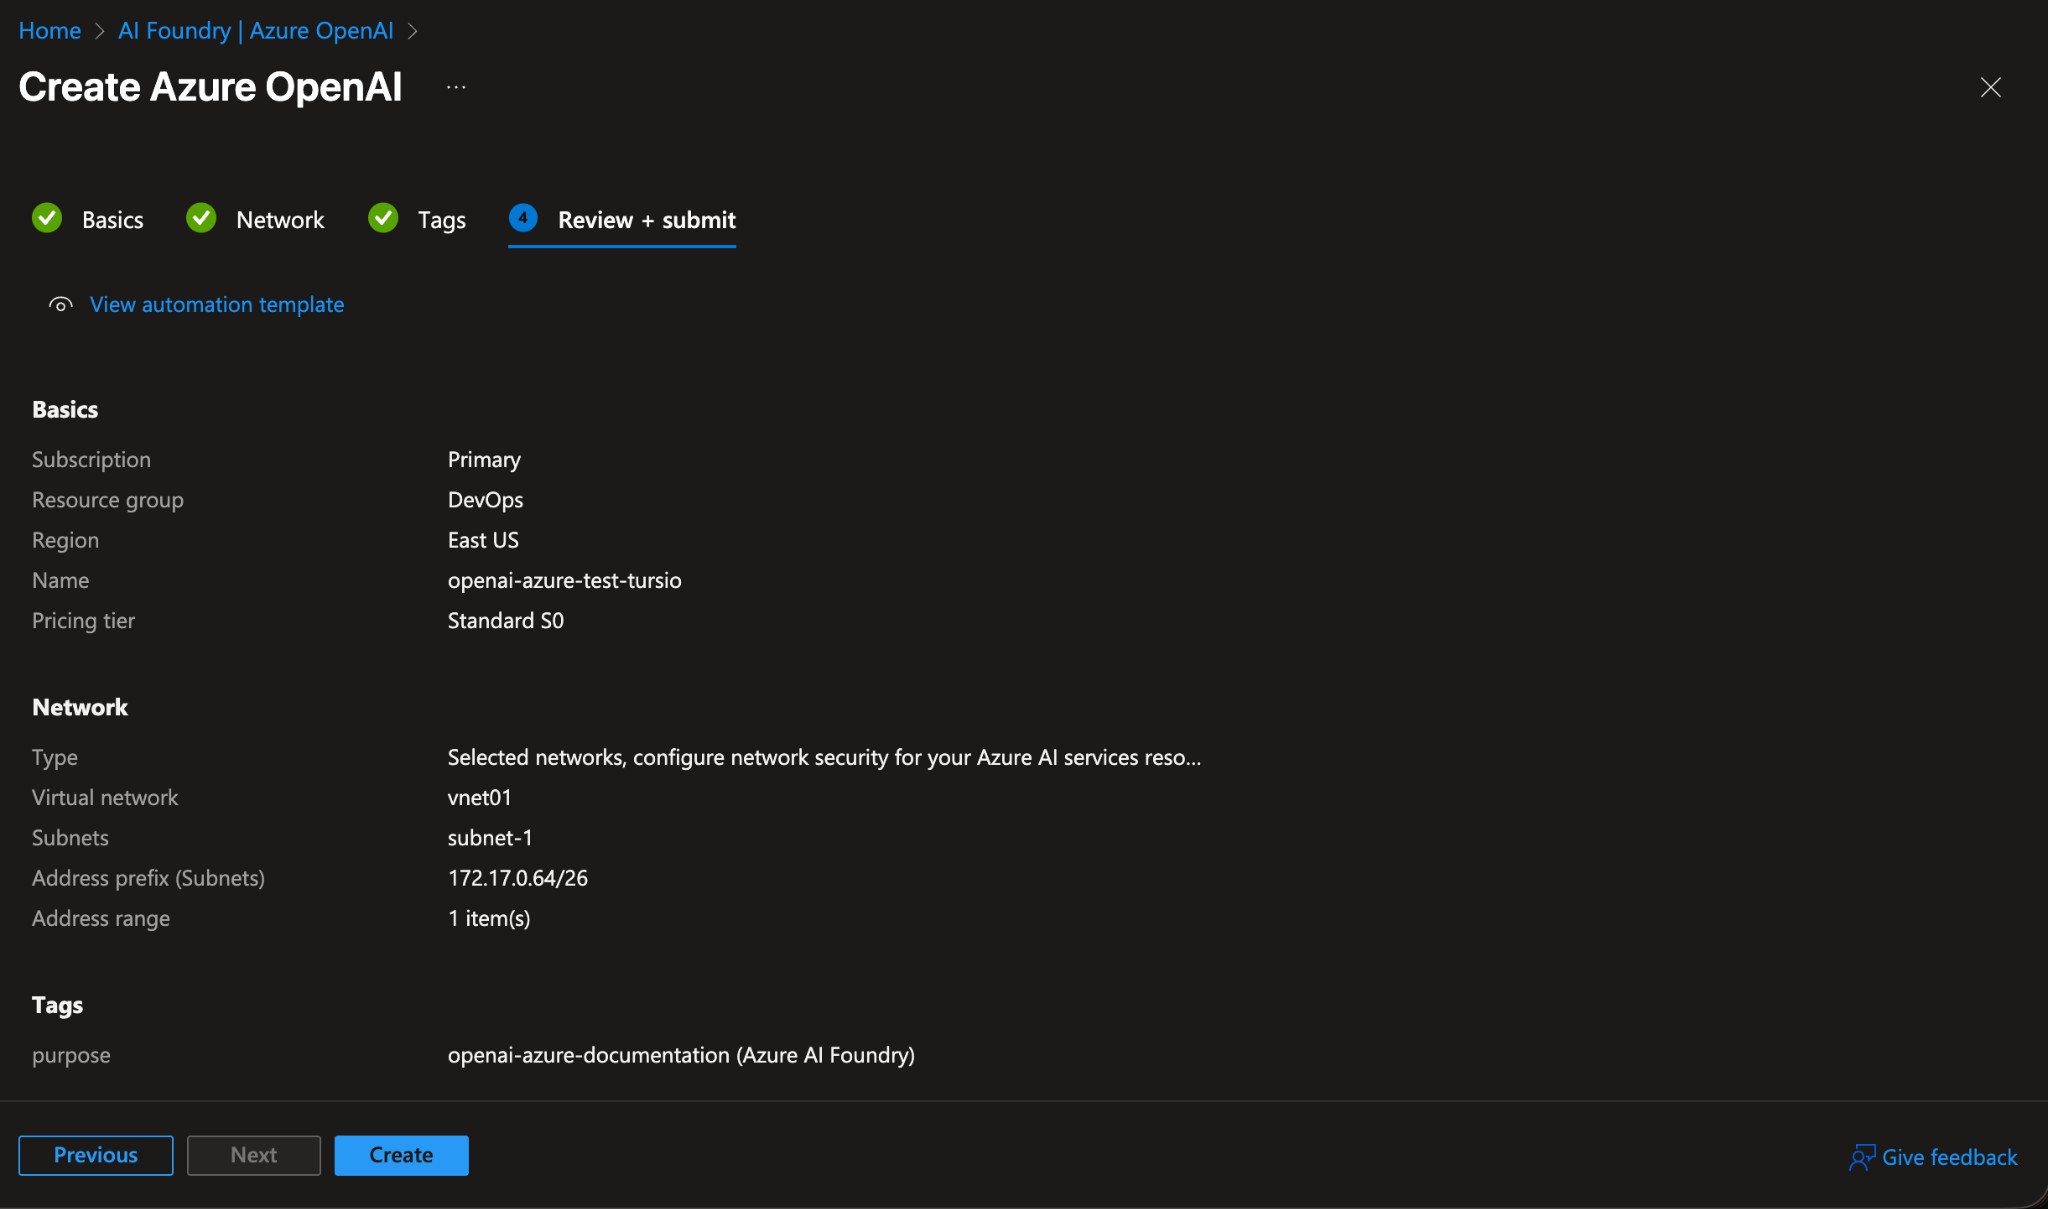
Enter your Subscription, Resource Group, Region, Resource Name, and Pricing Tier.
-
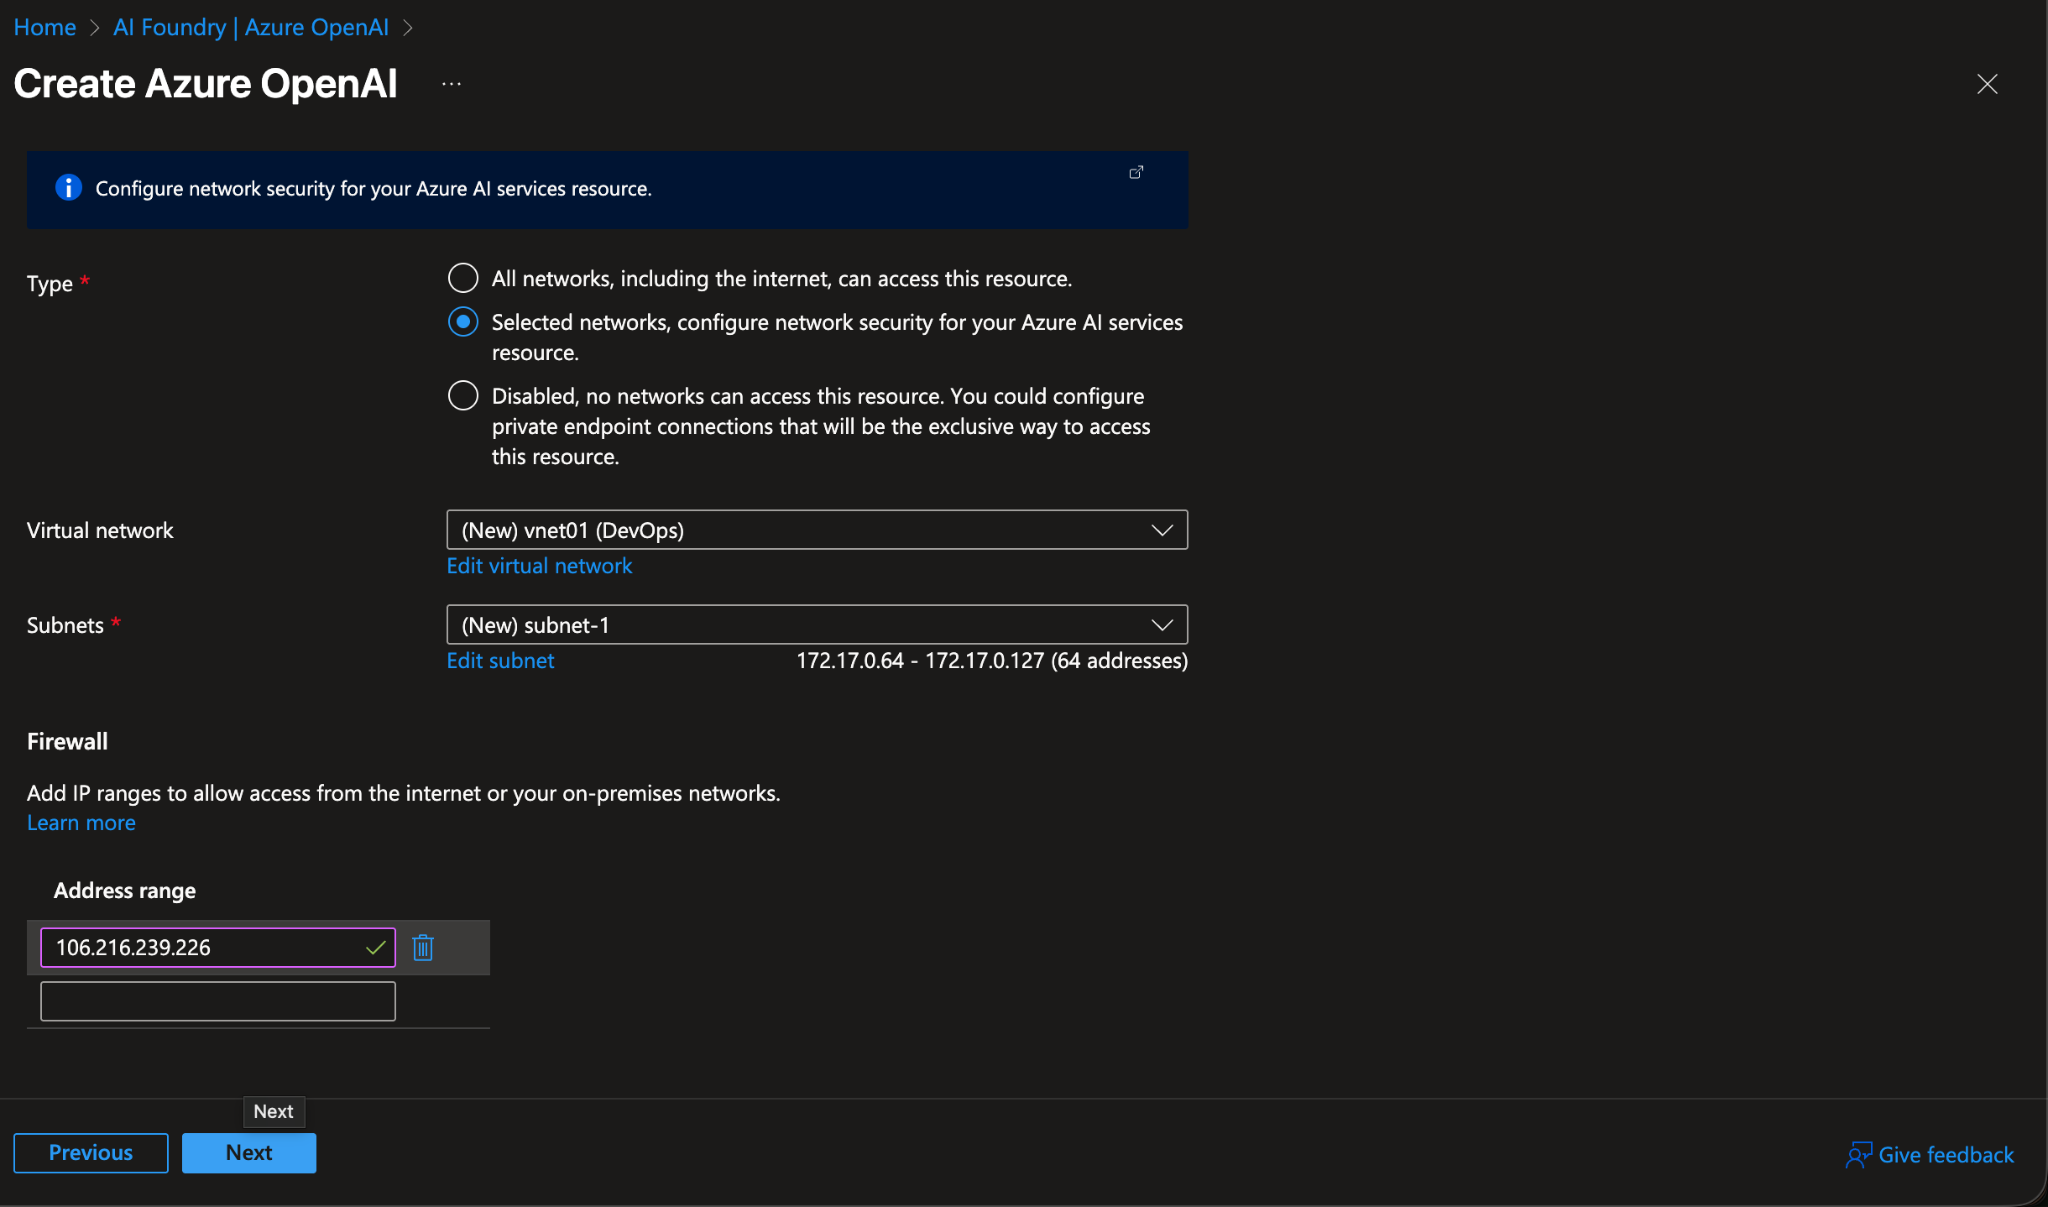
Click Next and review firewall or network settings if needed.
-
Follow the wizard to the Review + submit screen and click Create.
Validate Resource
-
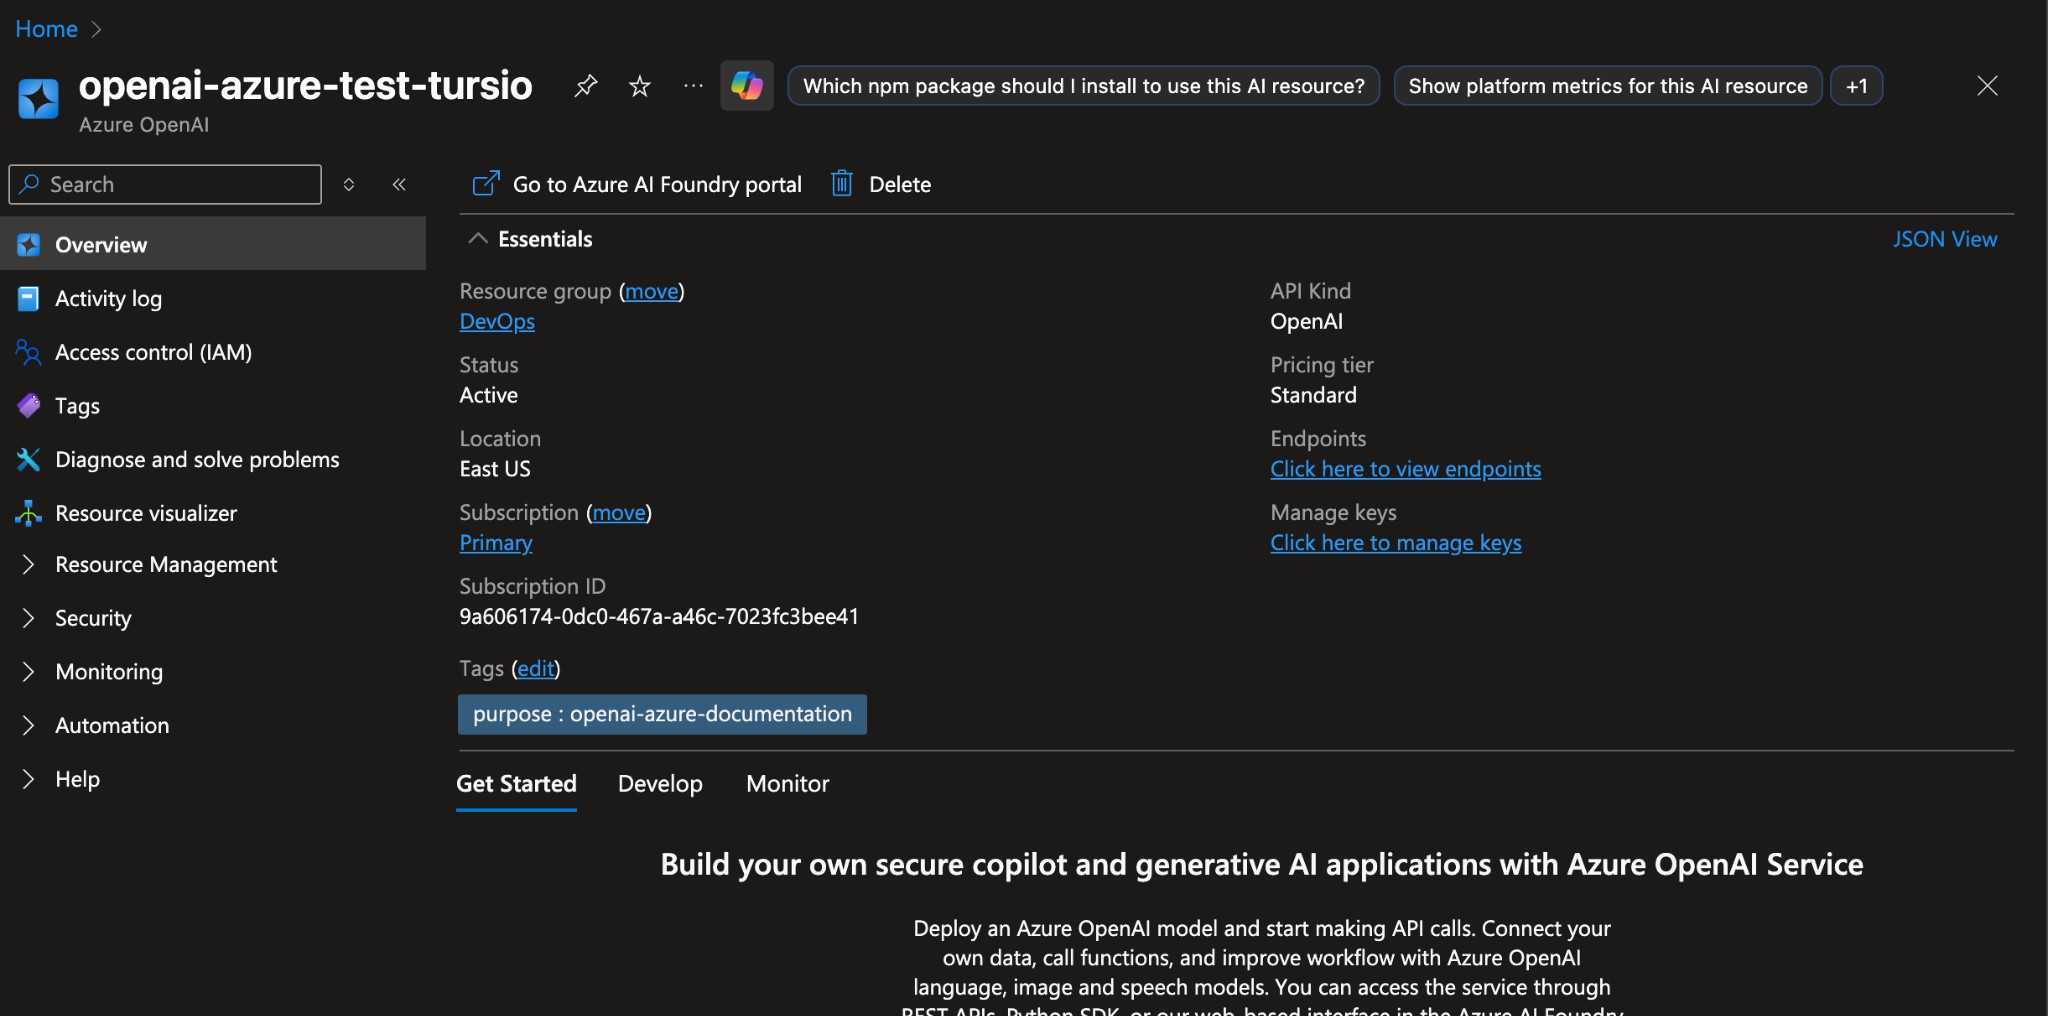
After creation, your resource appears under the resource list and on its Overview page.
-
Verify that the status is Active and the resource appears in your desired subscription and resource group.
Deploy Model
-
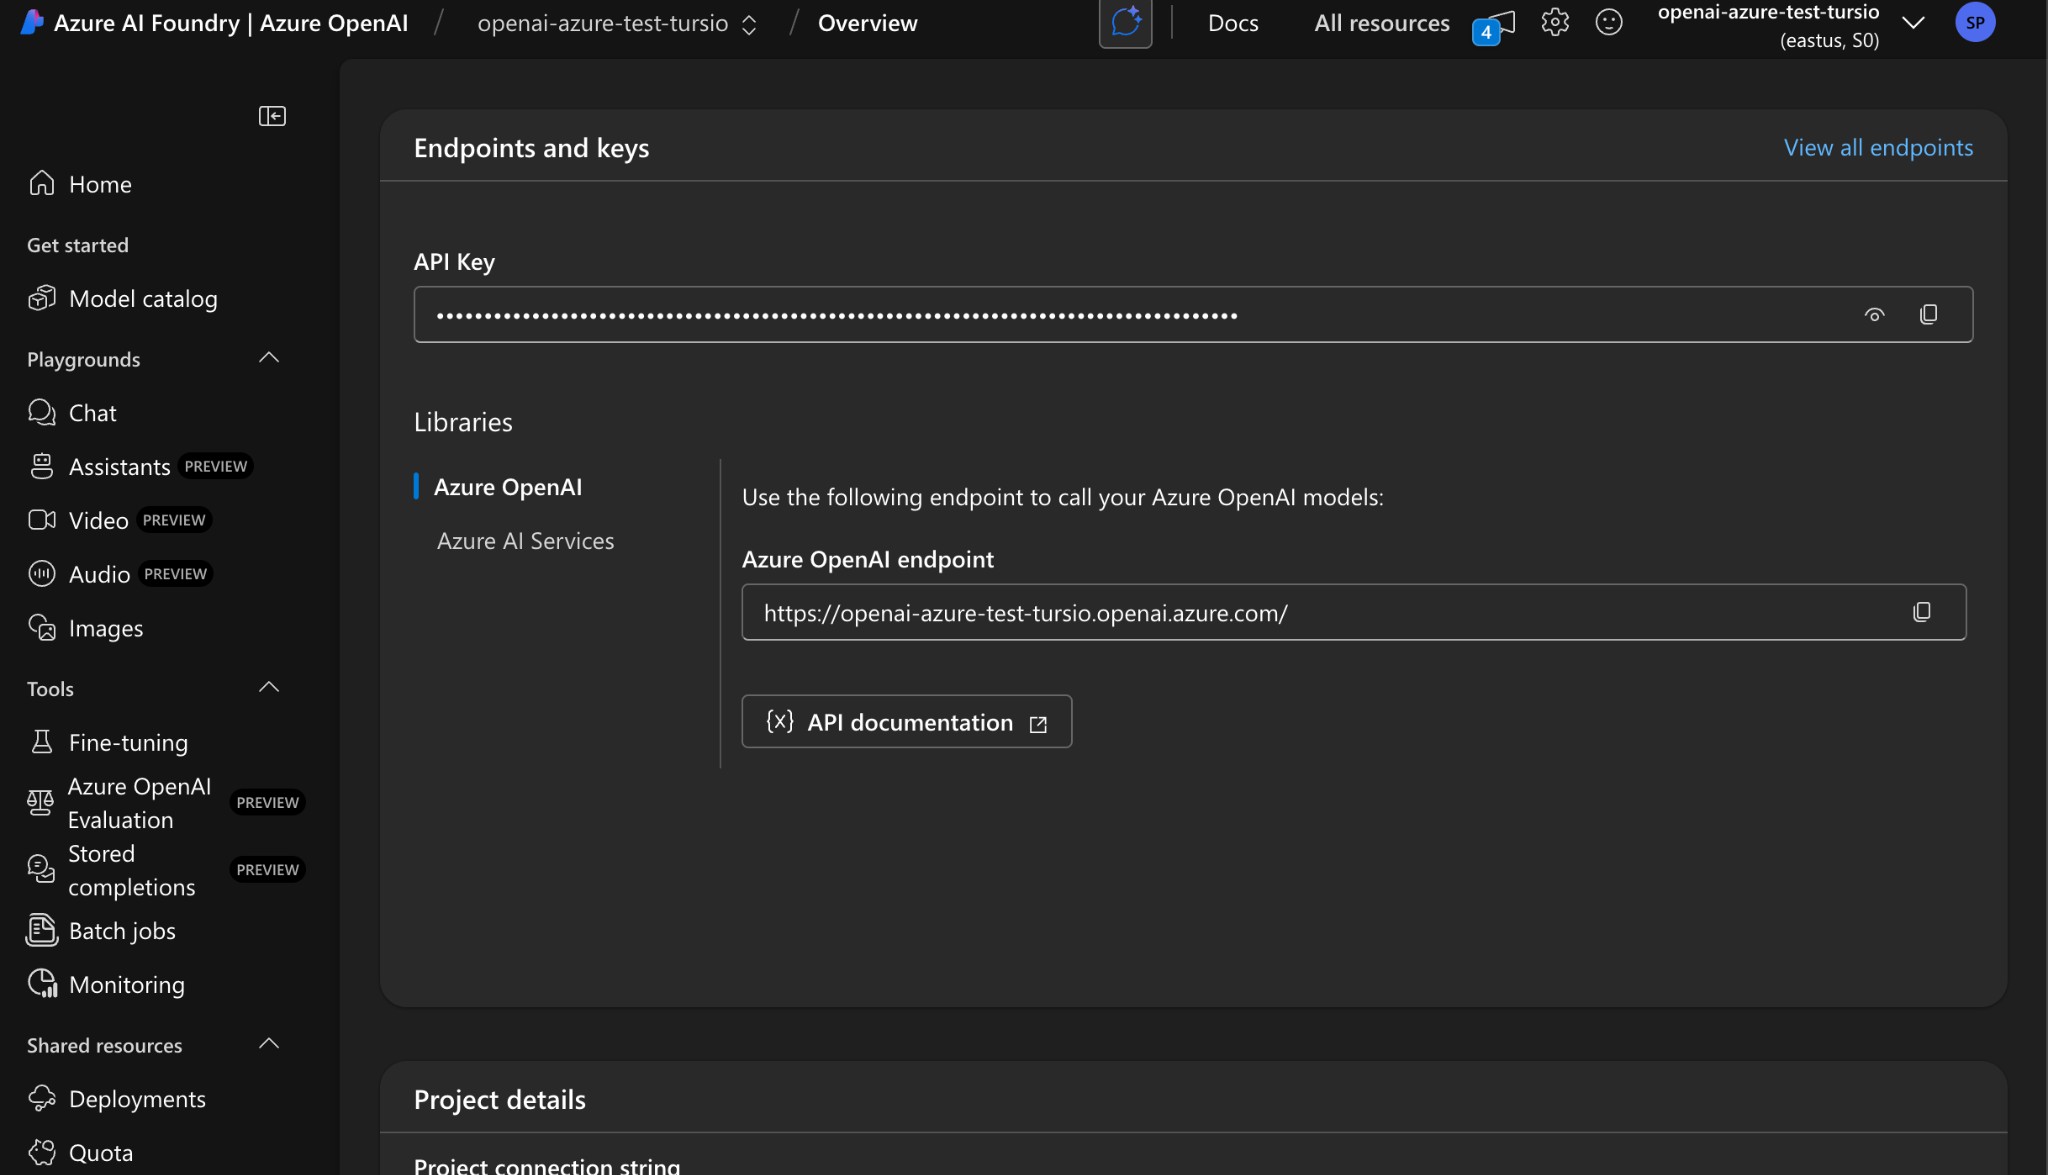
From the Overview page, click Go to Azure AI Studio (shown in the image above).
-
Inside Azure AI Studio, locate your OpenAI resource under "All Resources".
-
Navigate to the Deployments section.
-
Deploy a model by selecting the model type (e.g.,
gpt-4), assigning a deployment name likegpt-4-deployment, and waiting for the deployment status to show Succeeded.
Gather Info
-
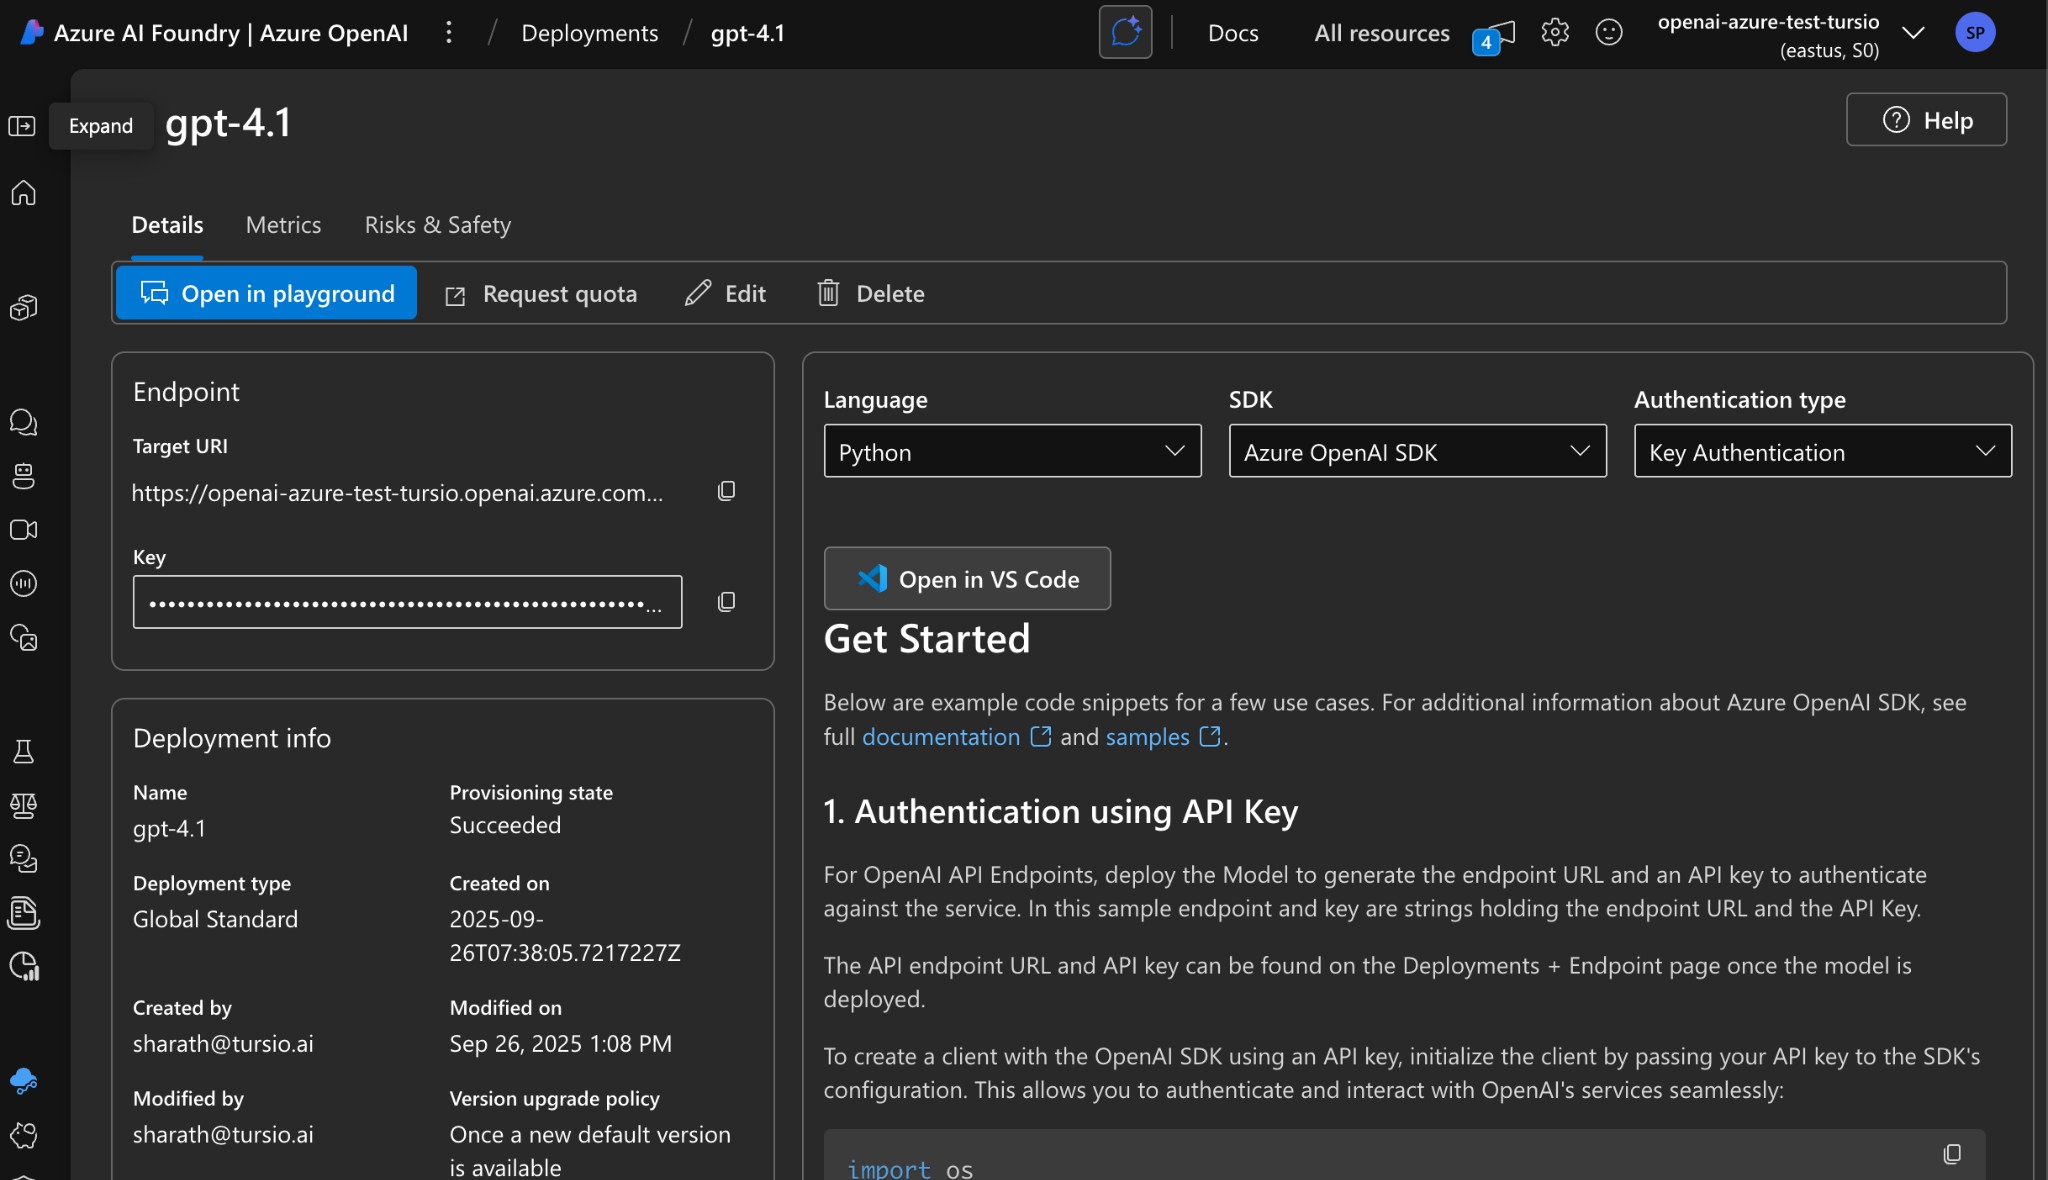
Your deployment details, including the endpoint and API key, can be viewed here.
-
From the deployment details page, collect the Endpoint, Deployment Name, and an API Key.
-
Ensure your network/firewall allows access, as configured during resource creation.
Test Model
Run the following cURL command in your terminal. Replace the placeholders <your_endpoint>, <your_deployment_name>, and <your_api_key> with the values you collected.
Test Command & Response
curl -X POST \
  "https://<your_endpoint>/openai/deployments/<your_deployment_name>/chat/completions?api-version=2023-05-15" \
  -H "Content-Type: application/json" \
  -H "api-key: <your_api_key>" \
  -d '{
    "messages":[
      {"role": "system", "content": "You are a helpful assistant."},
      {"role": "user", "content": "Hello, Azure OpenAI!"}
    ],
    "max_tokens": 50
  }'
A successful response looks like:
{
  "choices": [
    {
      "finish_reason": "stop",
      "index": 0,
      "logprobs": null,
      "message": {
        "annotations": [],
        "content": "Hello! How can I assist you today with Azure OpenAI or anything else?",
        "refusal": null,
        "role": "assistant"
      }
    }
  ],
  "created": 1758872481,
  "id": "chatcmpl-CJxMvn6onHKYcpXJgPsFVmszUKiJN",
  "model": "gpt-4.1-2025-04-14",
  "object": "chat.completion",
  "system_fingerprint": "fp_9ab7d013ff",
  "usage": {
    "completion_tokens": 17,
    "completion_tokens_details": {
      "accepted_prediction_tokens": 0,
      "audio_tokens": 0,
      "reasoning_tokens": 0,
      "rejected_prediction_tokens": 0
    },
    "prompt_tokens": 23,
    "prompt_tokens_details": {
      "audio_tokens": 0,
      "cached_tokens": 0
    },
    "total_tokens": 40
  }
}
Microsoft Purview
Tursio can source a connection's schema, descriptions, and table relationships from Microsoft Purview instead of scanning the database directly. Purview governs the metadata — the catalog, business descriptions, data products, and access policy — while Tursio reads it to build the semantic model. This is available for Azure SQL and Microsoft Fabric connections.
How it works
- Purview governs. Table and column schema, descriptions, glossary terms, foreign-key relationships, and the data product → tables scope all come from the Purview catalog.
- Tursio reads and enforces. Tursio pulls that metadata at training time to build Query Tables and the semantic model, and uses the data-product scope for query-time access control.
- Two catalog surfaces are used, so a connection needs access to both:
- the Data Map — the scanned schema of your dataset, and
- the Unified Catalog — the governance domain and its data products.
Because the schema comes from Purview, a Purview-governed connection does not run live schema-drift scans against your database.
Before you begin
Set up the following in Azure/Purview first:
- A scanned dataset in Purview. The Azure SQL database or Fabric dataset must already be registered and scanned so it appears in the Data Map.
- A governance domain with at least one data product that groups the tables you want to expose.
- An identity with access to Purview, either:
- a Microsoft Entra app registration (service principal) with a client secret — granted the Data Map: Data Reader role on the collection and Unified Catalog access to the governance domain; or
- a Managed Identity (Azure SQL only — see Authentication).
Note
If the governance domain uses a restricted (allow-list) mode, the identity above must be added as a Local Catalog Reader on the domain, or Purview returns an empty catalog and training finds no tables.
Enable Purview
When adding or editing an Azure SQL or Fabric database, fill in the standard connection details for the dialect, then turn on the Purview Configuration toggle to reveal the Purview fields.
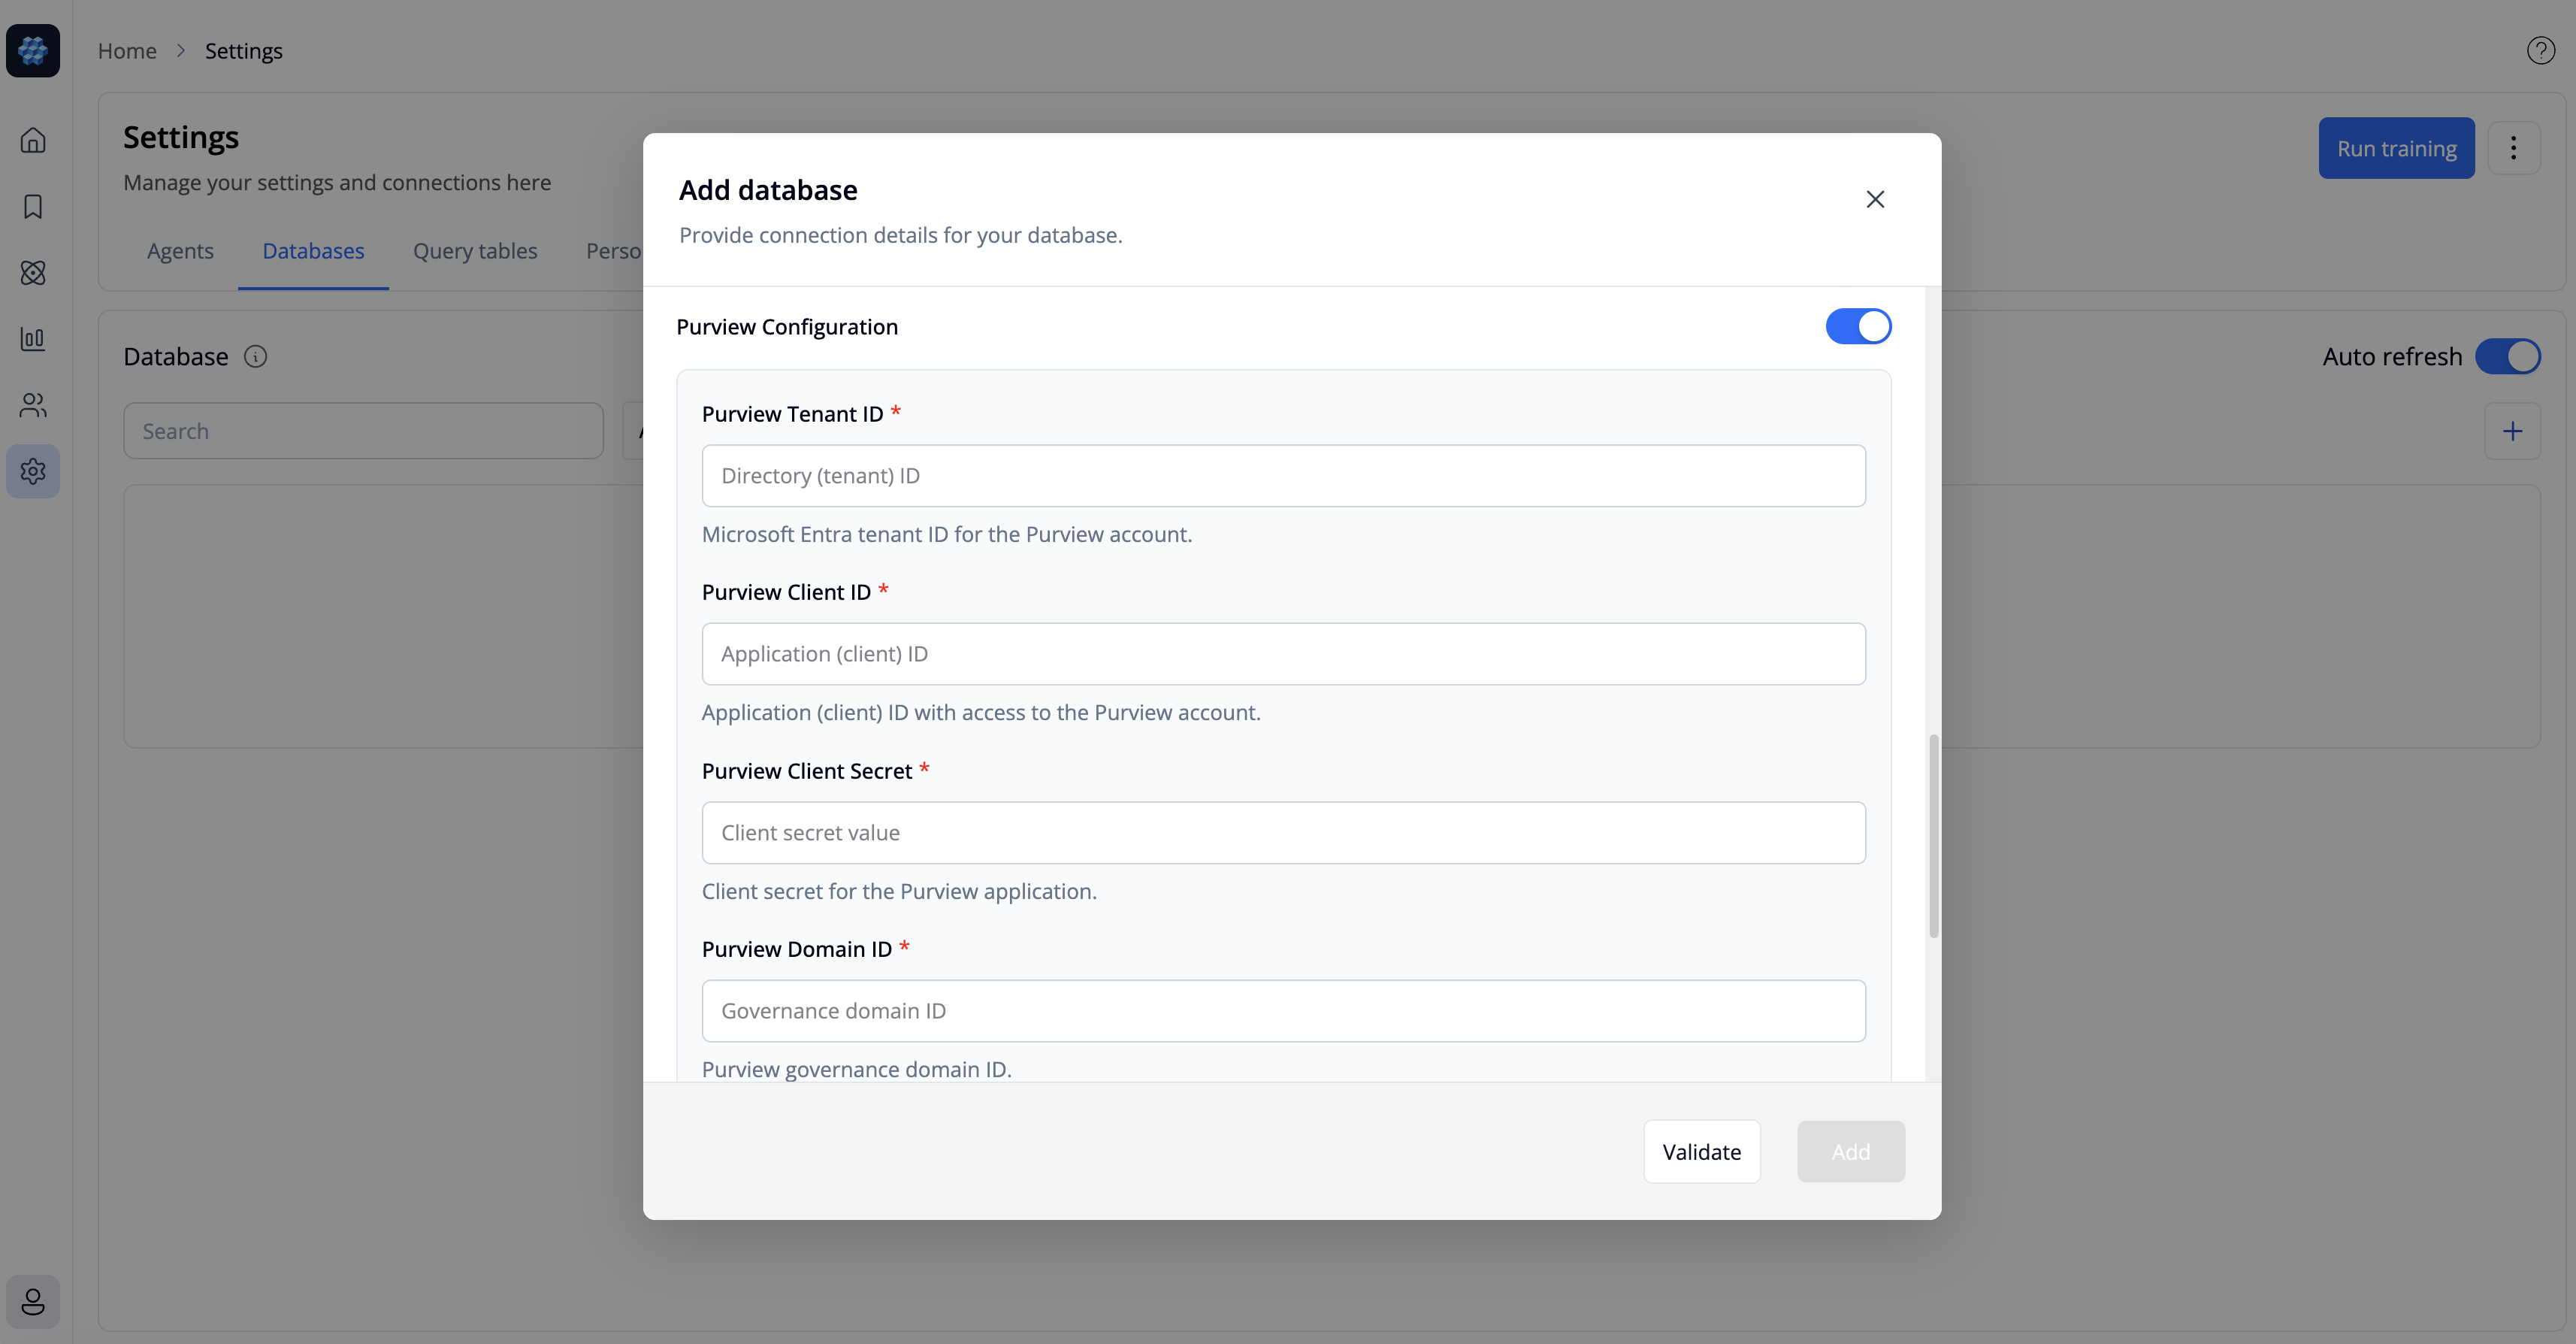
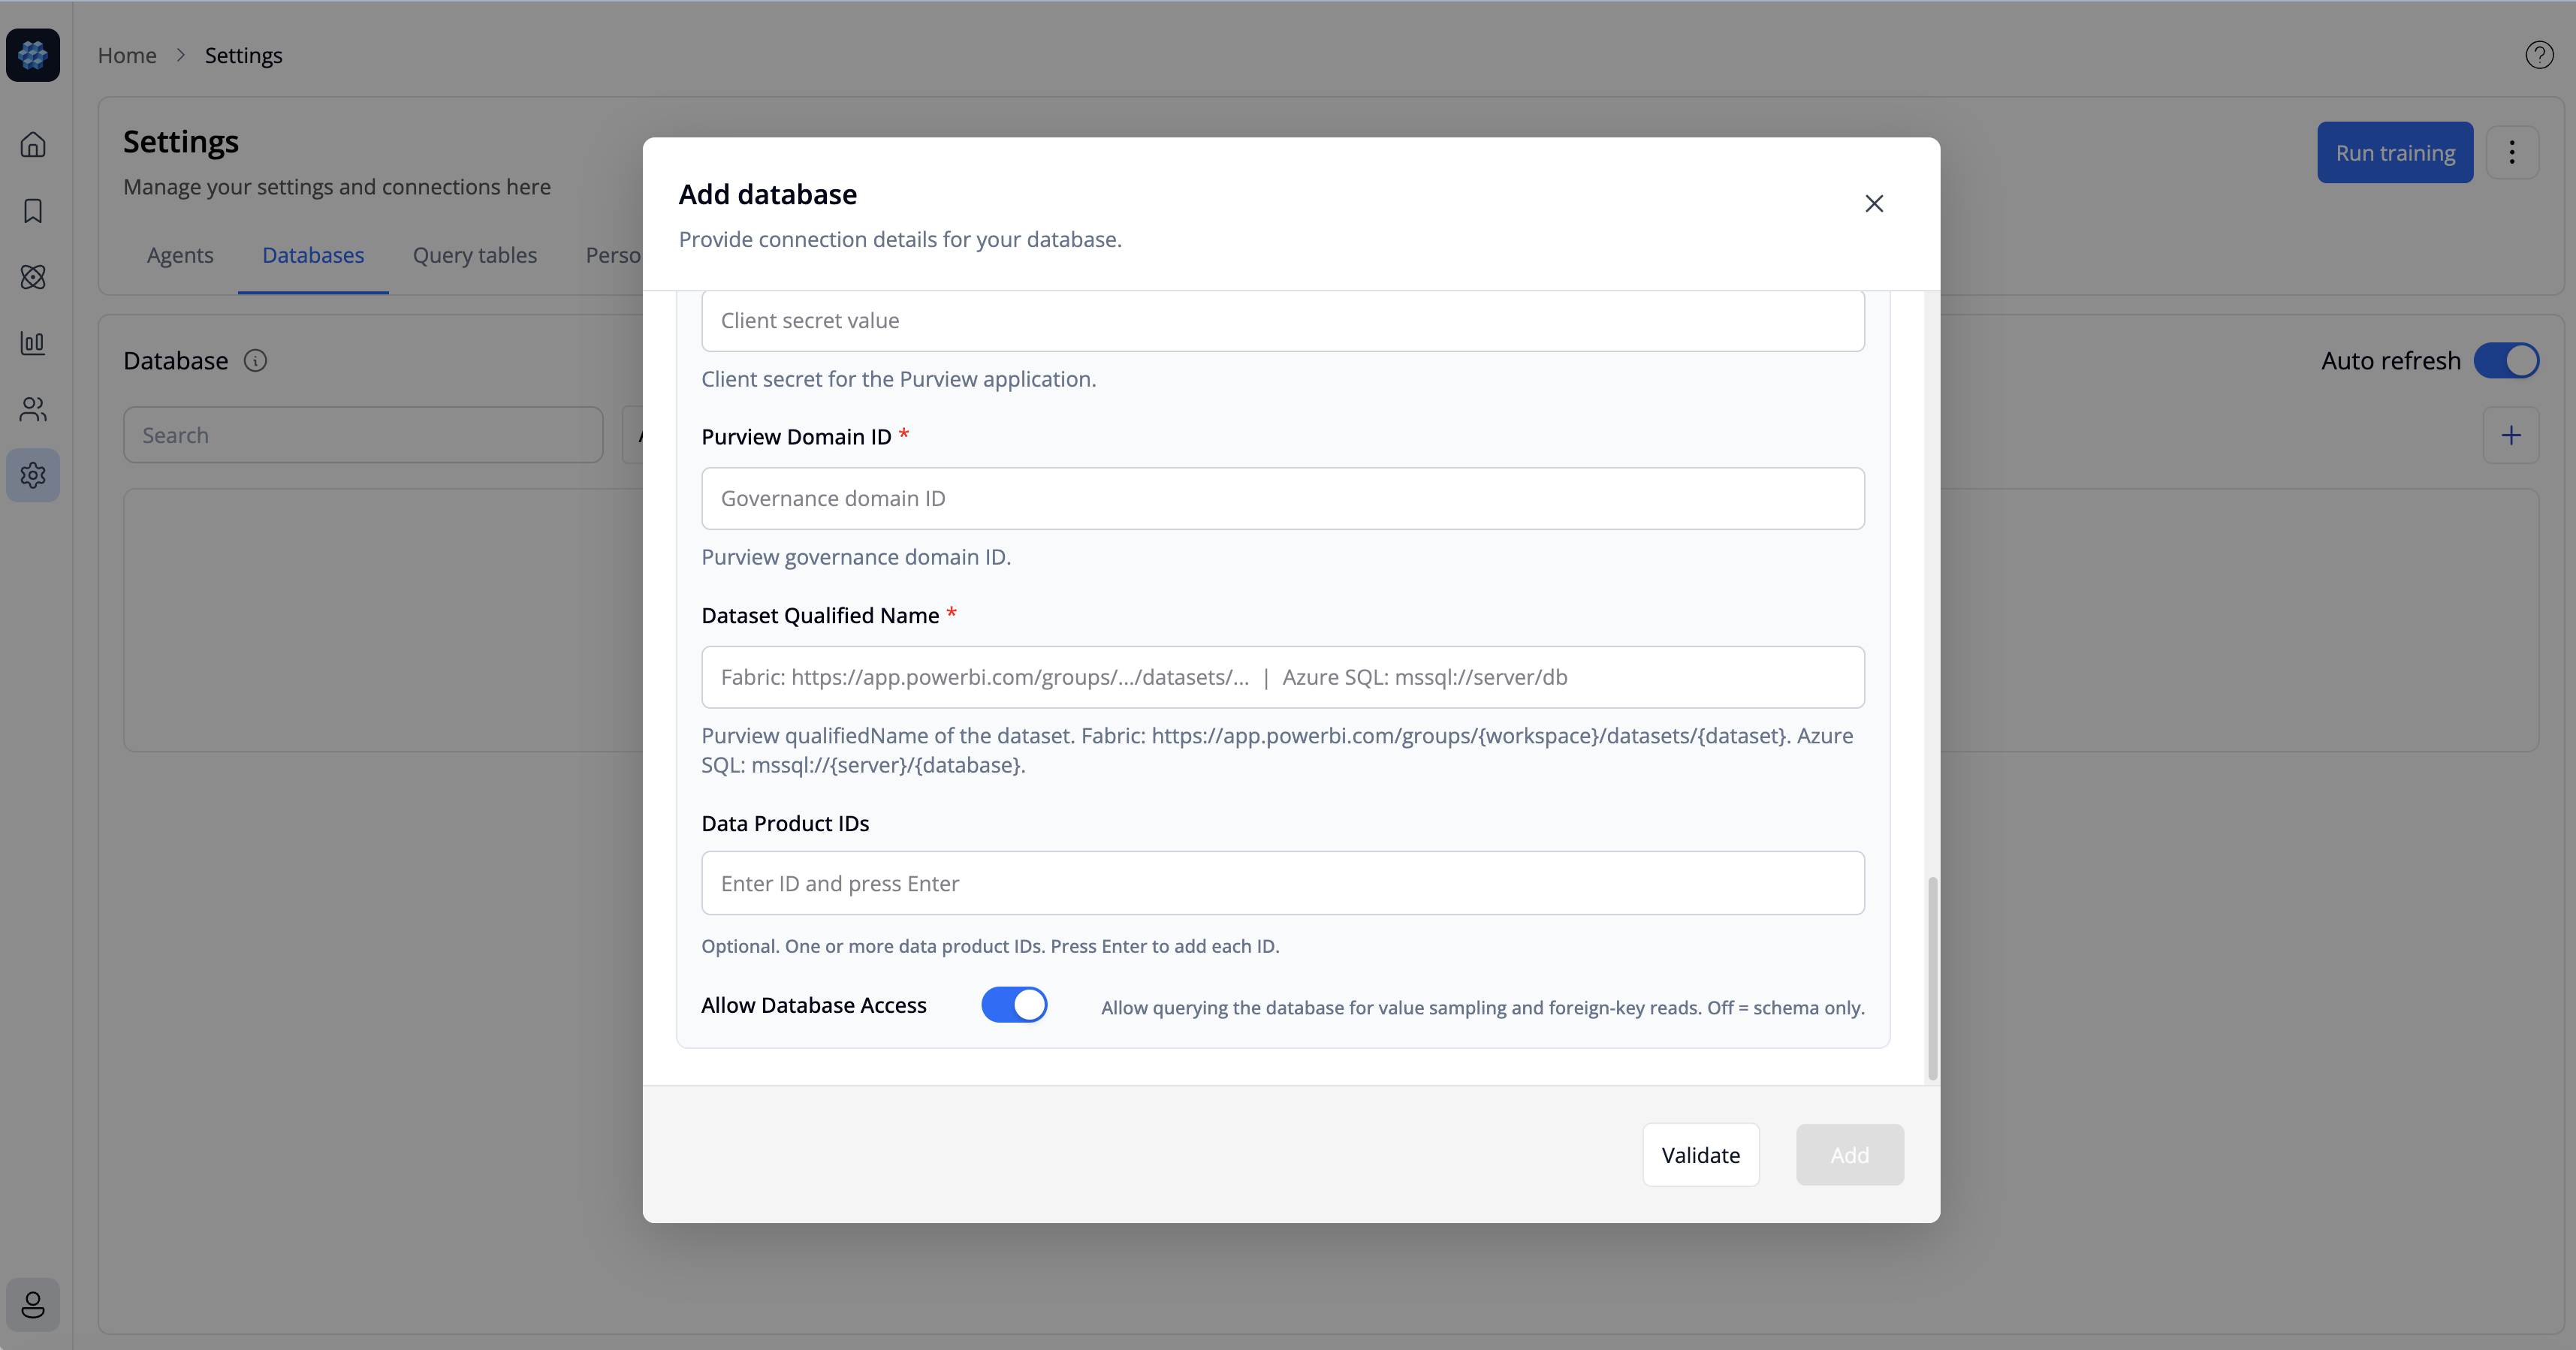
Purview fields
- Purview Tenant ID (required) — Microsoft Entra tenant ID for the Purview account (Directory (tenant) ID).
- Purview Client ID (required) — Application (client) ID with access to the Purview account. Not needed if using Managed Identity.
- Purview Client Secret (required) — Client secret for the Purview application. Not needed if using Managed Identity.
- Purview Domain ID (required) — the Purview governance domain ID that scopes data-product lookups.
- Dataset Qualified Name (required) — the Purview
qualifiedNameof the dataset this connection maps to:- Fabric:
https://app.powerbi.com/groups/{workspace}/datasets/{dataset} - Azure SQL:
mssql://{server}/{database}
- Fabric:
- Data Product IDs (optional) — one or more data product IDs; type each ID and press Enter. Leave blank to discover all data products accessible in the domain.
- Allow Database Access (toggle, default on) — see Allow Database Access.
Note
On edit, the Purview Client Secret stays blank — leave it empty to keep the stored secret, or enter a new value to replace it.
Authentication
A Purview connection authenticates two things: the Purview catalog (for metadata) and, when database access is enabled, the database itself (for value sampling and foreign-key reads).
Service principal (Azure SQL and Fabric)
The default option for both dialects. Provide the Purview Client ID and Purview Client Secret above; the same app registration authenticates the Purview catalog, and your dialect's connection credentials authenticate the database.
Managed Identity (Azure SQL only)
For on-premises deployments running on an Azure VM, an Azure SQL connection can authenticate with the VM's Managed Identity instead of stored secrets. Managed Identity will be available for Fabric connections soon.
Turn on the Use Managed Identity toggle on the Azure SQL connection. When it is on:
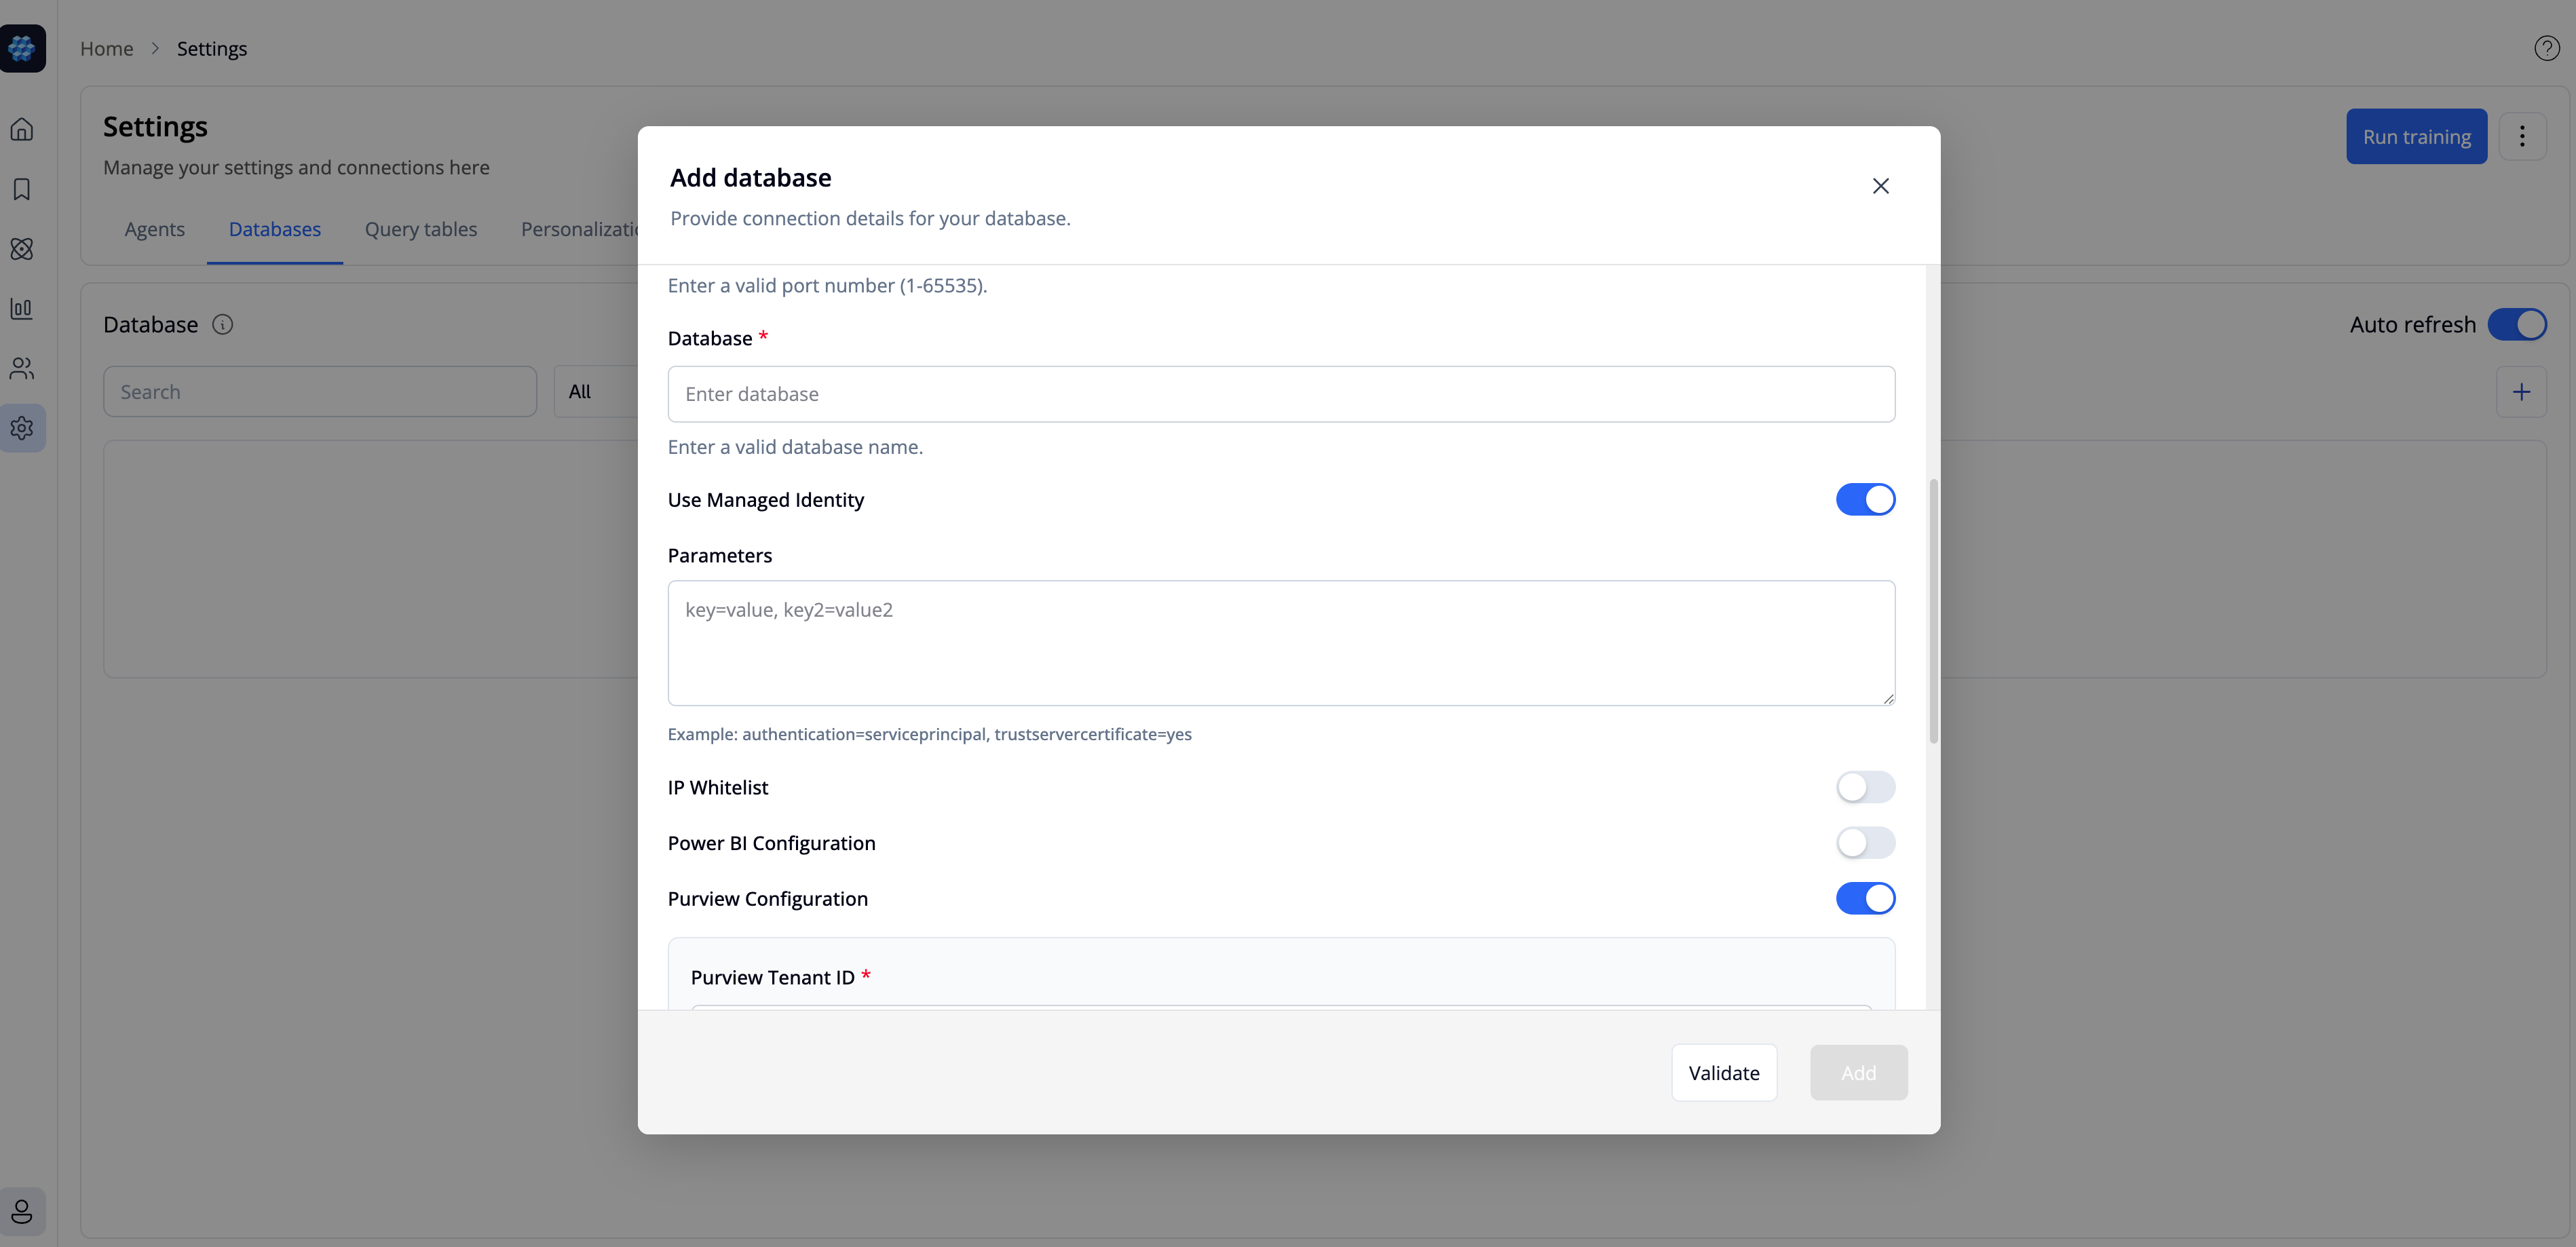
- The client ID / secret and the database username / password are no longer required and are hidden.
- Both the Azure SQL database and Purview authenticate via the VM's Managed Identity — one toggle covers the whole connection.
- Purview Tenant ID is still required.
Managed Identity prerequisites
Grant the VM's Managed Identity the same access a service principal would need: Data Map: Data Reader and Unified Catalog access in Purview, plus access to the Azure SQL database (a contained database user mapped to the Managed Identity). Tursio assumes a system-assigned Managed Identity.
Allow Database Access
The Allow Database Access toggle controls whether Tursio queries the database during training, on top of the metadata it reads from Purview.
- On (default): Tursio may query the database for value sampling (example column values) and foreign-key reads, producing a richer semantic model.
- Off: schema only — Tursio uses Purview metadata exclusively and never queries the database. Use this when your policy prohibits Tursio from reading the data itself.
Validate and save
Click Validate before saving. Validation checks both Purview surfaces and reports each separately, so a failure points at the specific fix:
| If validation fails on… | Check |
|---|---|
| Data Map | credentials / Managed Identity and its Data Map (Data Reader) role |
| Dataset not found | the Dataset Qualified Name and that the source has been scanned |
| Data products | the Domain ID and the identity's Unified Catalog access |
| No scoped tables | the Domain ID and Data Product IDs |
Once validation succeeds, click Add (or Accept on edit) to save the connection.
Post connection
- Train the connection as usual. Query Tables, dimensions, measures, and joins are built from the Purview catalog (enriched with sampled values when Allow Database Access is on).
- Query the connection like any other — natural-language questions run against the live database using the Purview-derived semantic model.
- No schema-drift banner. Because schema comes from Purview, Tursio skips the live schema-change checks it runs on standard connections; re-train after updating the dataset in Purview to pick up schema changes.
Security Note
Client secrets are encrypted at rest. With Managed Identity, no database or Purview secret is stored at all.