Deploy the MCP Server
Choose your deployment method below. Each section includes optional OAuth (Microsoft Login) setup at the end.
Important: Retrain Before Export
If you have connections trained before MCP was added, retrain them first. Export a new mcp_export.zip after retraining, or the MCP server won't start.
Jump to Section
- Zip Setup — No Docker? Use this (Linux only)
- Docker Compose Setup — Recommended for most users
- Kubernetes Setup — For Kubernetes clusters
- Connect AI Tools — Claude, ChatGPT, Copilot
- Customization — Path-based routing for multiple tenants on a single public IP
Zip Setup
Access required
- SSH or terminal access to the Linux machine where the MCP server will run
- sudo privileges
- Python 3.10+ installed
Use this method if you received a mcp_export.zip file and don't have Docker.
This guide is for Linux only (Ubuntu 20.04 or later recommended). Windows users without Docker should contact Tursio support.
Before You Start
From Tursio, you need:
mcp_export.zip— your server package with API credentials
On your Linux machine, you need:
- Ubuntu 20.04 or later (or another Debian-based distro)
- Python 3.10 or higher. Check your version:
Look for something like Python 3.11.2. If the number after "Python 3." is 10 or higher, you're set.
If Python is missing or too old:
unzip. Check if it's installed:
If not, install it:
sudoaccess — you need this to create/opt/tursio-mcp
Step 1 — Unzip the File
Open a terminal and run:
sudo mkdir -p /opt/tursio-mcp
sudo chown $USER /opt/tursio-mcp
unzip mcp_export.zip -d /opt/tursio-mcp
If you saved the file to your Downloads folder:
Navigate to the folder:
Step 2 — Edit Your Config File
Open the config file. First, find available config files:
ls /opt/tursio-mcp/mcp/server/configs/*.yaml
nano /opt/tursio-mcp/mcp/server/configs/<your-config>.yaml
You'll see these fields at the top:
Update all three:
| Field | Value |
|---|---|
search_url |
https://<your-tursio-hostname>/nlp-search |
context_url |
https://<your-tursio-hostname>/nlp-context |
api_key |
Your API key from Tursio portal → Settings |
Replace <your-tursio-hostname> with your company's Tursio portal address.
Example: If your portal is at https://yourcompany.tursio.ai, set search_url to https://yourcompany.tursio.ai/nlp-search.
For Cassandra-backed datasets:
search_url:https://<your-tursio-hostname>/cassandra-searchcontext_url:https://<your-tursio-hostname>/cassandra-context
For DynamoDB-backed datasets:
search_url:https://<your-tursio-hostname>/dynamodb-searchcontext_url:https://<your-tursio-hostname>/dynamodb-context
Save the file.
Step 3 — Make the Startup Script Executable
You only need to do this once.
Step 4 — Start the Server
The first run takes a minute or two because it installs Python packages automatically. You'll see output like:
Log file: /opt/tursio-mcp/mcp/run.log
Auto-detected config: your-dataset-name
Using Python: Python 3.11.x
Creating virtual environment...
Virtualenv activated: /opt/tursio-mcp/mcp/.venv
Upgrading pip...
Installing dependencies...
Dependencies installed.
Starting server without OAuth...
Config: your-dataset-name
Port: 8000
INFO:root:Starting semantic context warmup
INFO:root:Semantic context warmup completed
INFO:     Uvicorn running on http://0.0.0.0:8000 (Press CTRL+C to quit)
When you see "Uvicorn running on http://0.0.0.0:8000", the server is up.
Later runs are faster because the virtual environment is already set up.
Step 5 — Keep the Server Running
Using systemd (recommended for servers)
Create a service file:
sudo tee /etc/systemd/system/tursio-mcp.service > /dev/null <<EOF
[Unit]
Description=Tursio MCP Server
After=network.target

[Service]
Type=simple
User=$USER
WorkingDirectory=/opt/tursio-mcp
ExecStart=/opt/tursio-mcp/mcp/run.sh
Restart=on-failure
RestartSec=5

[Install]
WantedBy=multi-user.target
EOF
Enable and start the service:
Check the status:
To stop the server:
With systemd, the server restarts automatically if it crashes and starts when your machine boots.
Without systemd (quick background start)
The shell shows the process ID (PID). Save it so you can stop the server later:
To stop the server:
Replace "12345" with your actual PID. Note: this method doesn't survive reboots.
Step 6 — Connect to Your AI Tool
Your server URL is http://your-server-address:8000/mcp. Replace your-server-address with your Linux machine's IP or hostname (use localhost if Claude Desktop is on the same machine).
Jump to Connect AI Tools for step-by-step instructions.
Troubleshooting
"Permission denied" when running ./mcp/run.sh
You skipped Step 3. Run this first:
Then try Step 4 again.
Server starts but immediately stops with an api_key error
Check your config file (Step 2). Make sure api_key is your real API key from Tursio portal → Settings, not placeholder text.
"Port 8000 already in use"
Another process is using port 8000. Start on a different port:
Then use port 8001 in your AI tool configuration.
Server stopped after closing the terminal
You didn't use the background command from Step 5. Restart the server:
Something else went wrong
Check the log file for the full error:
Send this file to Tursio support.
Microsoft Login (OAuth) — Optional
Skip this section unless your IT team asked you to set up Microsoft login.
You need four values from your Azure App Registration:
| What | Where to find it in Azure Portal |
|---|---|
| Server's public URL | The URL users will access, e.g. https://mcp.yourcompany.com |
| Client ID | App registrations → your app → Application (client) ID |
| Client Secret | App registrations → your app → Certificates & secrets → your secret's Value |
| Tenant ID | App registrations → your app → Directory (tenant) ID |
Run the server with these extra flags:
./mcp/run.sh \
  --port 8000 \
  --oauth \
  --url https://mcp.yourcompany.com \
  --client-id paste-your-client-id-here \
  --client-secret "paste-your-client-secret-here" \
  --tenant-id paste-your-tenant-id-here
Important: --url must have no trailing slash.
Set the Azure redirect URI to: https://mcp.yourcompany.com/auth/ms-callback
With OAuth enabled, users must sign in with their Microsoft account — this is expected.
Update your AI tool URL
With OAuth, the server needs a public URL. Localhost won't work.
Claude Desktop — update the config file:
Save and restart Claude Desktop.
Claude.ai (web):
- Go to Org / Admin Settings → Connectors → find your Tursio connector → Edit
- Change the Remote MCP server URL to
https://mcp.yourcompany.com/mcp - Click Save
In both cases, use your --url value with /mcp appended.
Docker Compose Setup
Access required
- SSH or terminal access to the machine where the MCP server will run
- Docker installed and running on that machine
- The
.tarimage file andmcp_export.zipaccessible on that machine
Use this method if you received a Docker image (.tar file) and an mcp_export.zip.
Before You Start
From Tursio, you need:
tursio-mcp-<version>.tar.gz— the Docker imagemcp_export.zip— your server package (connection ID is pre-configured)
You also need Docker installed. Check:
If Docker isn't installed, get Docker Desktop from https://docs.docker.com/get-docker.
Step 1 — Load the Docker Image
Open a terminal in the folder with your .tar file and run:
Replace with your actual filename. Example:
You'll see output like:
Save the image name for the next step.
Step 2 — Place Your mcp_export.zip
Copy the file to a permanent location:
Linux / Mac:
Windows (PowerShell):
New-Item -ItemType Directory -Force -Path C:\tursio
Copy-Item mcp_export.zip C:\tursio\mcp_export.zip
Don't rename or unzip it. The Docker container reads it as-is.
Step 3 — Get Your Configuration Values
Before starting the server, get these from your Tursio portal:
- API key — Go to Tursio portal → Settings and copy your API key.
- Hostname — Your company's Tursio portal address, like
https://yourcompany.tursio.ai.
Your URLs will be:
| URL | Value |
|---|---|
| Search | https://<your-tursio-hostname>/nlp-search |
| Context | https://<your-tursio-hostname>/nlp-context |
For Cassandra-backed datasets:
- Search:
https://<your-tursio-hostname>/cassandra-search - Context:
https://<your-tursio-hostname>/cassandra-context
For DynamoDB-backed datasets:
- Search:
https://<your-tursio-hostname>/dynamodb-search - Context:
https://<your-tursio-hostname>/dynamodb-context
Keep these handy for the next step.
Step 4 — Start the Server
Using Docker Compose (Recommended)
Tursio provides a compose.yaml and env.example file.
-
Copy the env template:
-
Edit
.envwith your values: -
Start the server:
-
Check the status:
You should see the startup output (see Step 5 below for details).
Upgrading to a New Version
When Tursio sends a new .tar file:
Update .env:
Restart:
Your configuration stays the same.
Useful Commands
| Task | Command |
|---|---|
| View live logs | docker compose logs -f tursio-mcp |
| Stop the server | docker compose stop |
| Start the server | docker compose start |
| Restart the server | docker compose restart |
| Remove everything | docker compose down |
Without Docker Compose
If you don't have Docker Compose, run this command instead.
Linux / Mac:
docker run -d \
  --name tursio-mcp \
  --restart unless-stopped \
  -p 8000:8000 \
  -v /opt/tursio/mcp_export.zip:/app/server.zip:ro \
  -e MCP_PORT=8000 \
  -e API_KEY=paste-your-api-key-here \
  -e SEARCH_URL=https://<your-tursio-hostname>/nlp-search \
  -e CONTEXT_URL=https://<your-tursio-hostname>/nlp-context \
  tursio.azurecr.io/tursio-mcp:<version>
Windows (PowerShell):
docker run -d `
  --name tursio-mcp `
  --restart unless-stopped `
  -p 8000:8000 `
  -v C:\tursio\mcp_export.zip:/app/server.zip:ro `
  -e MCP_PORT=8000 `
  -e API_KEY=paste-your-api-key-here `
  -e SEARCH_URL=https://<your-tursio-hostname>/nlp-search `
  -e CONTEXT_URL=https://<your-tursio-hostname>/nlp-context `
  tursio.azurecr.io/tursio-mcp:<version>
Replace the image name with yours from Step 1.
Step 5 — Check the Server Status
You should see:
Extracting config from /app/server.zip...
Extracted: your-dataset-name.yaml
Extraction complete.
Auto-detected config: your-dataset-name
Starting server without OAuth on port 8000...
INFO:root:Starting semantic context warmup
INFO:root:Semantic context warmup completed
INFO:     Started server process [1]
INFO:     Waiting for application startup.
INFO:     Application startup complete.
INFO:     Uvicorn running on http://0.0.0.0:8000 (Press CTRL+C to quit)
If you see "Uvicorn running on http://0.0.0.0:8000", the server is up.
The warmup messages are normal — the server pre-loads your Tursio context on startup.
Step 6 — Connect to Your AI Tool
Your server URL is http://your-server-address:8000/mcp. Replace your-server-address with your machine's IP or hostname (use localhost if on the same machine).
The server restarts automatically after reboots thanks to restart: unless-stopped.
Jump to Connect AI Tools for step-by-step instructions.
Troubleshooting
"Cannot connect to the Docker daemon"
Docker isn't running. Open Docker Desktop, wait for it to fully start, then try again.
"No such file or directory" when loading the image
You're in the wrong folder. Navigate to where your .tar file is saved, then try again.
Logs show: ERROR: No server.zip found at /app/server.zip
Your ZIP_PATH in .env is wrong. Check that it points to the correct location and the file exists there.
Logs show: ERROR: api_key ... is still a placeholder
Set API_KEY in .env to your real API key from Tursio portal → Settings.
Logs show: port is already allocated
Another process is using port 8000. Change MCP_PORT=8001 in .env and run docker compose up -d. Use port 8001 in your AI tool config.
Server stopped after closing the terminal
This shouldn't happen with restart: unless-stopped, but if it does, run:
Microsoft Login (OAuth) — Optional
Skip this section unless your IT team asked you to set up Microsoft login.
In your .env file, add:
OAUTH_ENABLED=true
PUBLIC_URL=https://mcp.yourcompany.com
MICROSOFT_CLIENT_ID=paste-your-client-id-here
MICROSOFT_CLIENT_SECRET=paste-your-client-secret-here
MICROSOFT_TENANT_ID=paste-your-tenant-id-here
The server needs a public HTTPS URL. Register this as the redirect URI in your Azure App Registration:
Restart the server:
Kubernetes Setup
Access required
- kubectl configured and pointing at the target cluster
- Docker on a machine that can reach the cluster's image registry
- Permissions to create namespaces, apply manifests, exec into pods, and tail logs
Use this method if you're deploying to a Kubernetes cluster.
This guide covers only the MCP server. It assumes the Tursio portal is already deployed and accessible.
No dedicated public IP or running multiple tenants? See Customization for path-based routing with NGINX, Traefik, or Azure Application Gateway.
Want to keep secrets out of your manifest? See Secret Management Options for alternatives to putting credentials in mcp-server.yaml.
Before You Start
From Tursio, you need:
tursio-mcp-<version>.tar.gz— the MCP server imagemcp_export.zip— your server package (connection ID is pre-configured)
You also need:
- A running Kubernetes cluster with
kubectlaccess - Docker on a machine that can reach the cluster
Verify kubectl is connected:
Step 1 — Load the MCP Image
On a machine with Docker access to your cluster's registry:
You'll see:
Save this image name for Step 3.
Now make the image available to your cluster. Choose one option:
Option A — Push to your private registry (recommended for multi-node clusters):
docker tag tursio.azurecr.io/tursio-mcp:<version> \
  registry.yourcompany.com/tursio-mcp:<version>
docker push registry.yourcompany.com/tursio-mcp:<version>
Then update the image: field in mcp-server.yaml to use your registry path.
Option B — Load directly on a single node:
Copy the .tar file to the target node and run:
Then uncomment nodeName in mcp-server.yaml and set it to that node's name.
Step 2 — Create the Namespace and Load Your Package
Create the namespace:
Load your mcp_export.zip as a Secret:
kubectl create secret generic tursio-mcp-zip \
  --from-file=server.zip=mcp_export.zip \
  -n tursio-mcp --dry-run=client -o yaml | kubectl apply -f -
Run this command again whenever you get an updated mcp_export.zip, then restart the deployment (see the Upgrading section below).
Step 3 — Configure the Manifest
Open mcp-server.yaml and fill in these values:
| Location | Field | Value |
|---|---|---|
| Secret | API_KEY | Your Tursio API key from Tursio portal → Settings |
| ConfigMap | SEARCH_URL | https://<your-tursio-hostname>/nlp-search |
| ConfigMap | CONTEXT_URL | https://<your-tursio-hostname>/nlp-context |
| Deployment | image | Your image from Step 1 |
Replace <your-tursio-hostname> with your company's Tursio portal address.
For Cassandra-backed datasets:
- SEARCH_URL:
https://<your-tursio-hostname>/cassandra-search - CONTEXT_URL:
https://<your-tursio-hostname>/cassandra-context
For DynamoDB-backed datasets:
- SEARCH_URL:
https://<your-tursio-hostname>/dynamodb-search - CONTEXT_URL:
https://<your-tursio-hostname>/dynamodb-context
Secret Management Options
By default, credentials go directly into mcp-server.yaml. This is fine for testing, but don't commit real values to git.
Option A — Separate secrets file (recommended for teams)
Extract the Secret to a separate file mcp-secrets.yaml, fill in real values there, and add it to .gitignore. Apply both files:
Leave the Secret block in mcp-server.yaml with placeholder values so it's safe to commit.
Option B — Azure Key Vault (AKS, production)
Store API_KEY and MICROSOFT_CLIENT_SECRET in Azure Key Vault and mount them using the Secrets Store CSI Driver. No Kubernetes Secret object is needed. See: https://learn.microsoft.com/en-us/azure/aks/csi-secrets-store-driver
Step 4 — Deploy
Check the pod status:
You should see STATUS: Running and READY: 1/1.
Check the logs:
Look for:
Step 5 — Expose the Server
The manifest creates a Service on port 8000 and exposes it as a LoadBalancer. Your cloud provider assigns an external IP.
Get the external IP:
Access the server at:
For Microsoft OAuth or AI tools that need HTTPS, configure TLS at your load balancer or reverse proxy. The MCP server itself runs on plain HTTP internally.
If the Tursio portal is in the same cluster and you are not using OAuth, you don't need to expose the MCP server externally. Connect directly using the internal cluster DNS:
This does not work with OAuth — the OAuth redirect callback requires a public HTTPS URL. If OAuth is enabled, expose the server externally and set
PUBLIC_URLaccordingly.
Step 6 — Connect to Your AI Tool
Your server URL is http://<your-mcp-endpoint>/mcp from Step 5.
Jump to Connect AI Tools for step-by-step instructions.
Upgrading
New mcp_export.zip:
kubectl create secret generic tursio-mcp-zip \
  --from-file=server.zip=mcp_export.zip \
  -n tursio-mcp --dry-run=client -o yaml | kubectl apply -f -
kubectl rollout restart deployment/tursio-mcp -n tursio-mcp
New image version:
Load and push the new image (as in Step 1), update the image: tag in mcp-server.yaml, then:
Microsoft Login (OAuth) — Optional
Skip this section unless your IT team asked you to set up Microsoft login.
In mcp-server.yaml, uncomment the OAuth fields in the ConfigMap and Secret:
MICROSOFT_CLIENT_ID: "paste-your-client-id-here"
MICROSOFT_TENANT_ID: "paste-your-tenant-id-here"
Secret
MICROSOFT_CLIENT_SECRET: "paste-your-client-secret-here"
The server needs a public HTTPS URL. Register this as the redirect URI in your Azure App Registration:
Apply the changes:
Troubleshooting
Pod is in CrashLoopBackOff
Check the logs:
| Log message | Fix |
|---|---|
| ERROR: Missing required env vars | A required value is missing from the ConfigMap or Secret in mcp-server.yaml |
| ERROR: API_KEY looks like a placeholder | Set API_KEY to your real Tursio API key from Tursio portal → Settings |
| ERROR: No server.zip found | The zip Secret wasn't created — run the kubectl create secret command from Step 2 |
| ERROR: No .yaml config files found in zip | The mcp_export.zip is invalid or corrupt — re-export from the Tursio portal |
Pod is Running but AI tool cannot connect
- Make sure the service is reachable from outside the cluster
- Check your ingress or load balancer configuration
- If using a LoadBalancer, allow port 8000 in your firewall / security group
Connect AI Tools
Once your Tursio MCP server is running, connect your AI client using the server URL from Step 6 of your deployment method.
For web-based AI tools (Claude.ai, ChatGPT, Copilot), the MCP server must be accessible via a public HTTPS URL. Claude Desktop can connect to a local server on localhost.
Claude
Availability: Custom connectors using remote MCP are free on Claude.
Claude Desktop
Open the Claude Desktop config file:
- Mac:
~/Library/Application Support/Claude/claude_desktop_config.json - Windows:
%APPDATA%\Claude\claude_desktop_config.json
Add this, replacing the URL with your server address:
Save the file and restart Claude Desktop.
Cursor
Go to Settings → MCP and add a new server with your server URL.
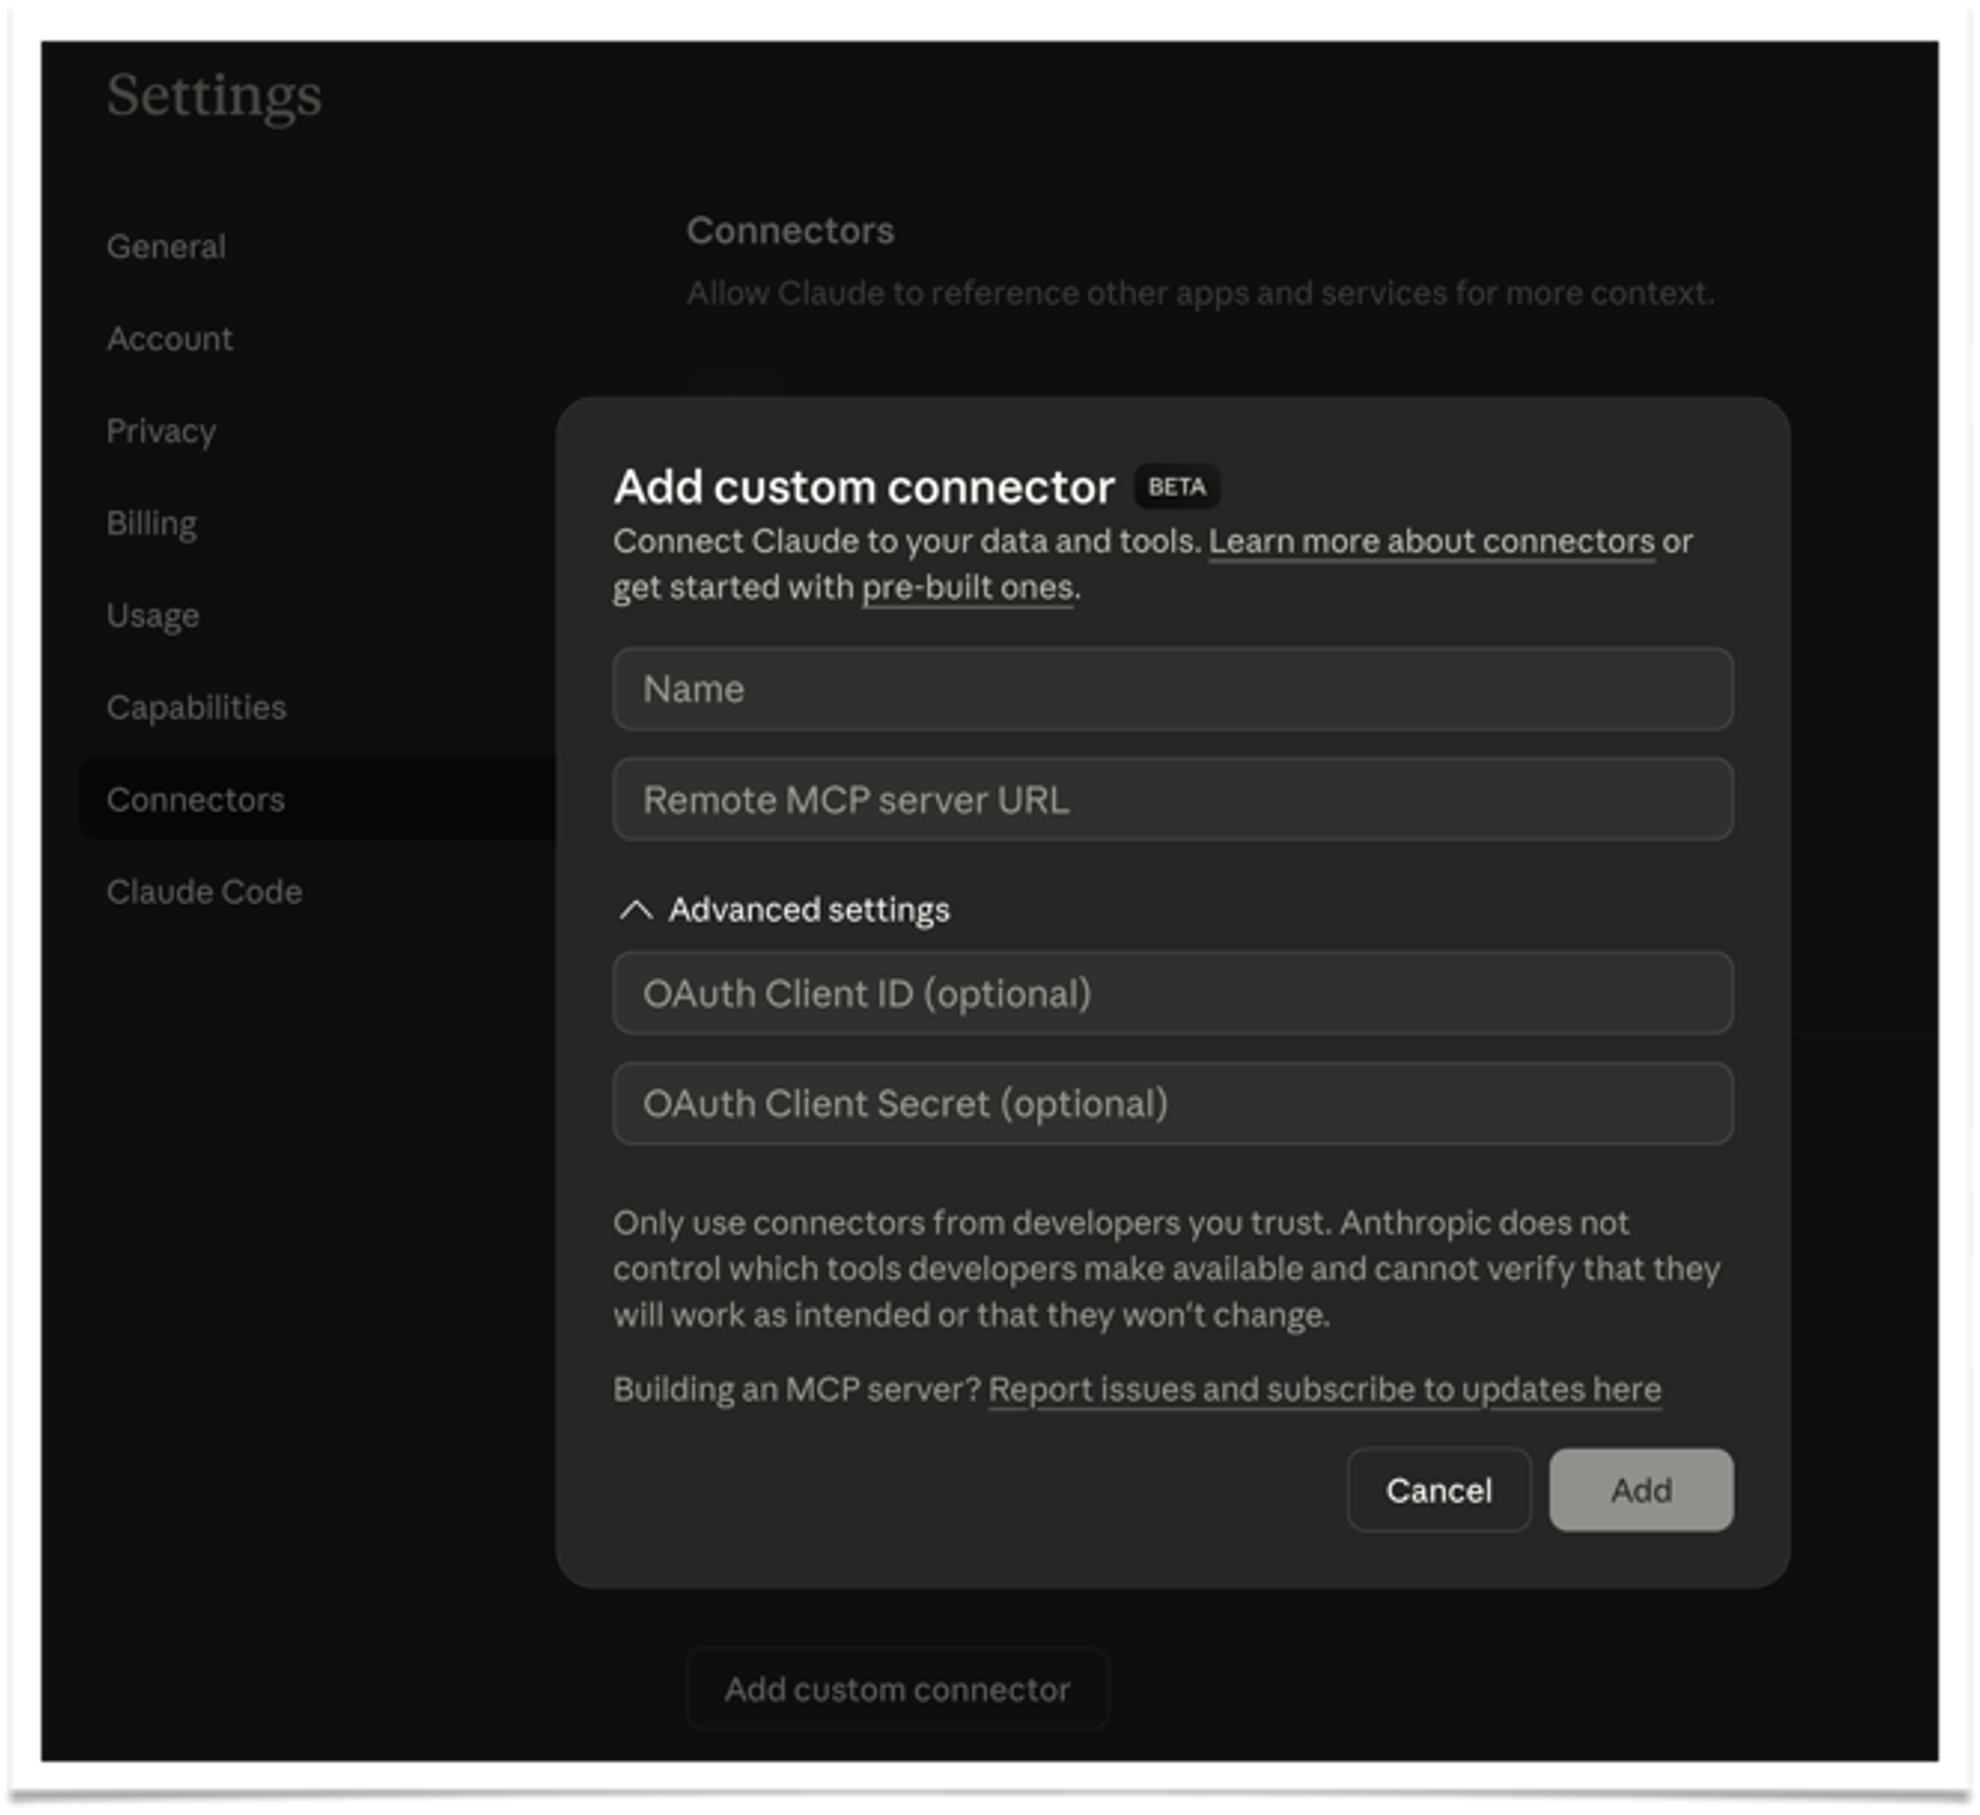
Claude.ai (web)
- Go to Org / Admin Settings → Connectors (sidebar) → Add custom connector
- Select MCP
- Enter a Name (e.g., Tursio) and your Remote MCP server URL
- Click Add
Follow Anthropic's official MCP instructions to add a custom connector.
ChatGPT
Availability:
- MCP is available in developer mode beta for Pro, Plus, Business, Enterprise, and Education accounts on the web.
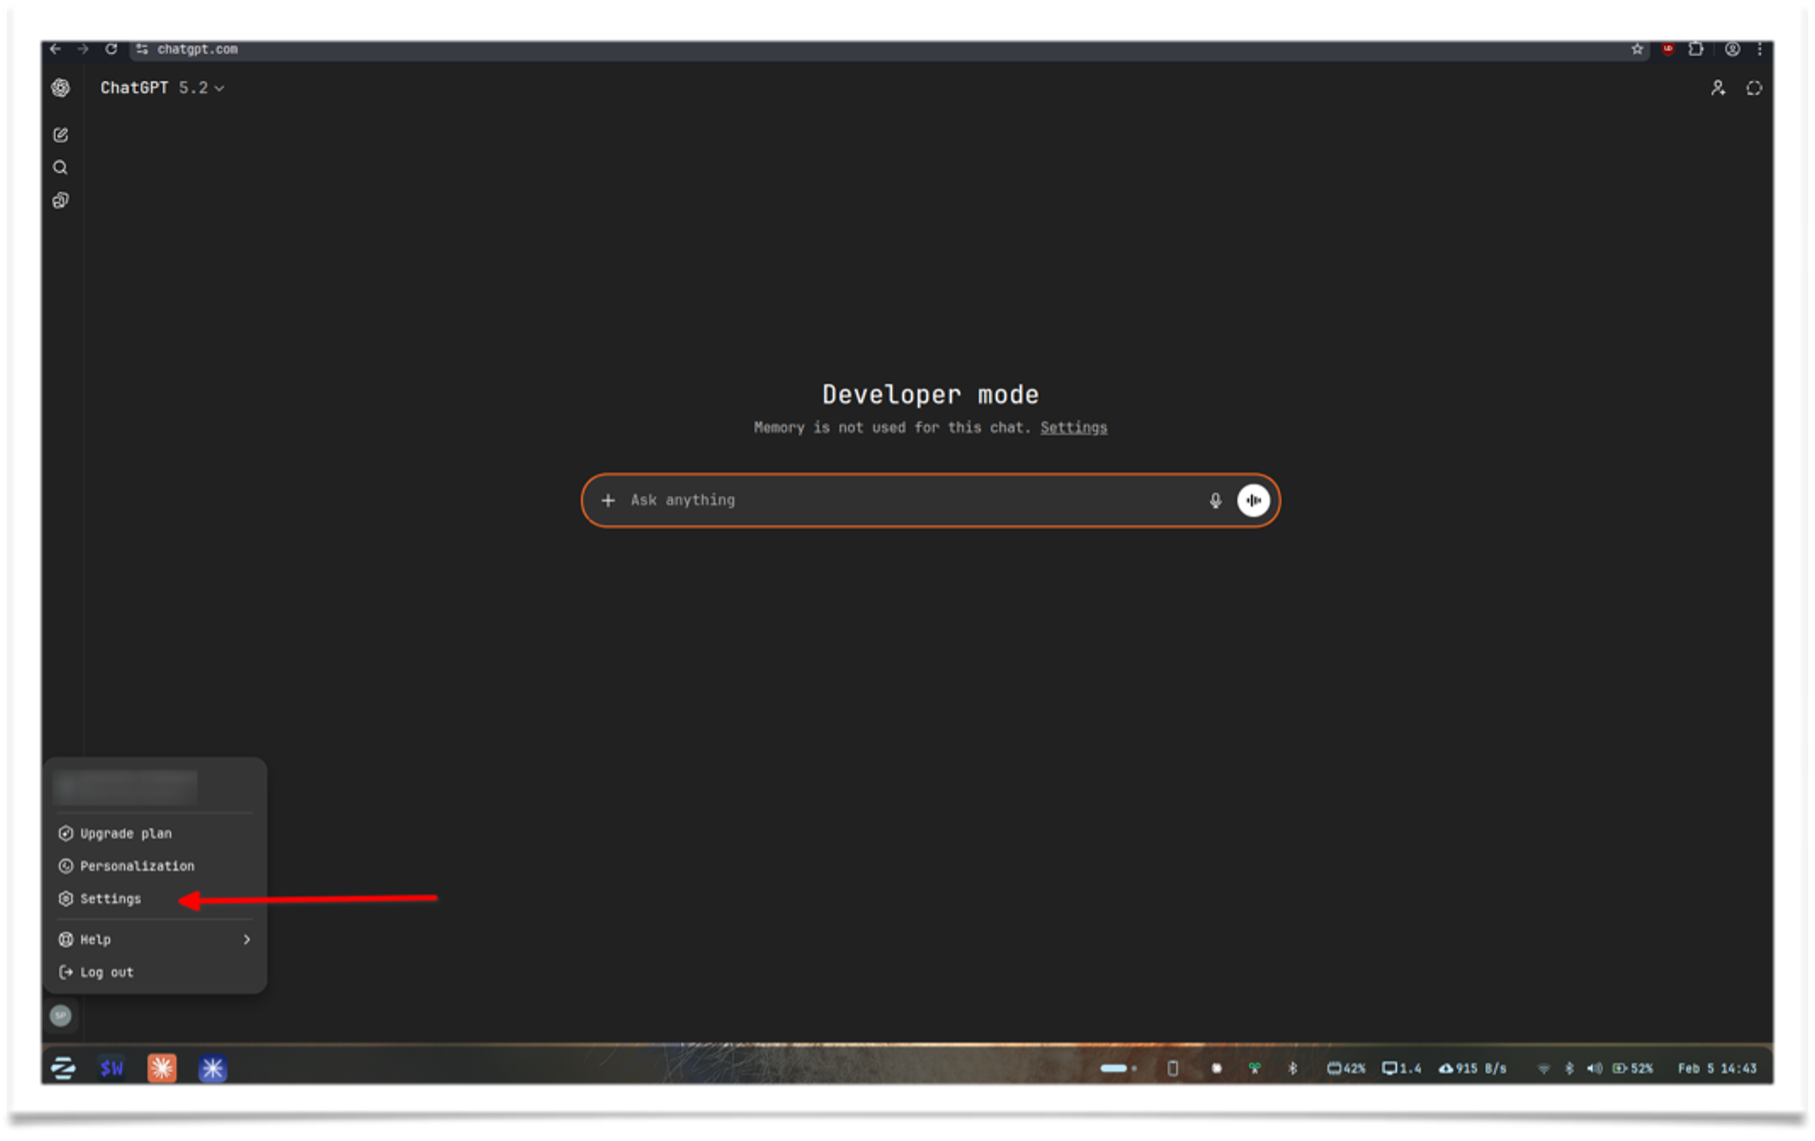
ChatGPT developer mode is a beta feature that enables full MCP client support. Follow these steps to create an app that connects to your Tursio MCP server:
-
Enable developer mode: Click your profile → Settings
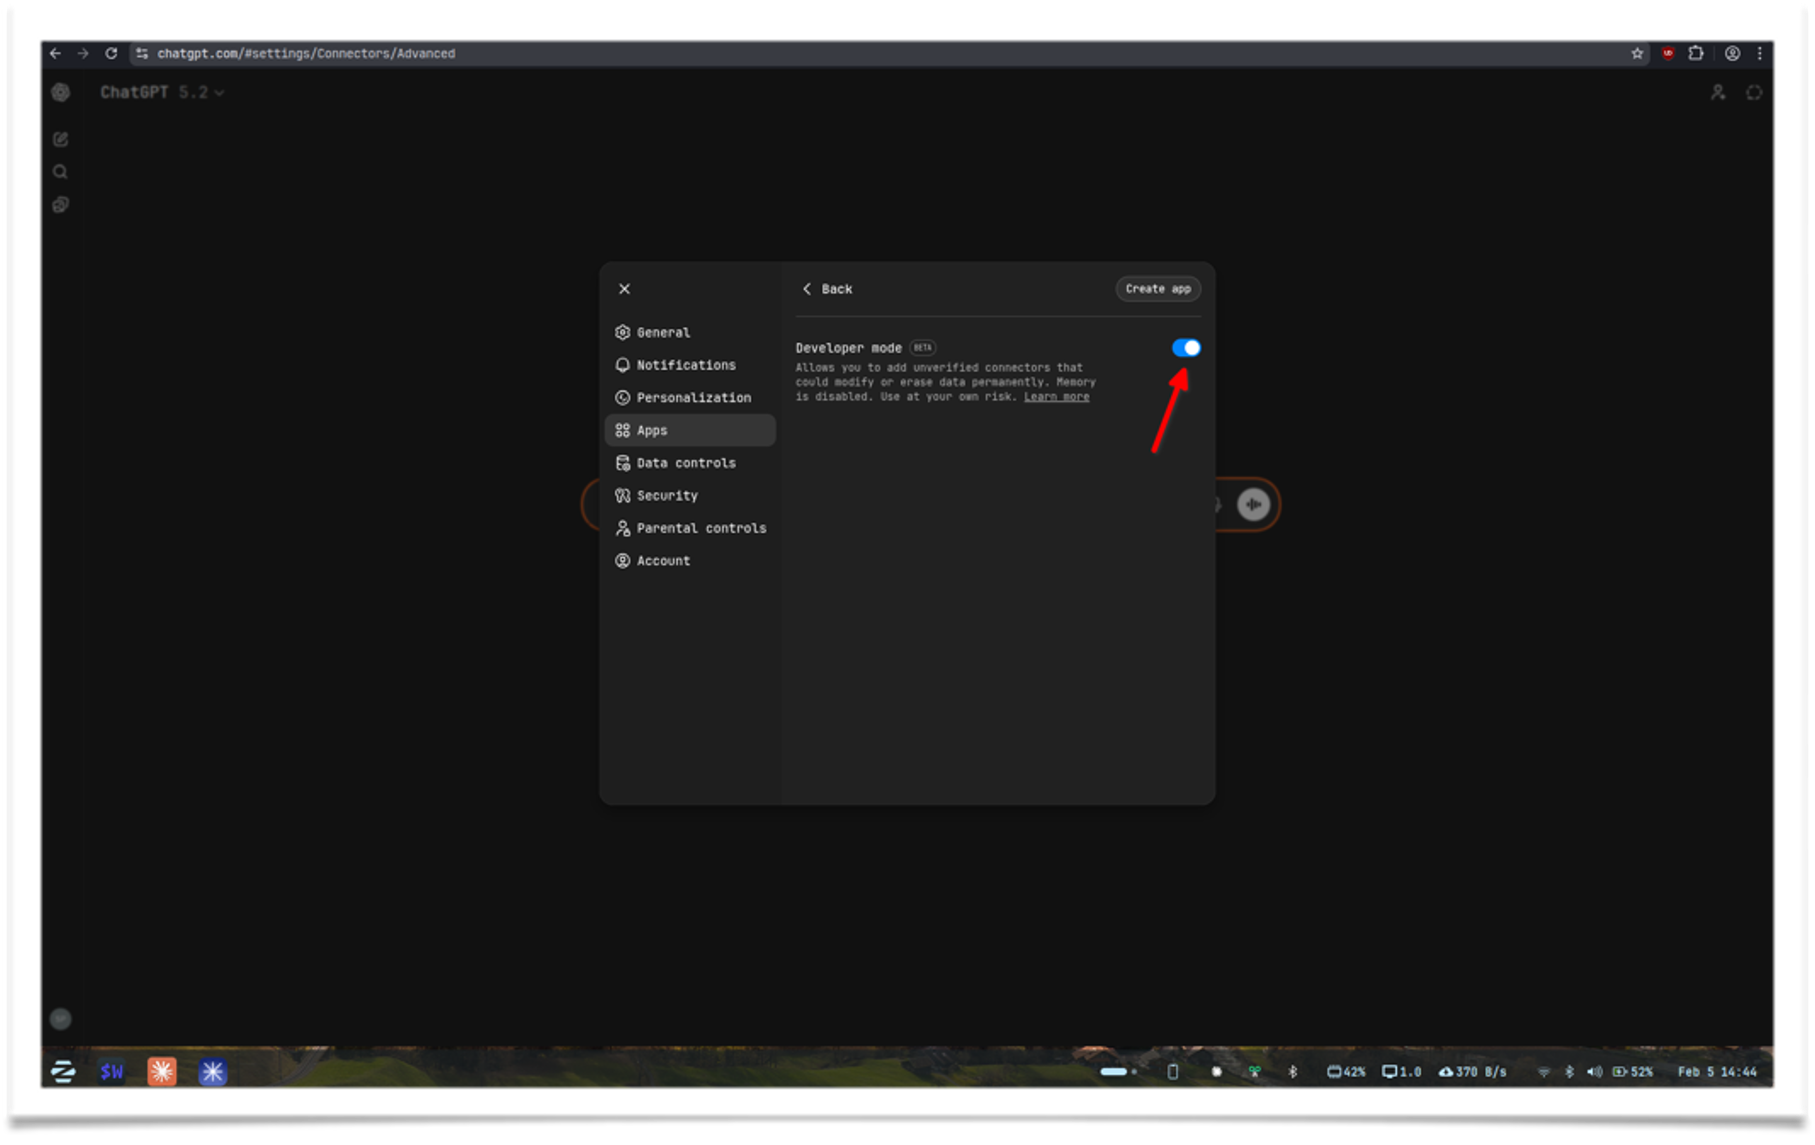
-
Go to Apps → Advanced settings
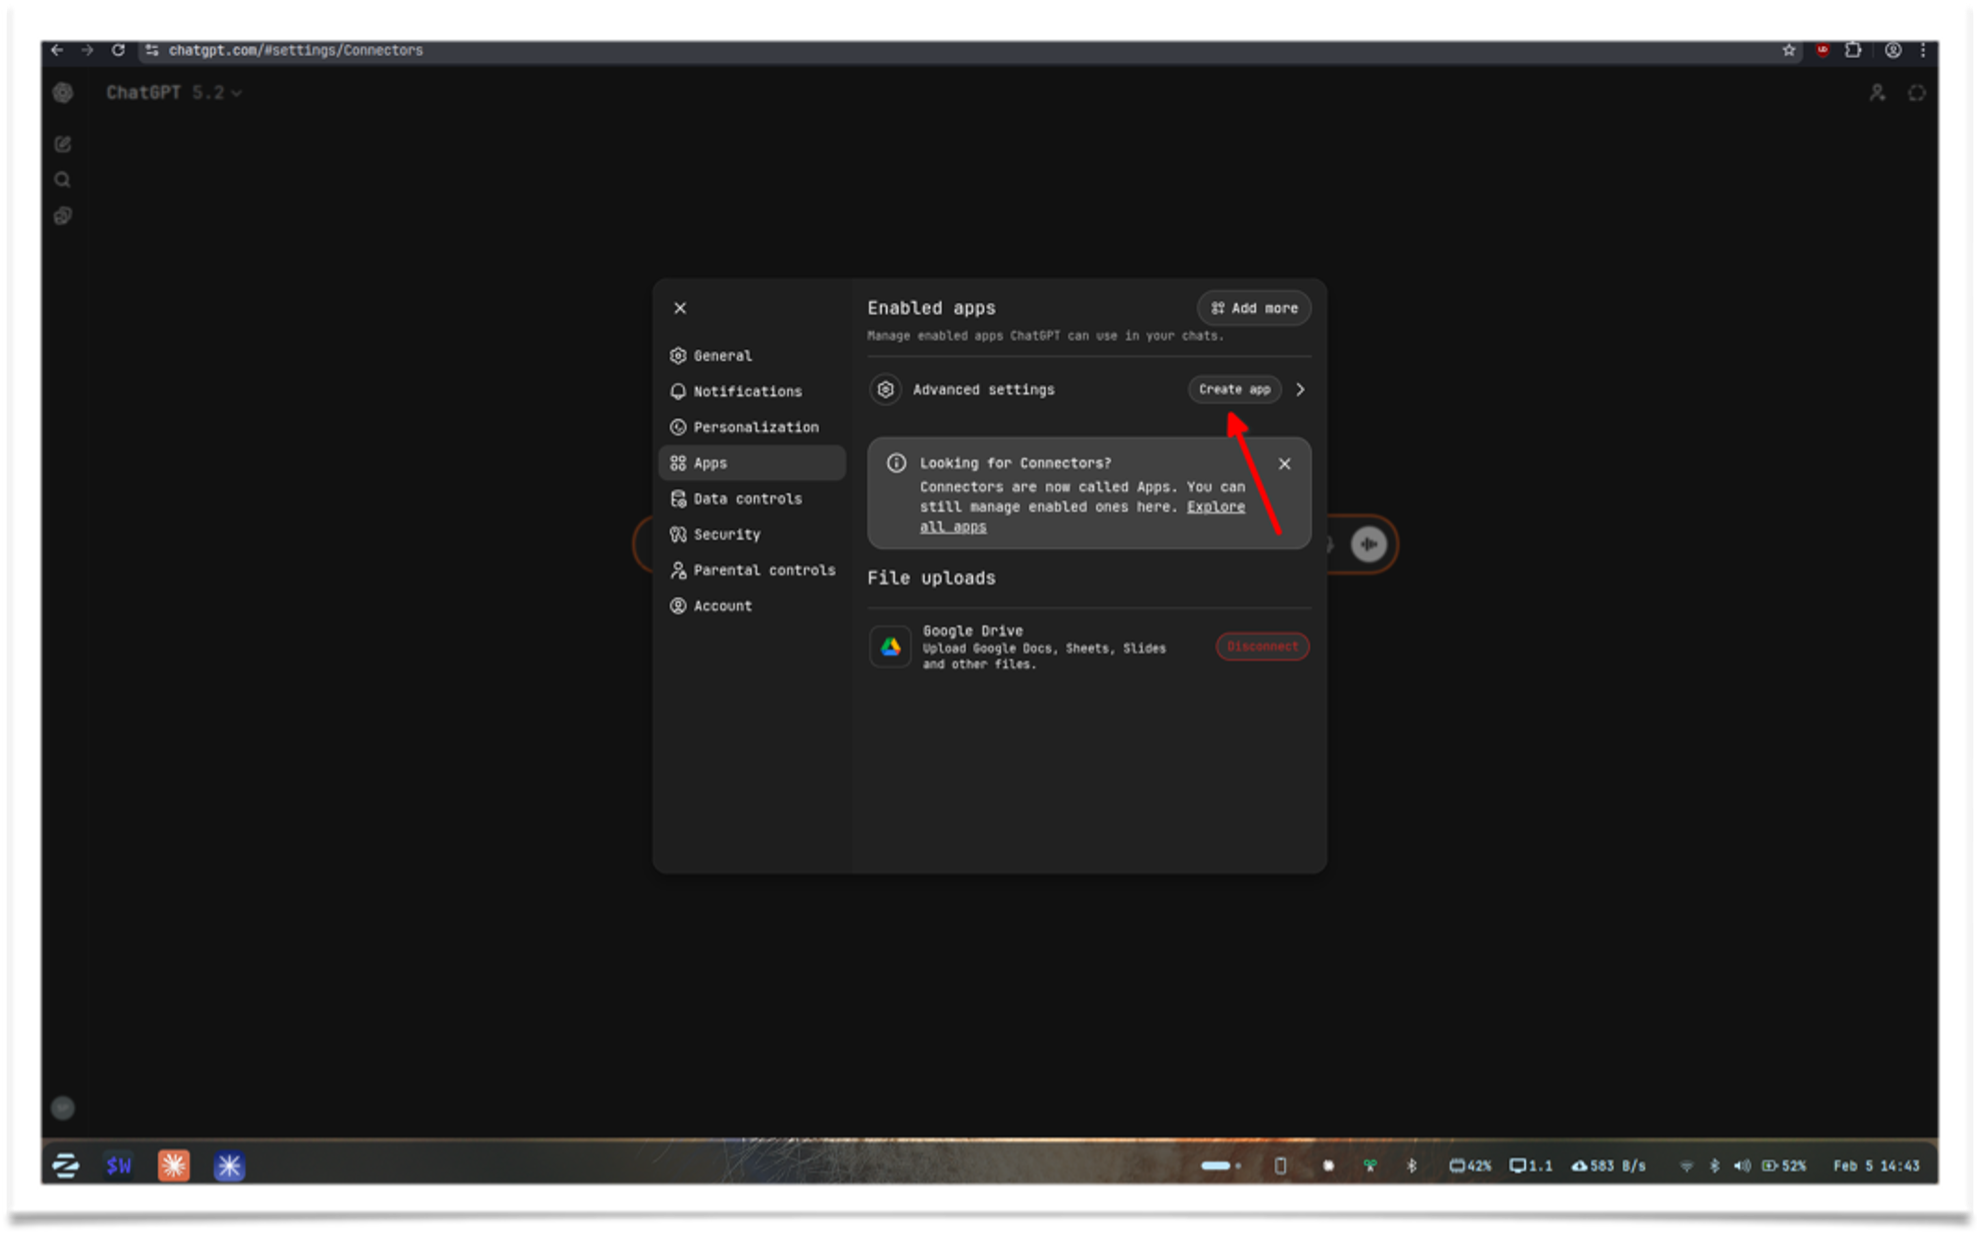
-
Find Developer mode and enable it
-
Go back and click Create app
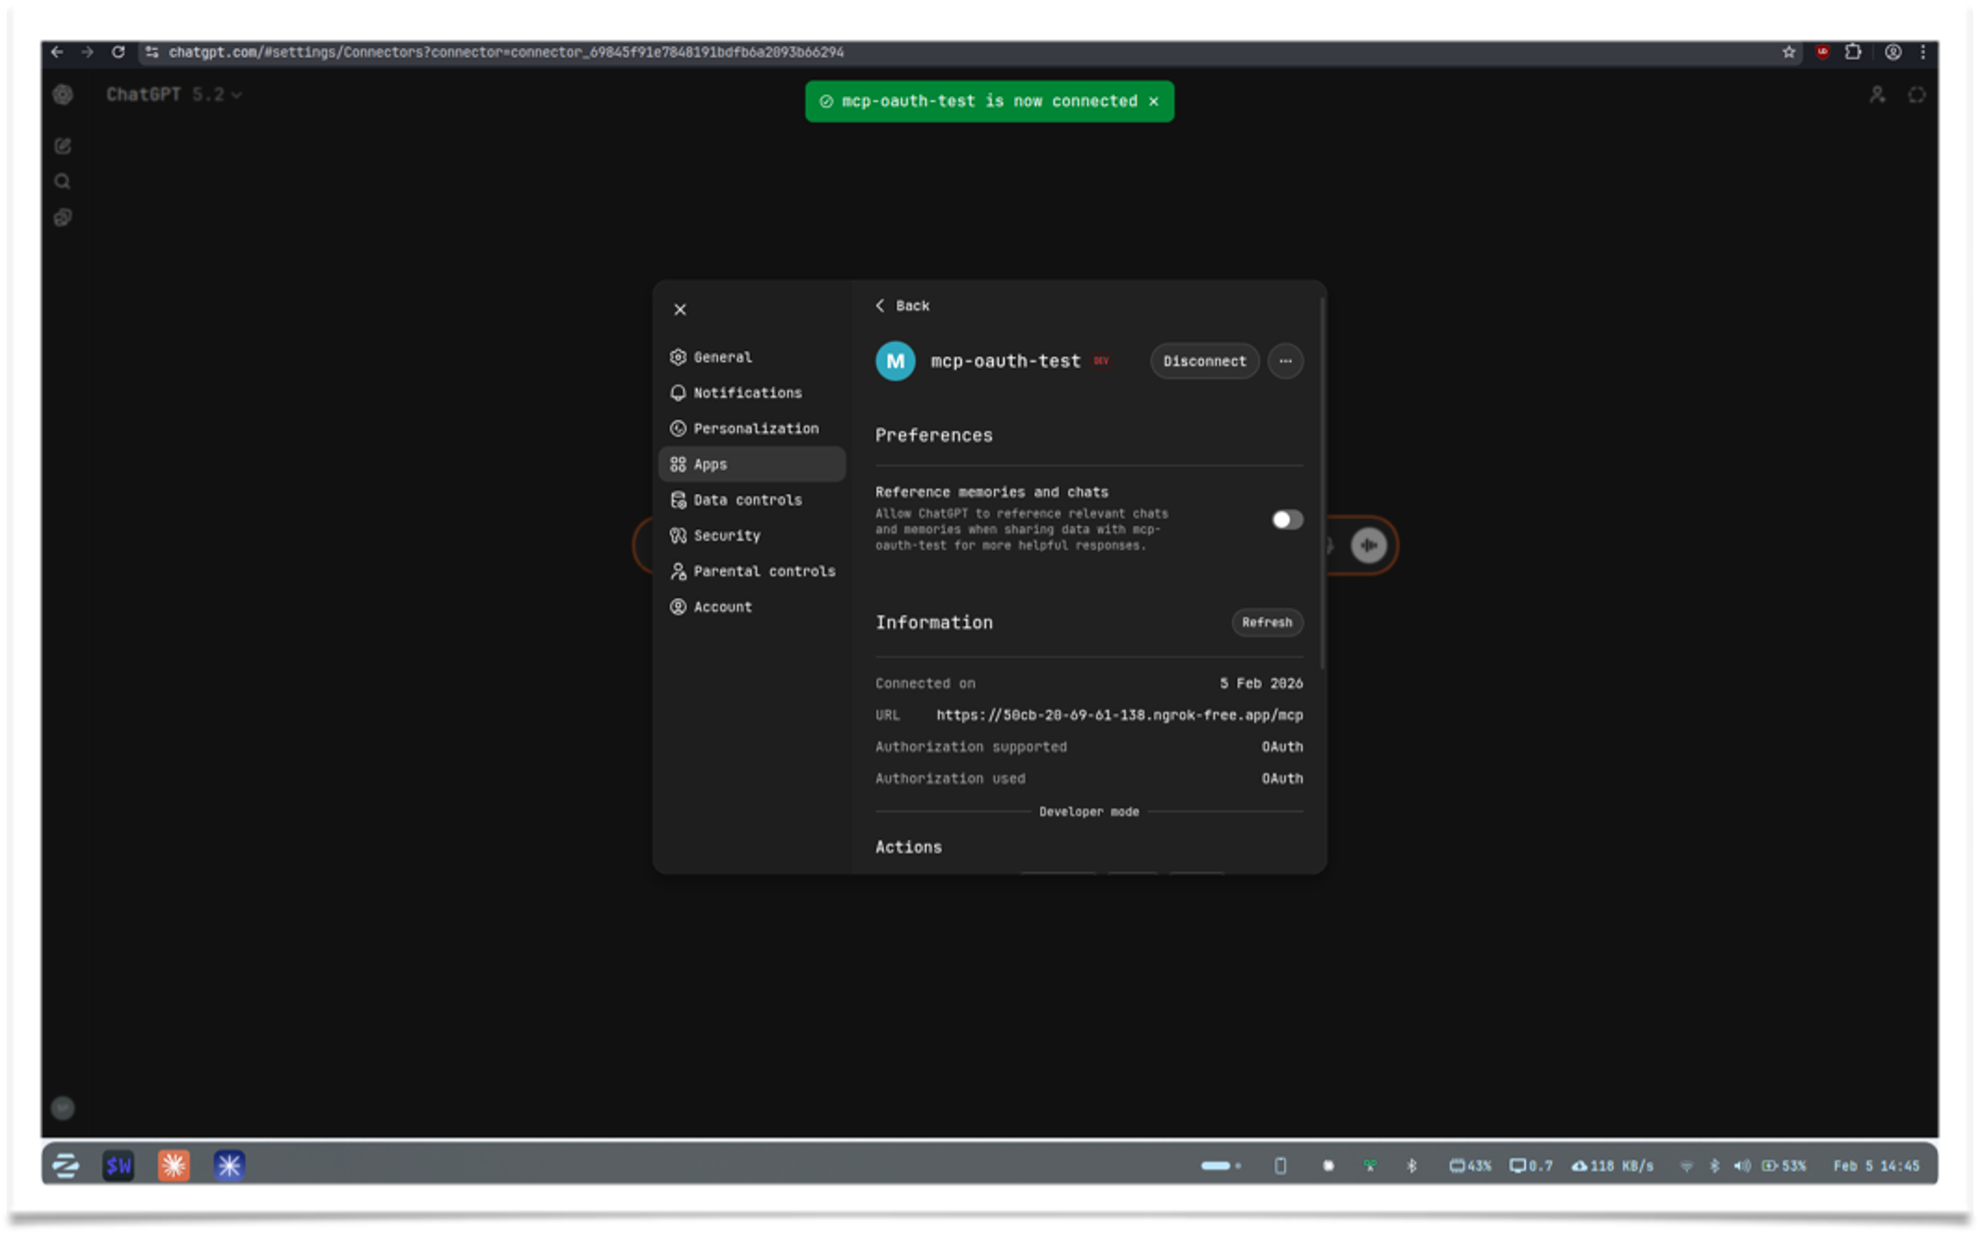
-
Fill in the details. If dynamic discovery is enabled on your MCP server, you only need a name and URL. Otherwise, you may also need the client ID and secret
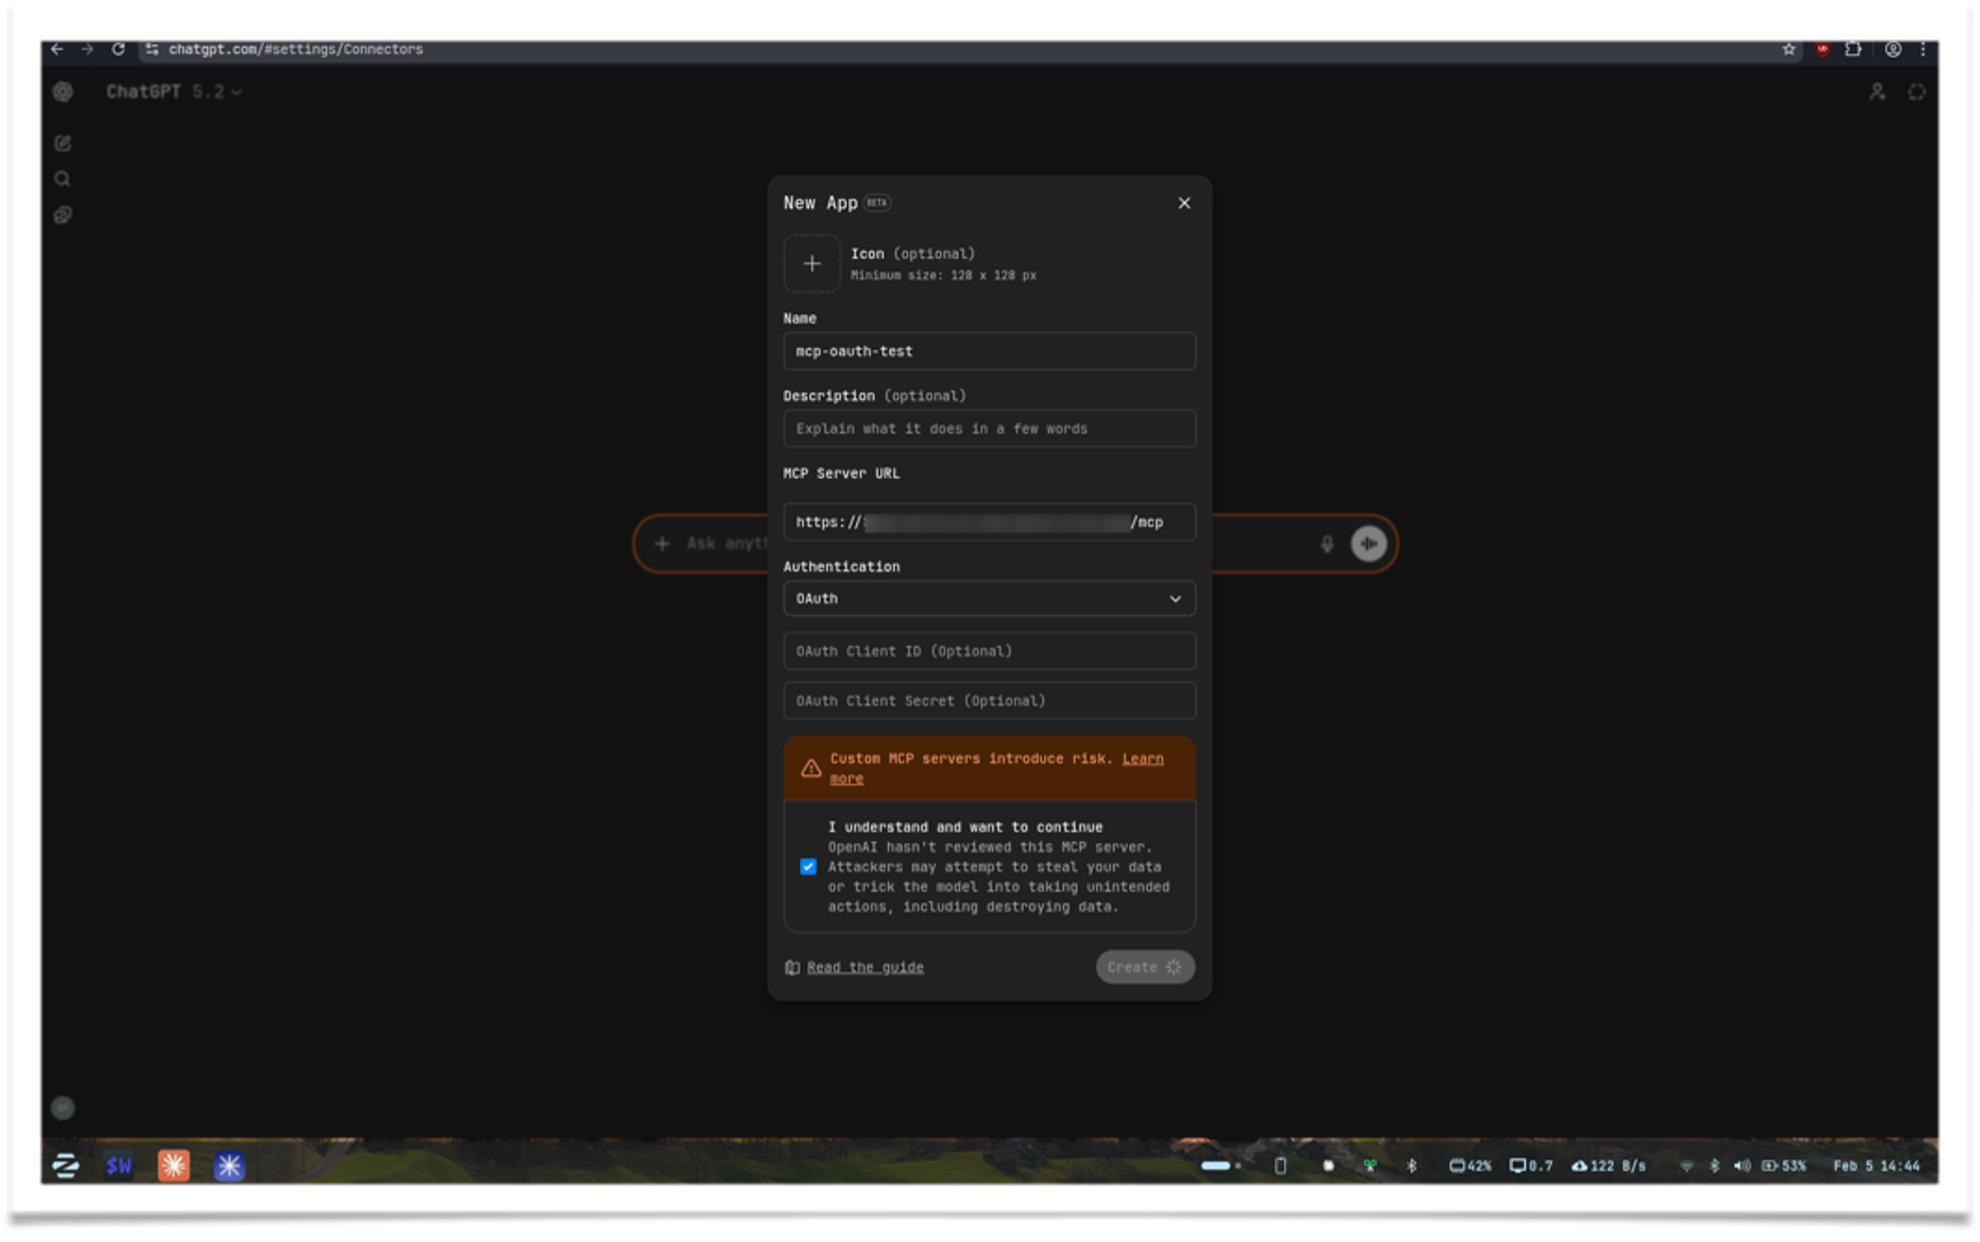
-
Click Create. It will log in and refresh the page, then you'll see your tool ready
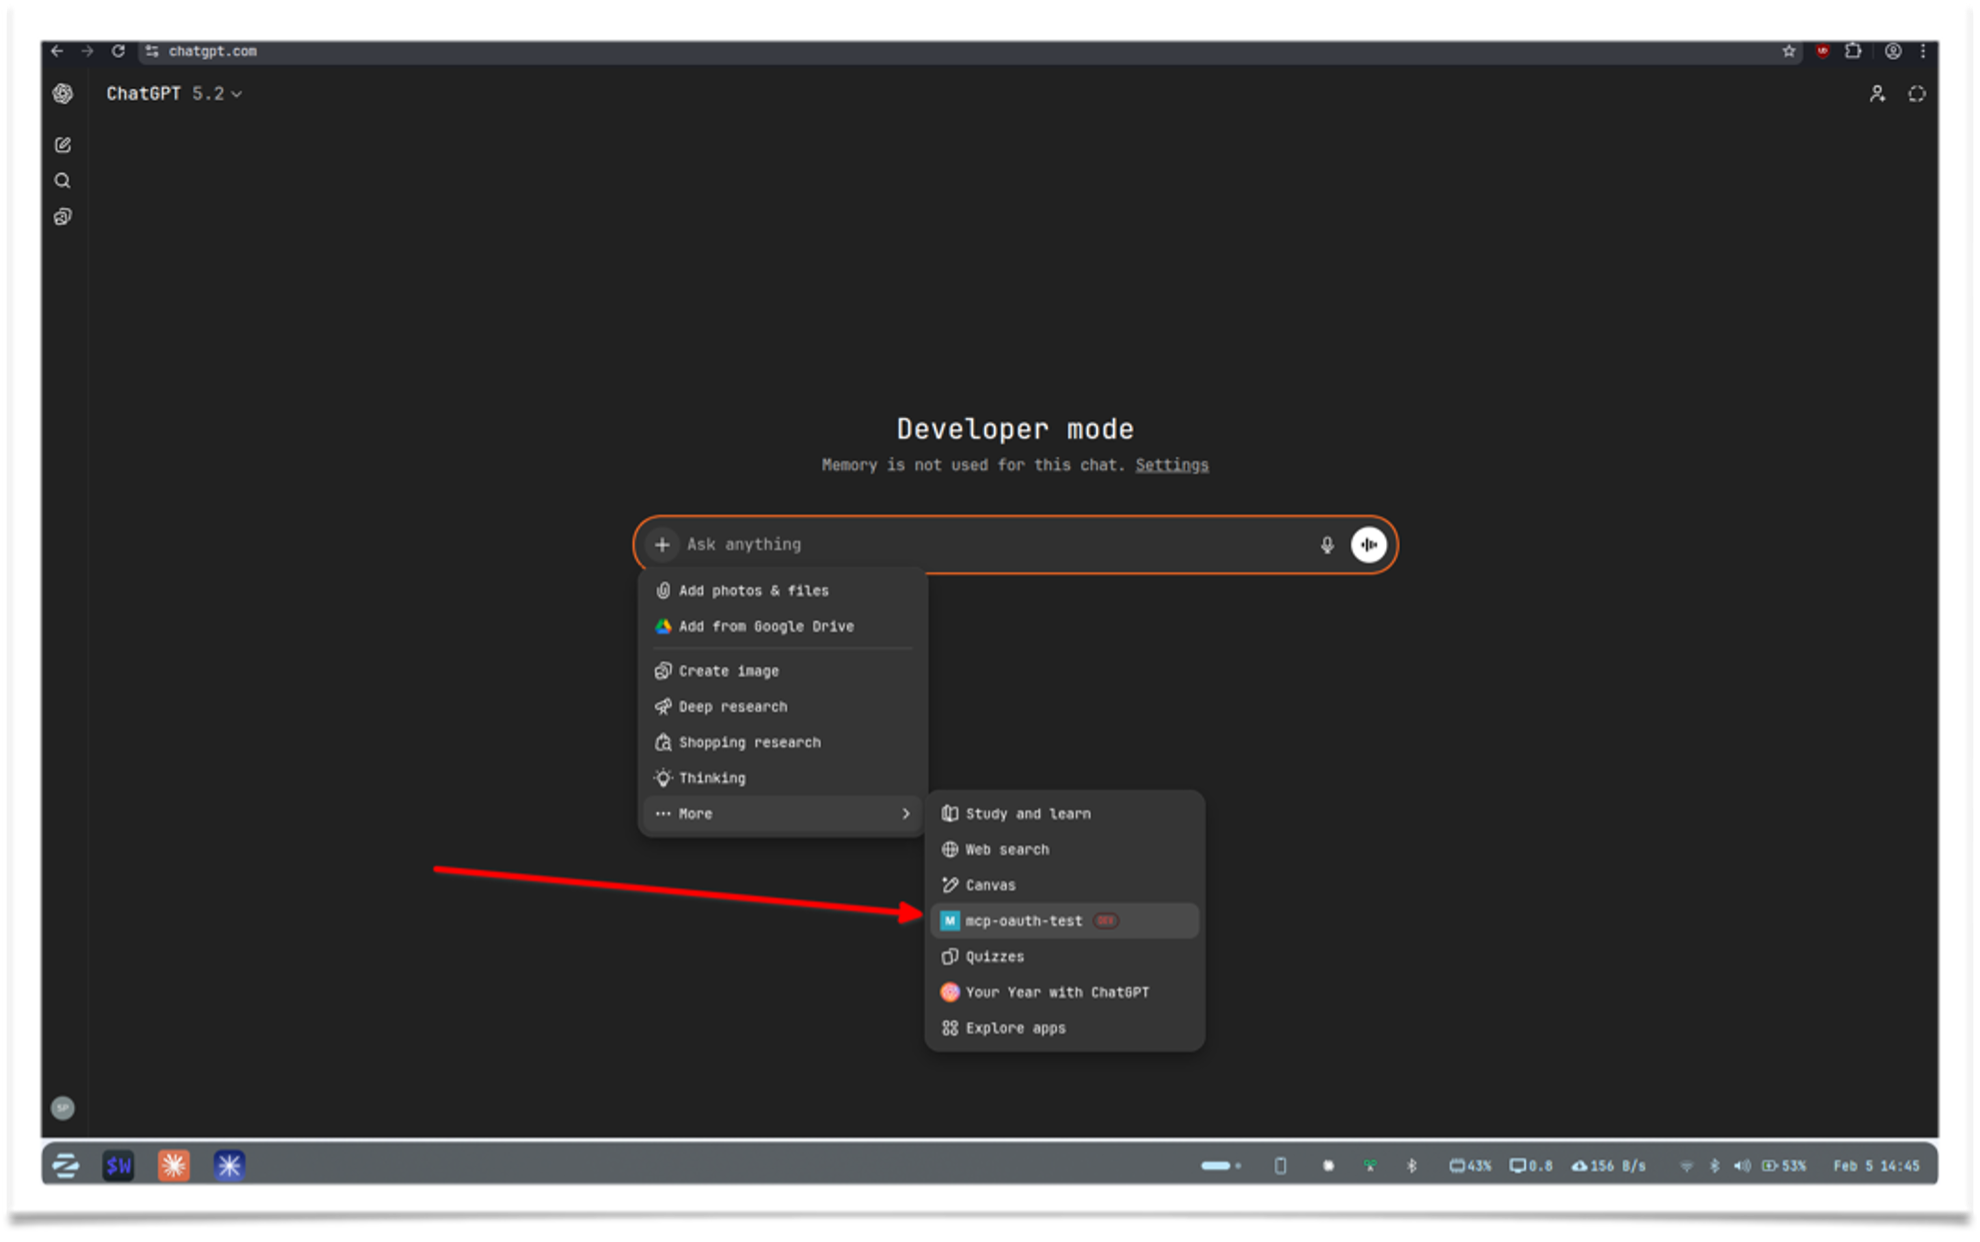
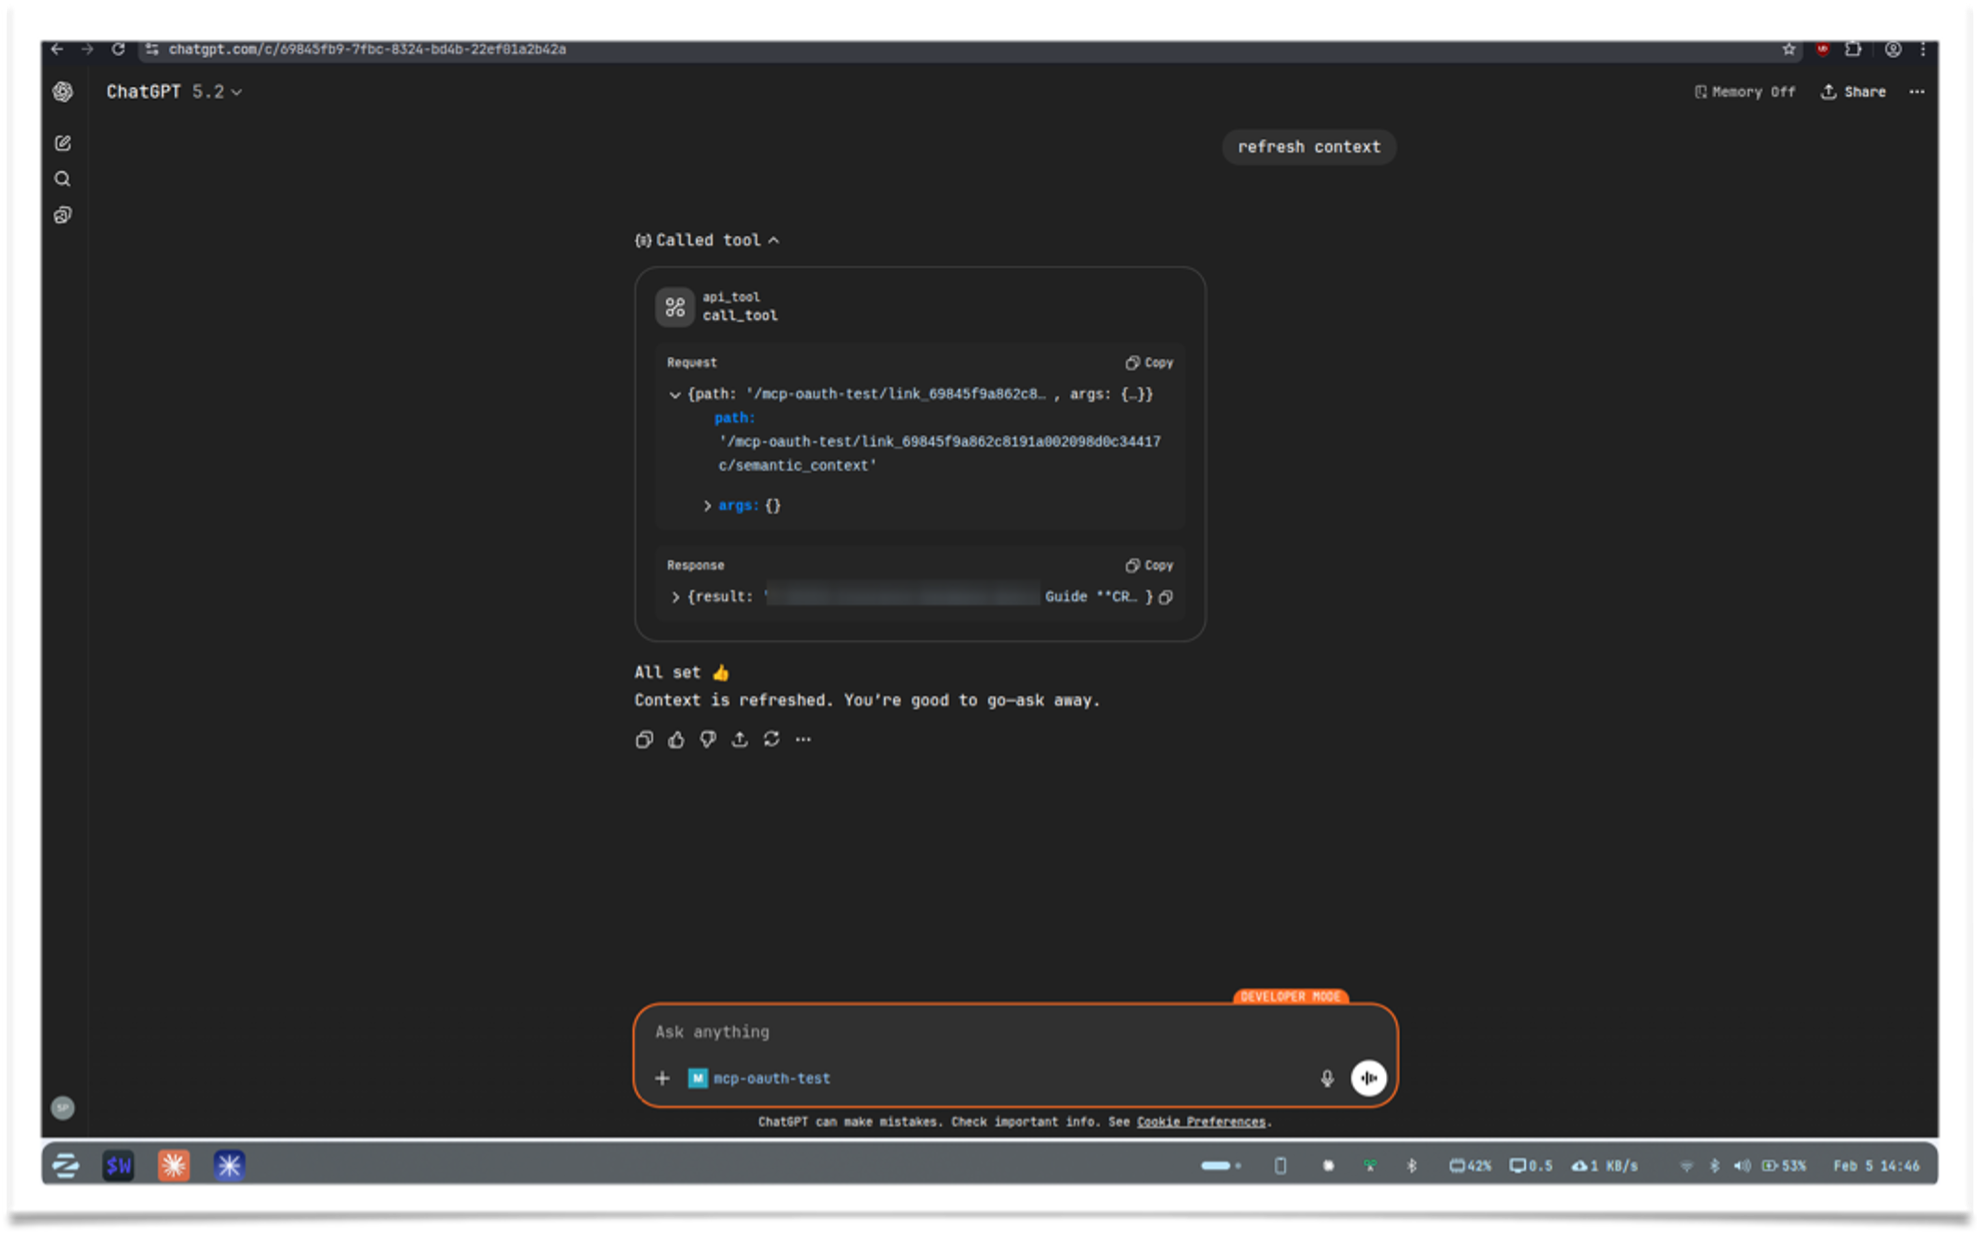
-
Select the tool and use it as shown below
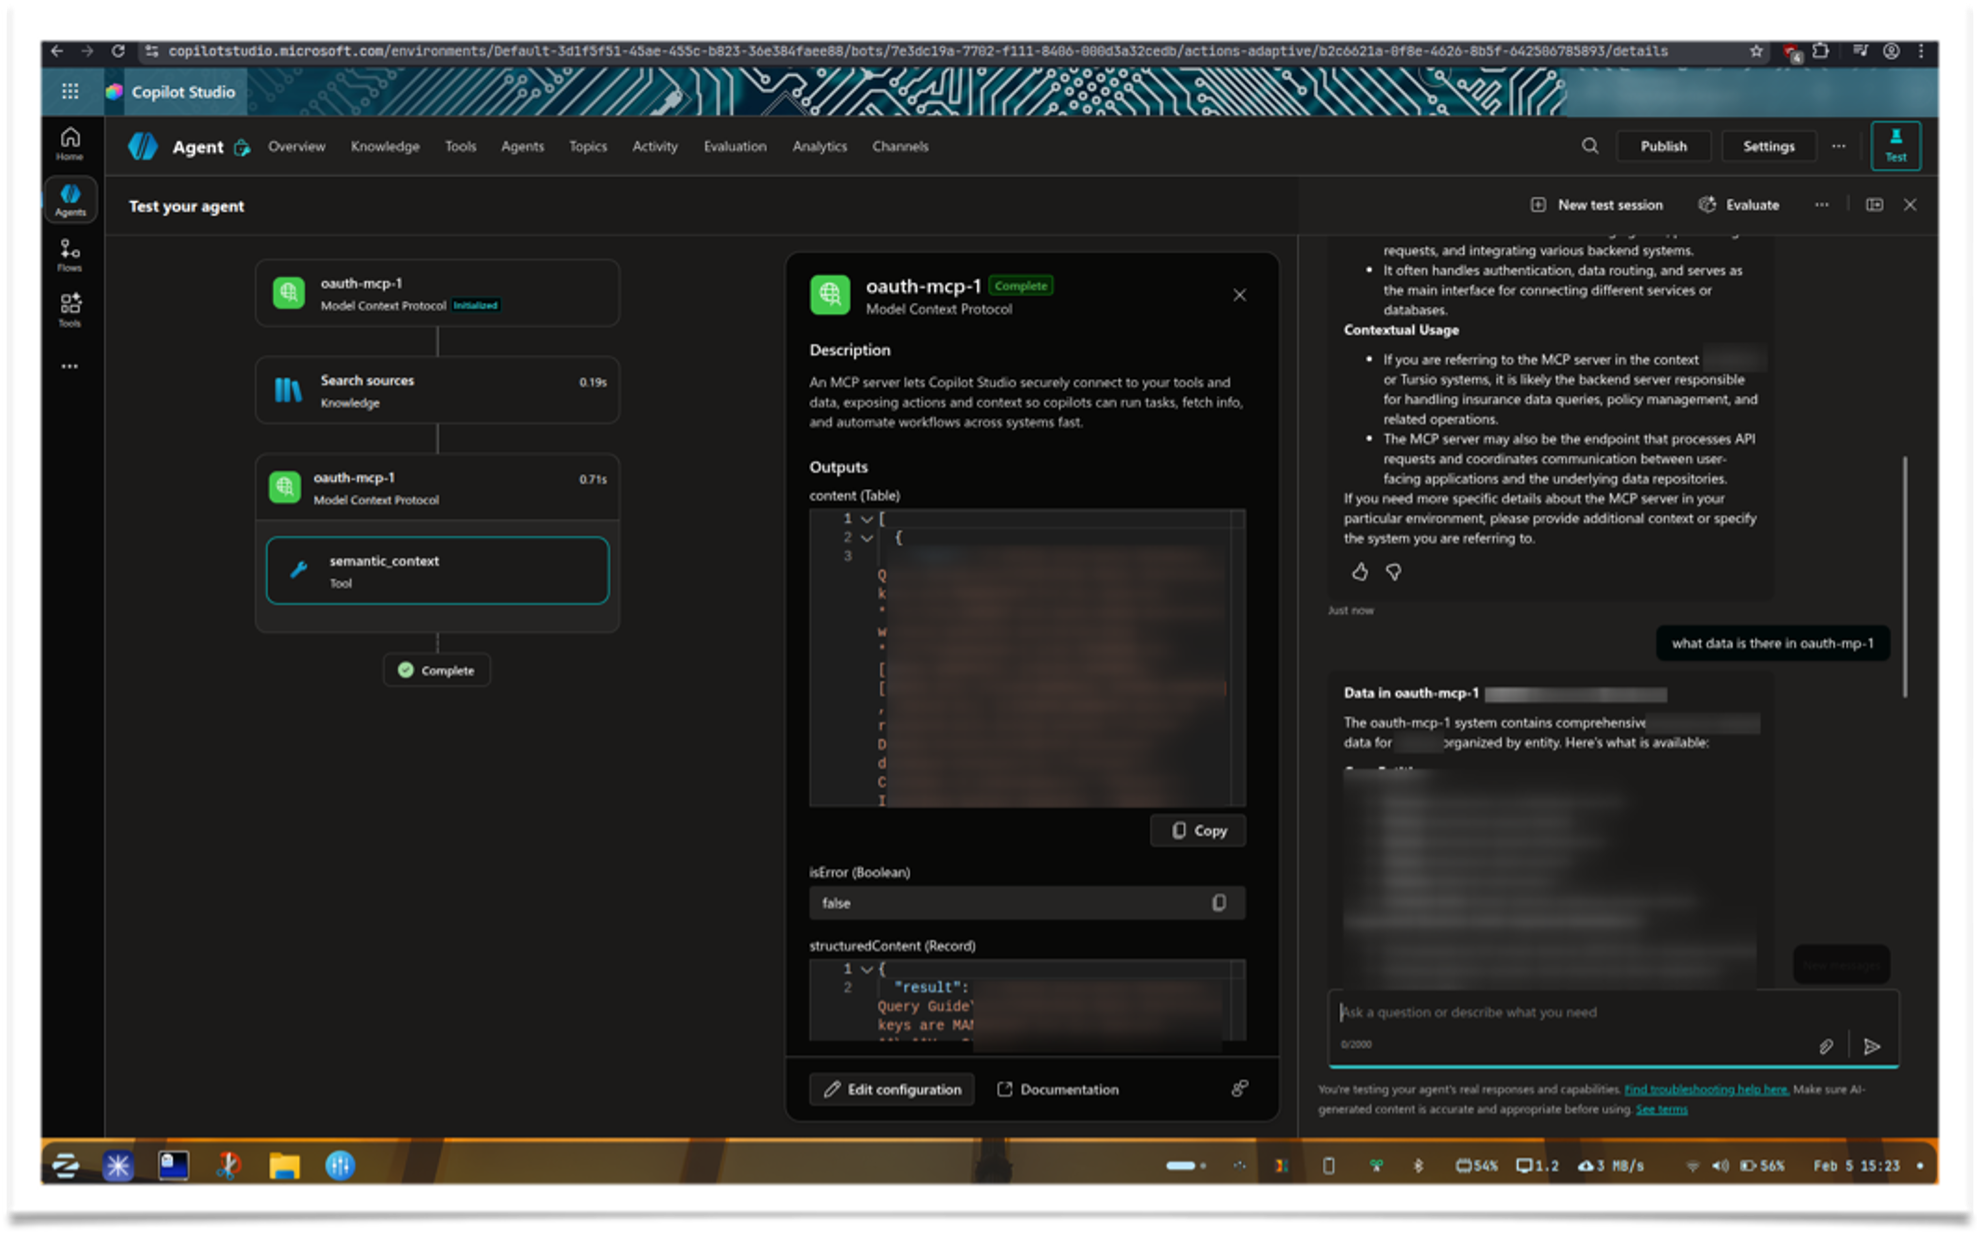
Microsoft Copilot
Availability
- Requires a Copilot Studio License. Trial or developer accounts are available.
Microsoft offers MCP support across Copilot products, with Copilot Studio providing the smoothest integration.
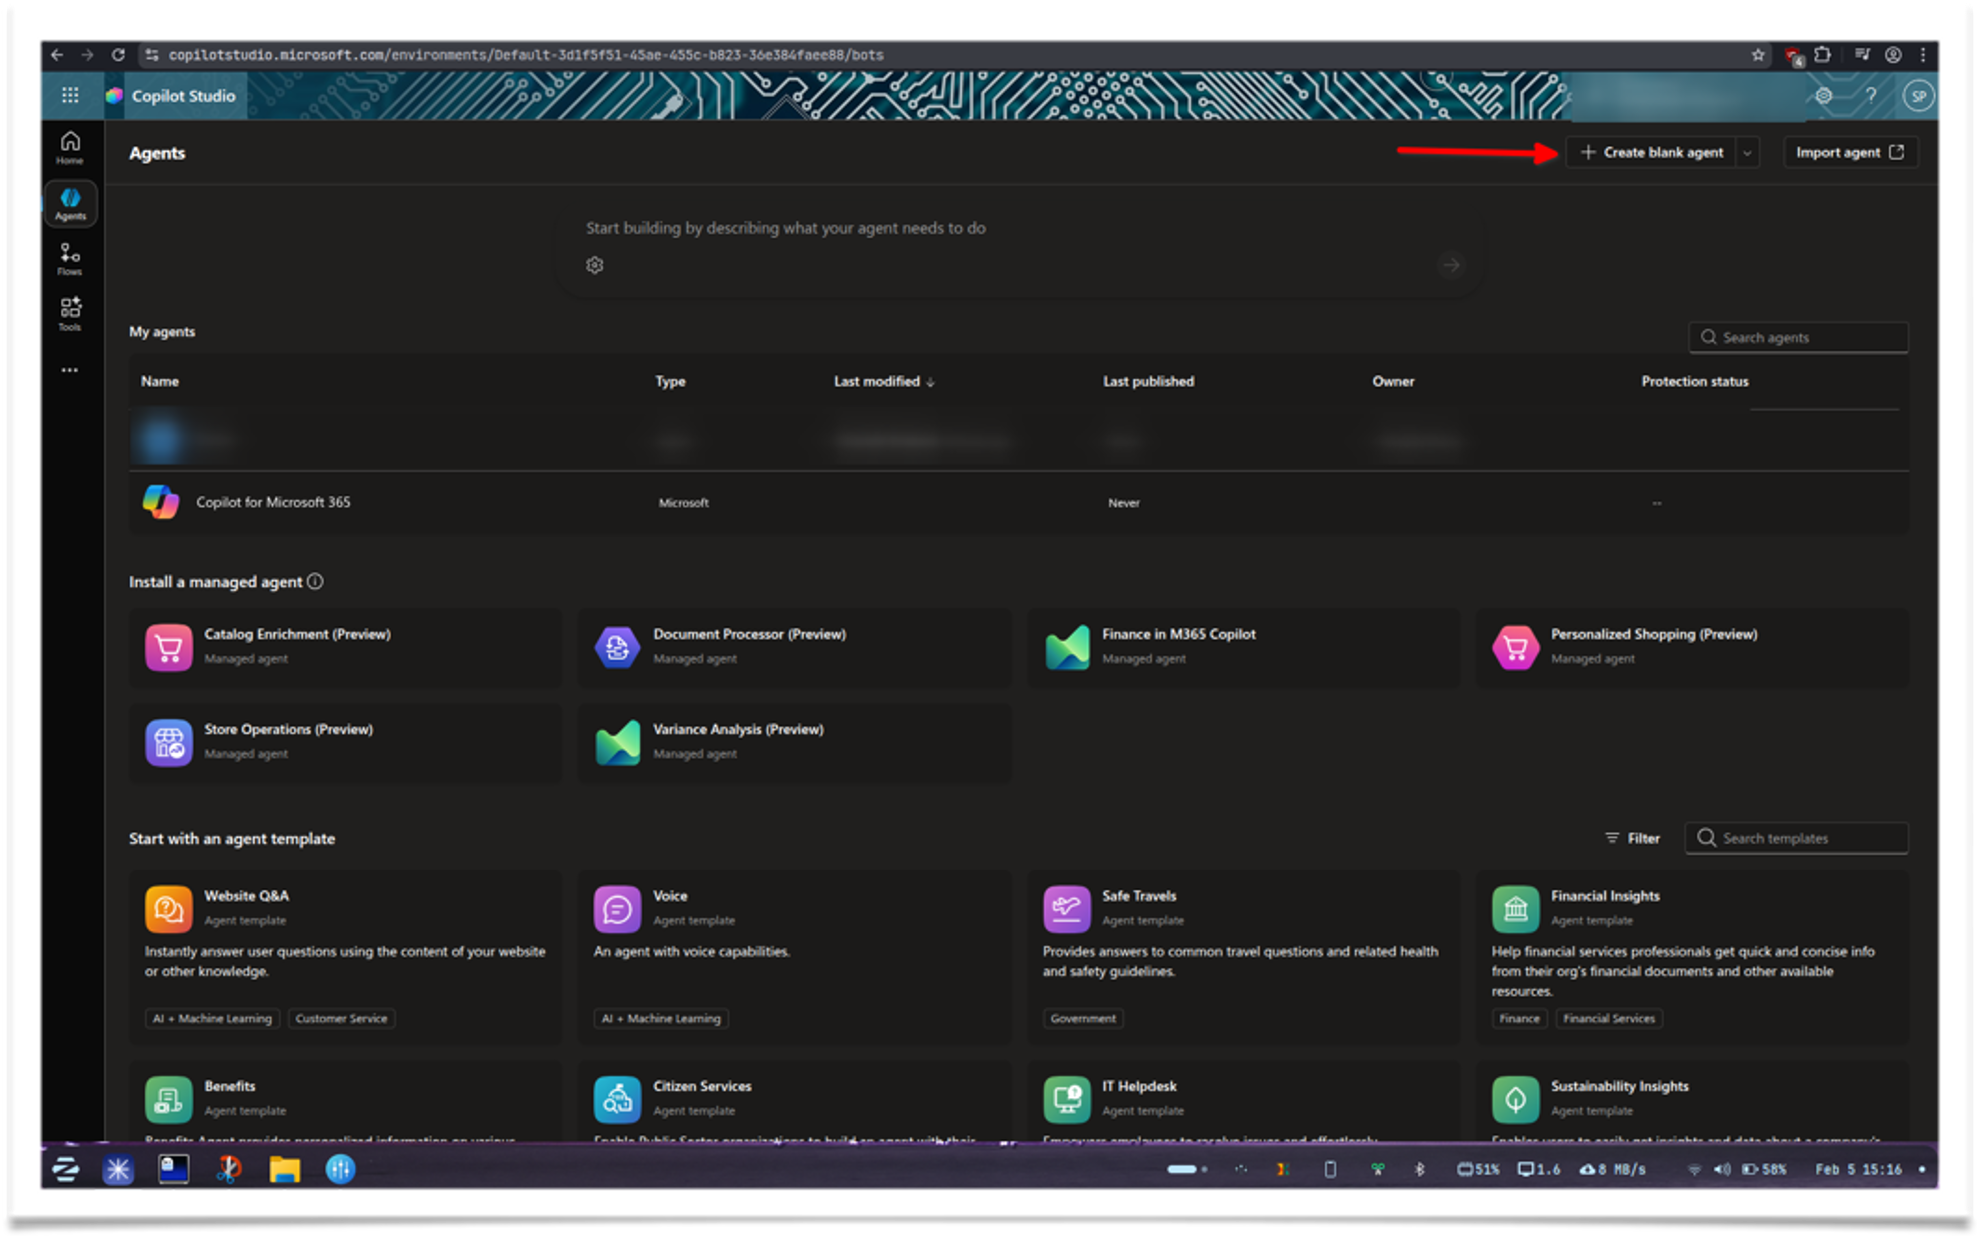
-
Open Copilot Studio and log in. Select Agents from the sidebar, then click Create blank agent
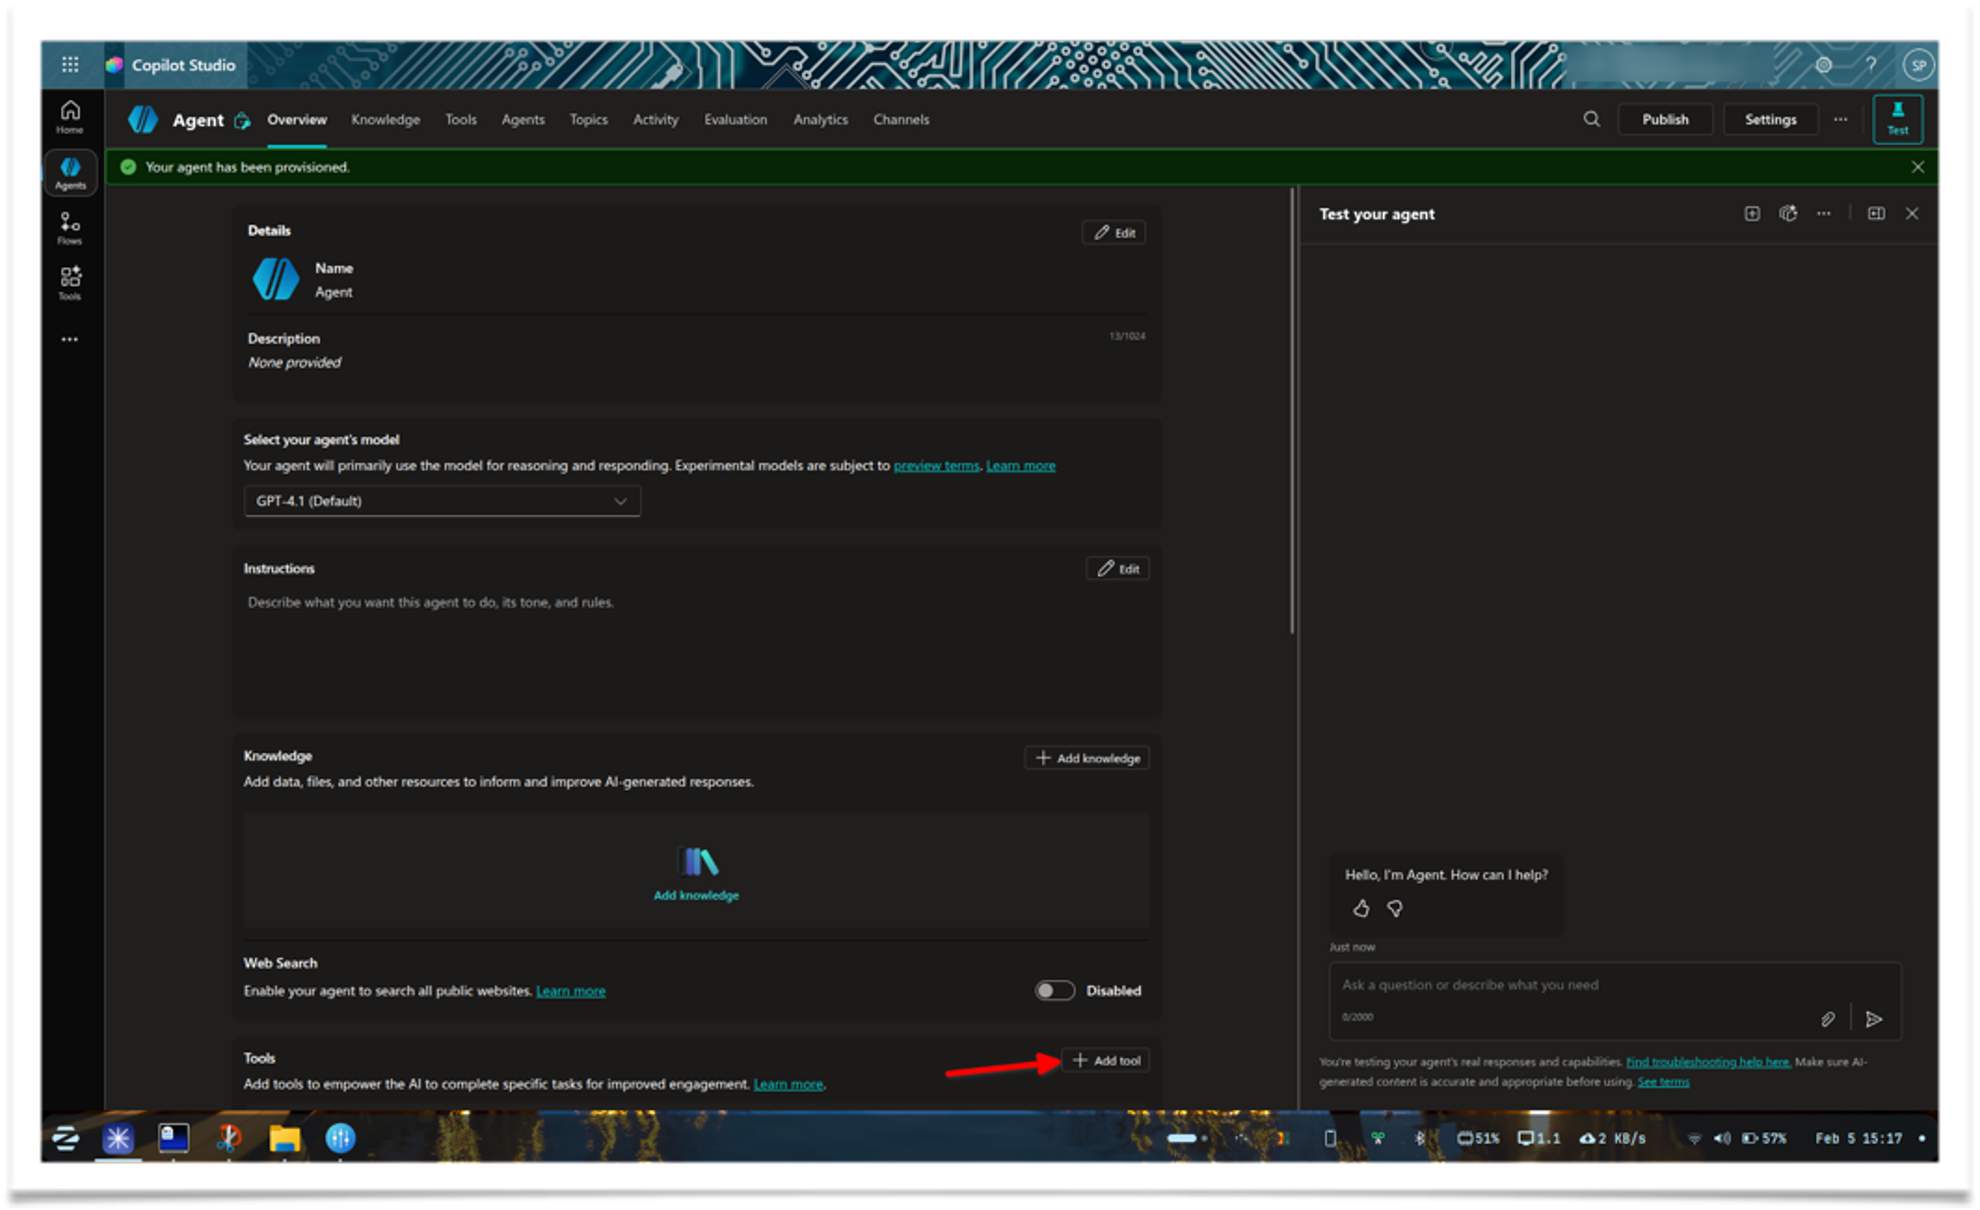
-
Wait a moment for the setup to complete. When the screen loads, click Add tool
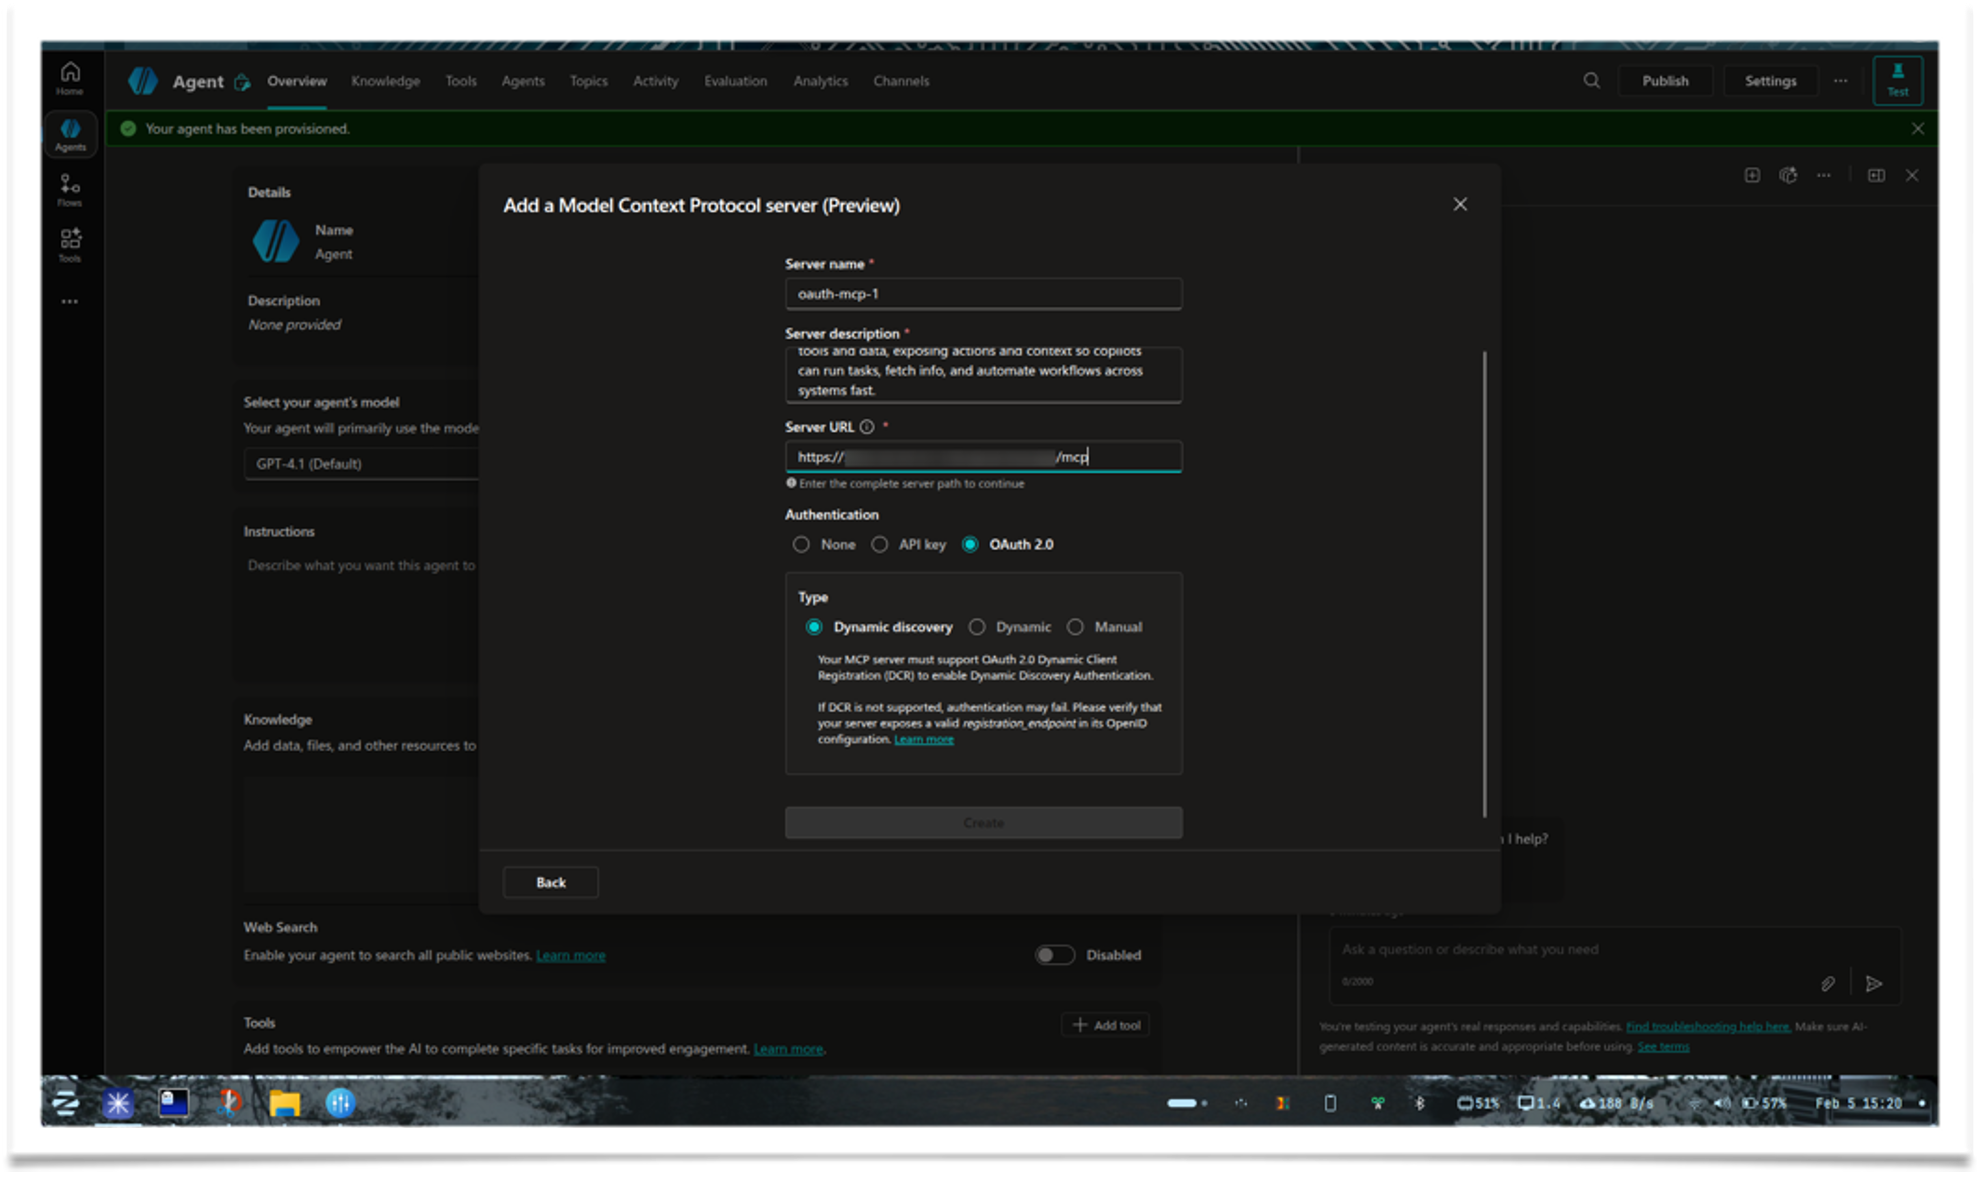
-
From the model options, choose Model Context Protocol

-
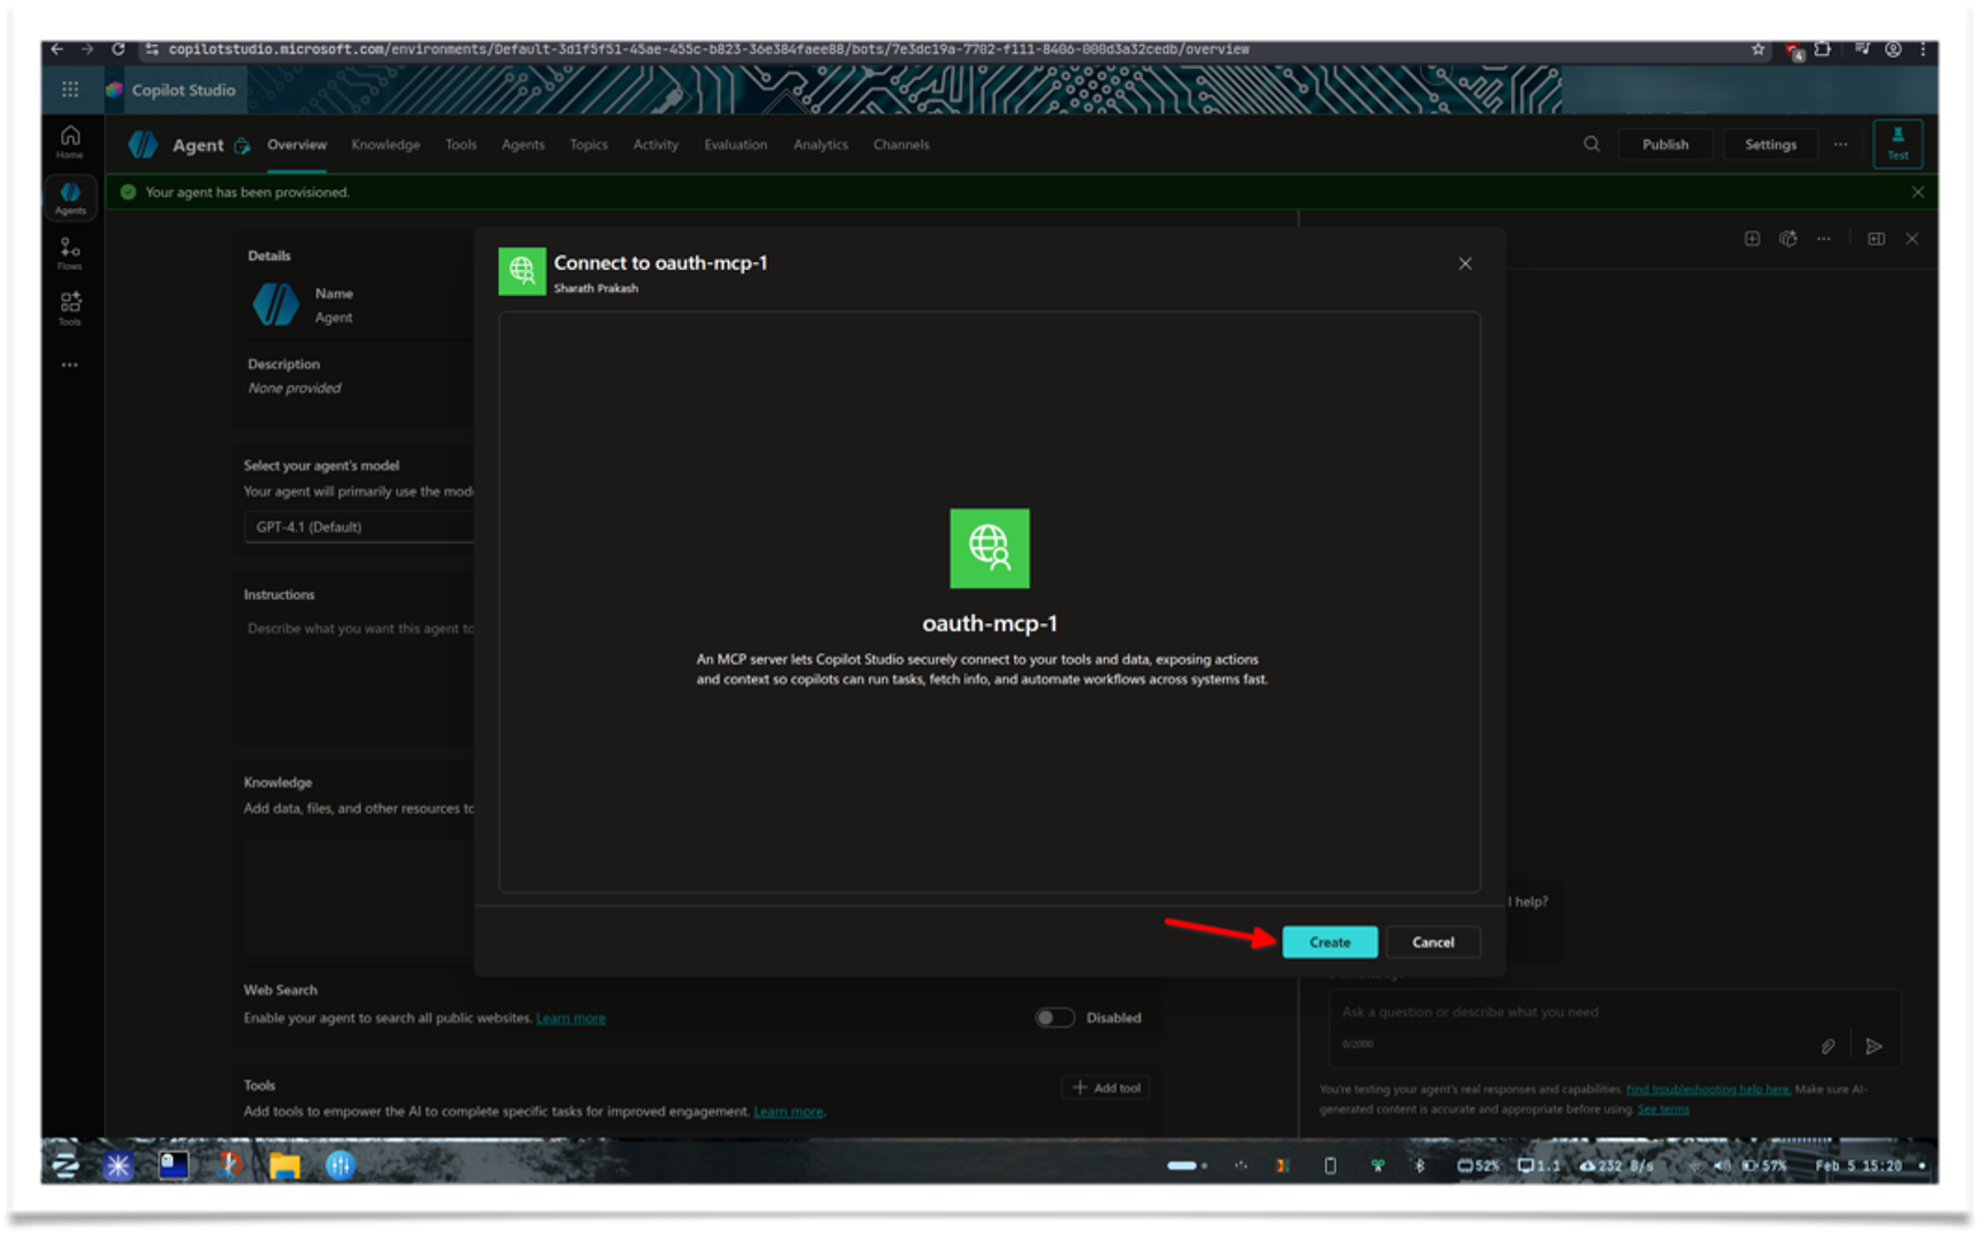
Fill in the details. Select OAuth 2.0 and Dynamic Discovery if enabled
-
Once done, click Create new connection to add a connection
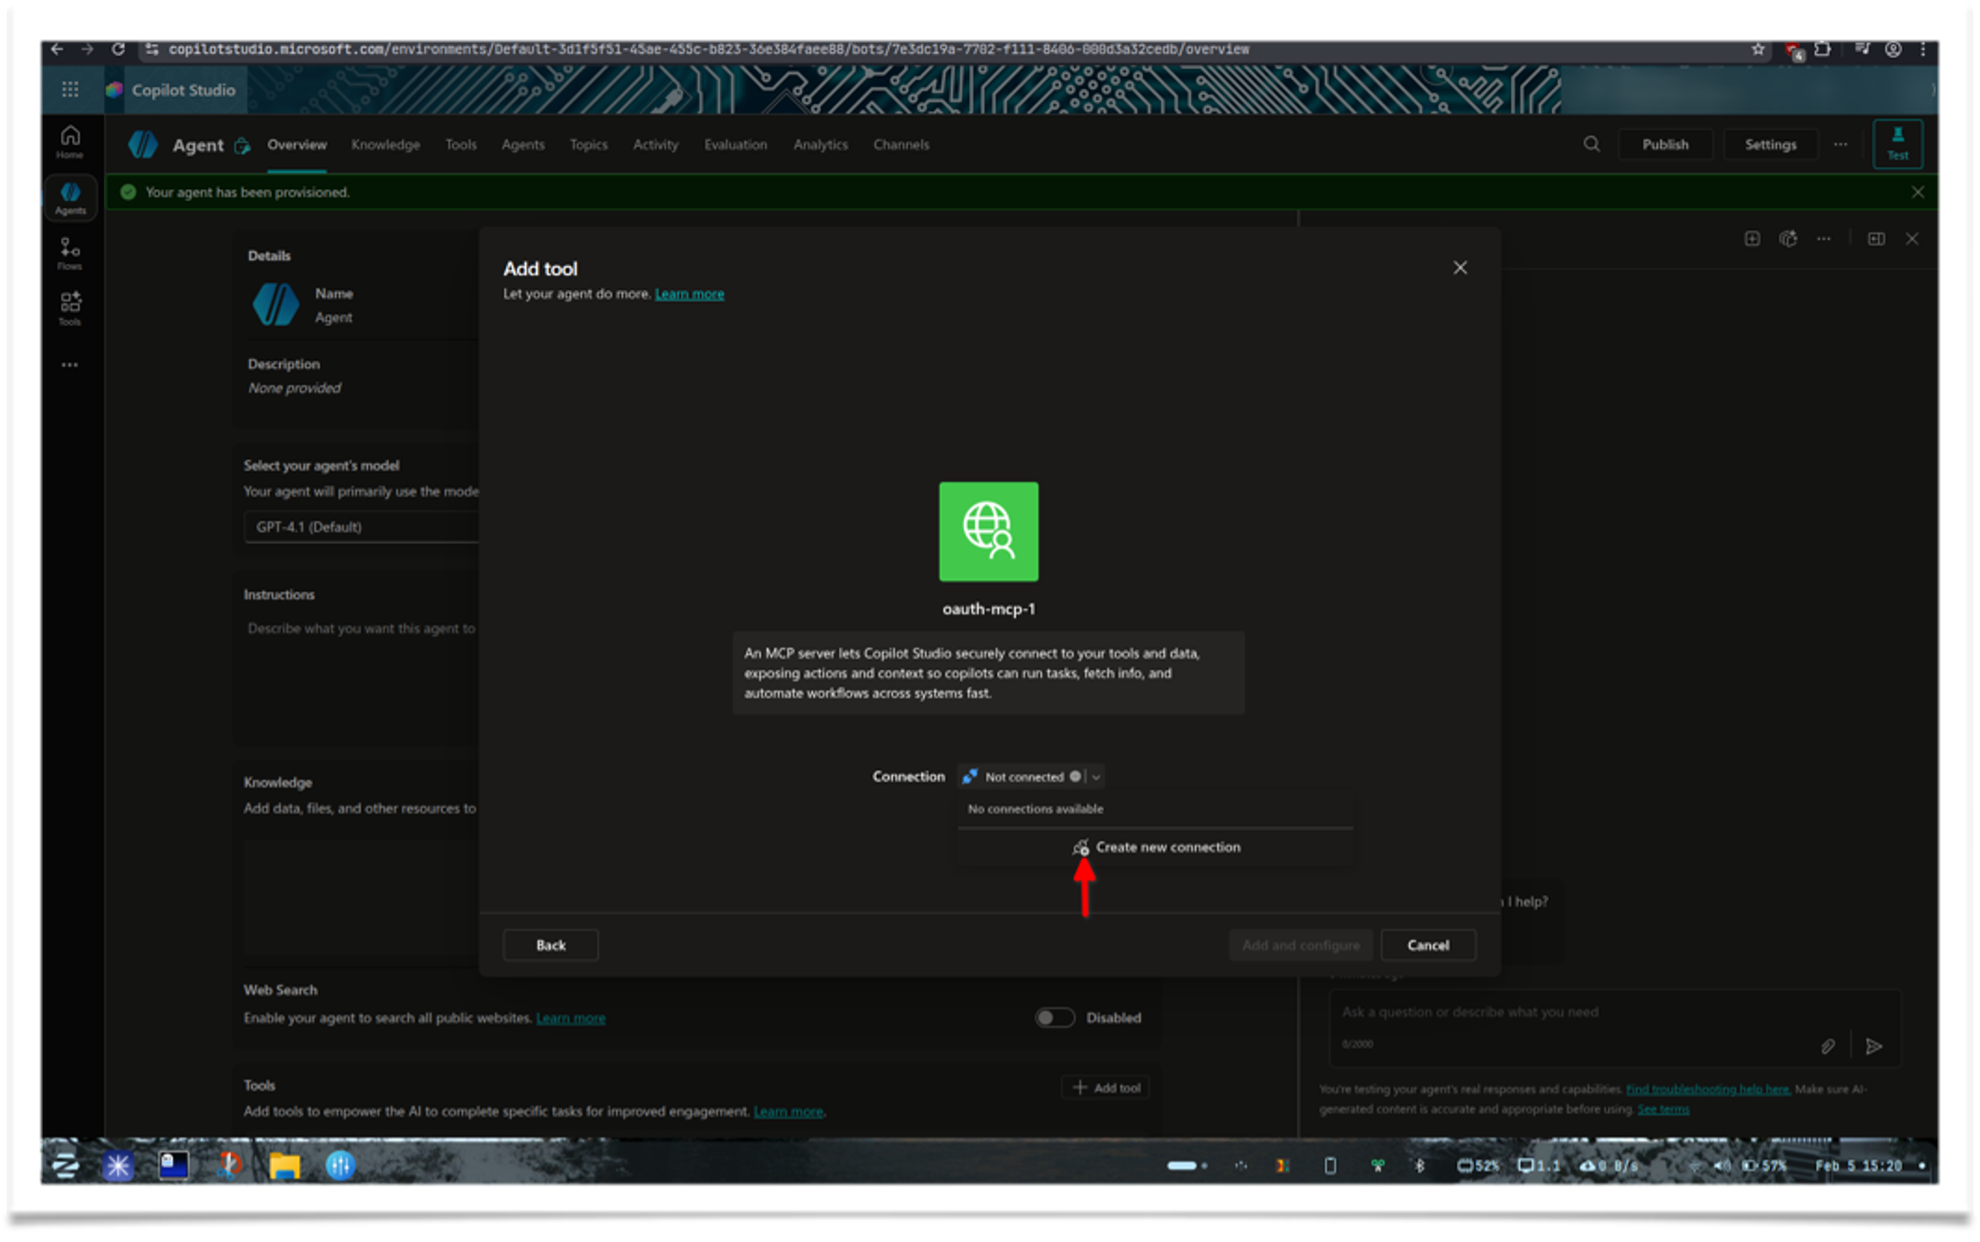
-
Click Create on the next screen. It will sign in using the URL you provided
-
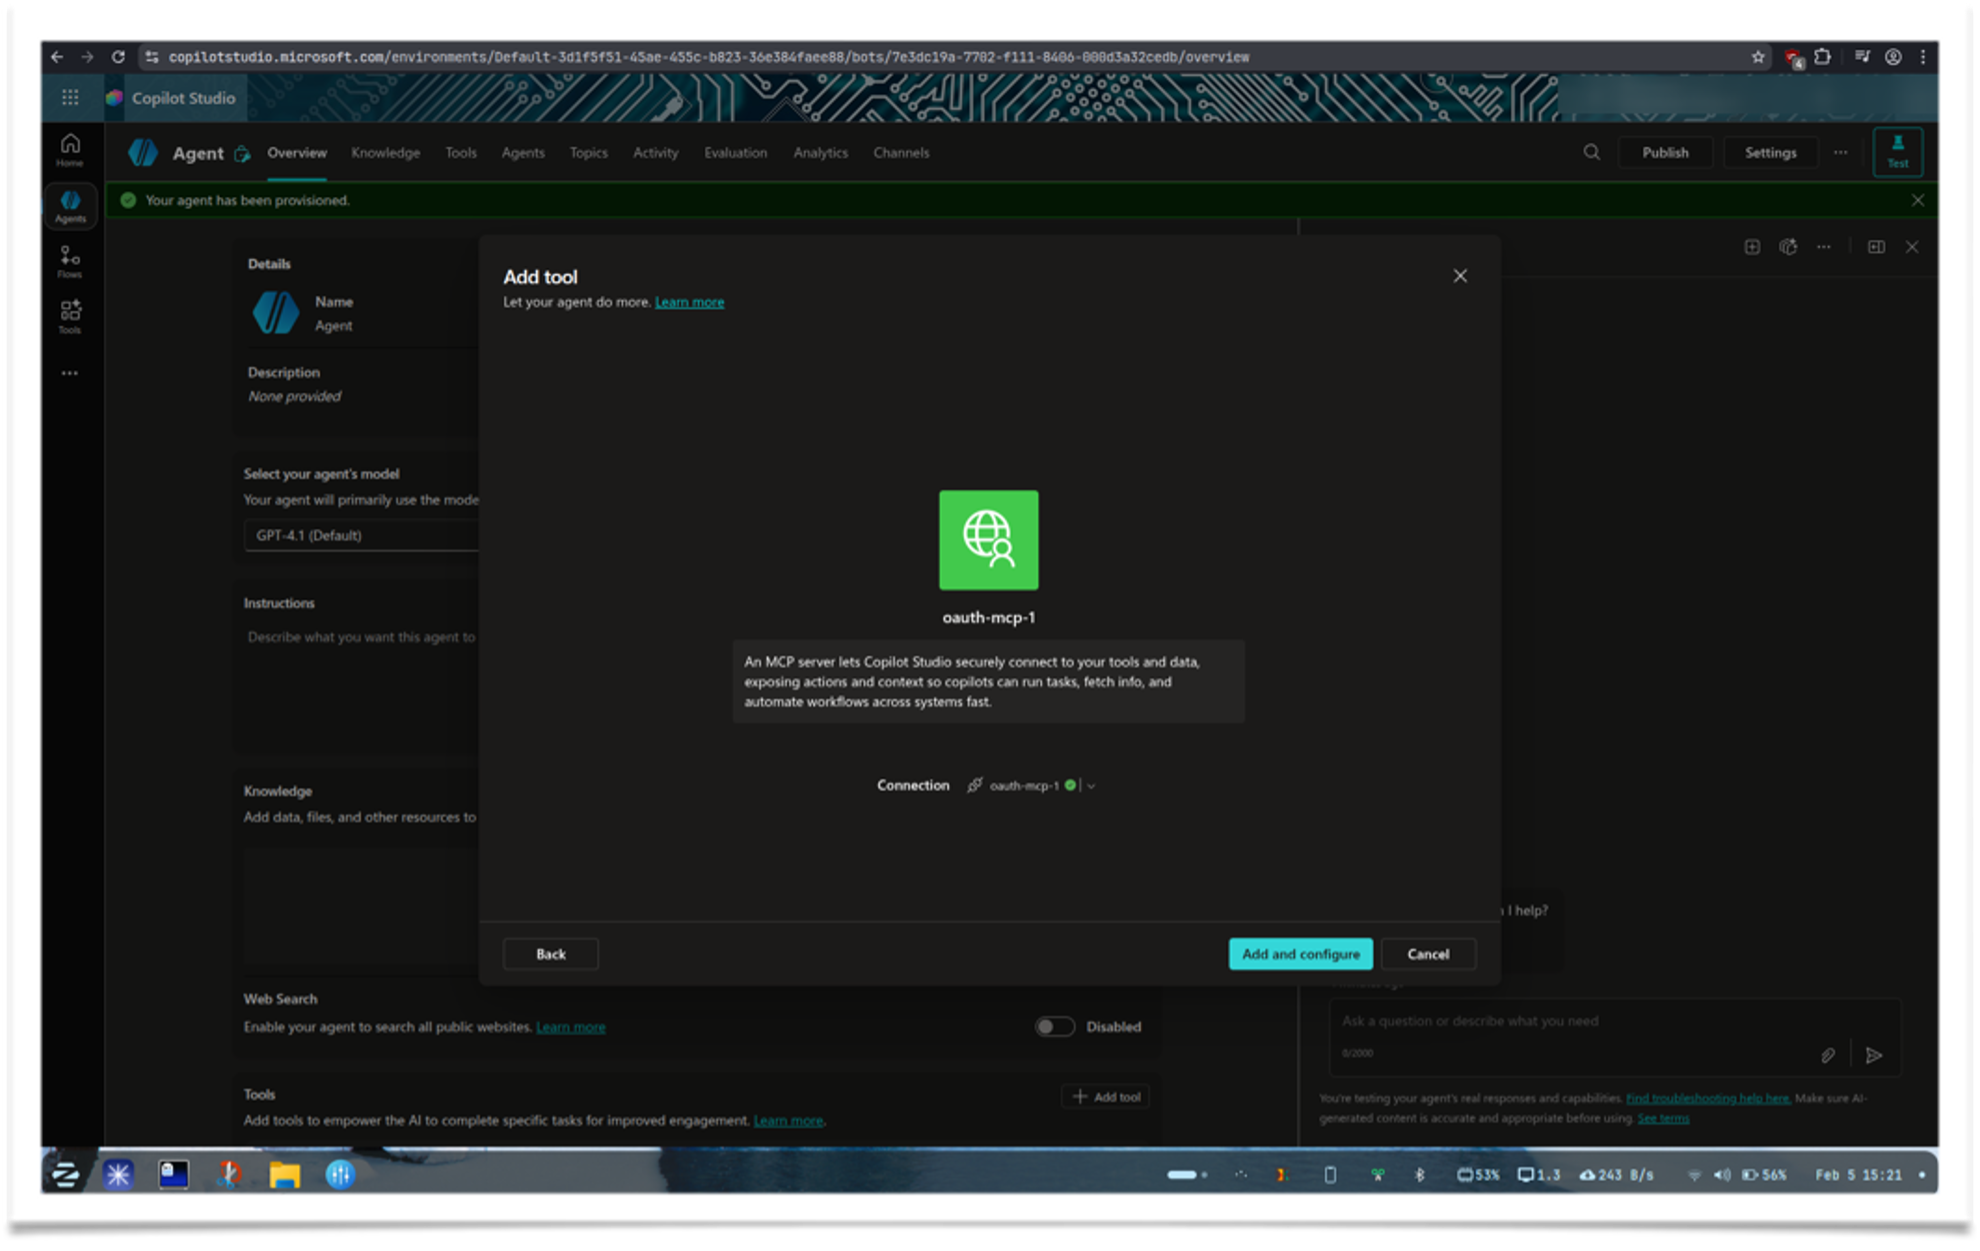
Click Add and Configure
-
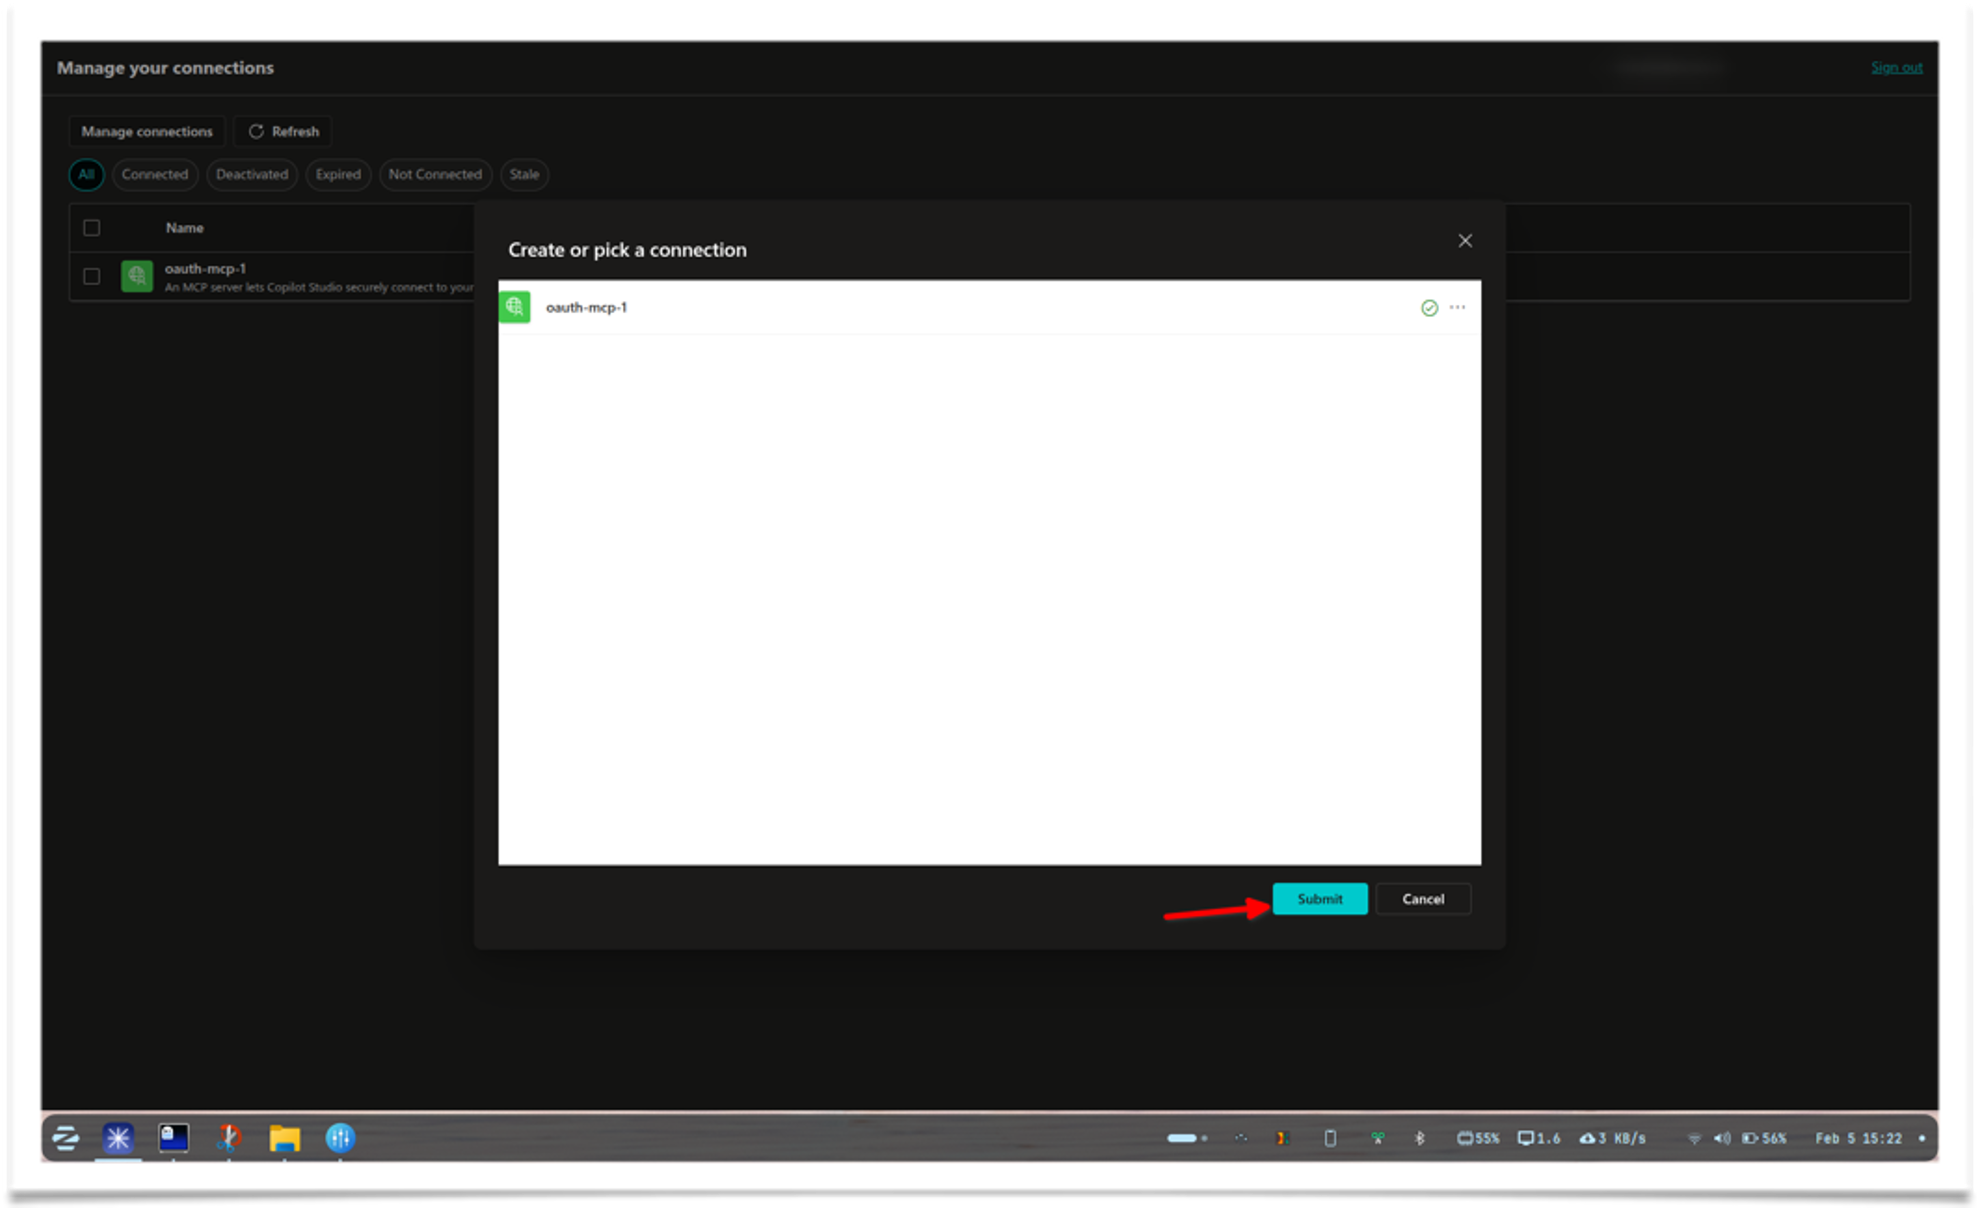
Type "hi" in the test chatbox. If prompted to configure the connection, click Open connection manager
-
Click Connect, then click Submit in the modal. A popup will appear for Microsoft OAuth login
-
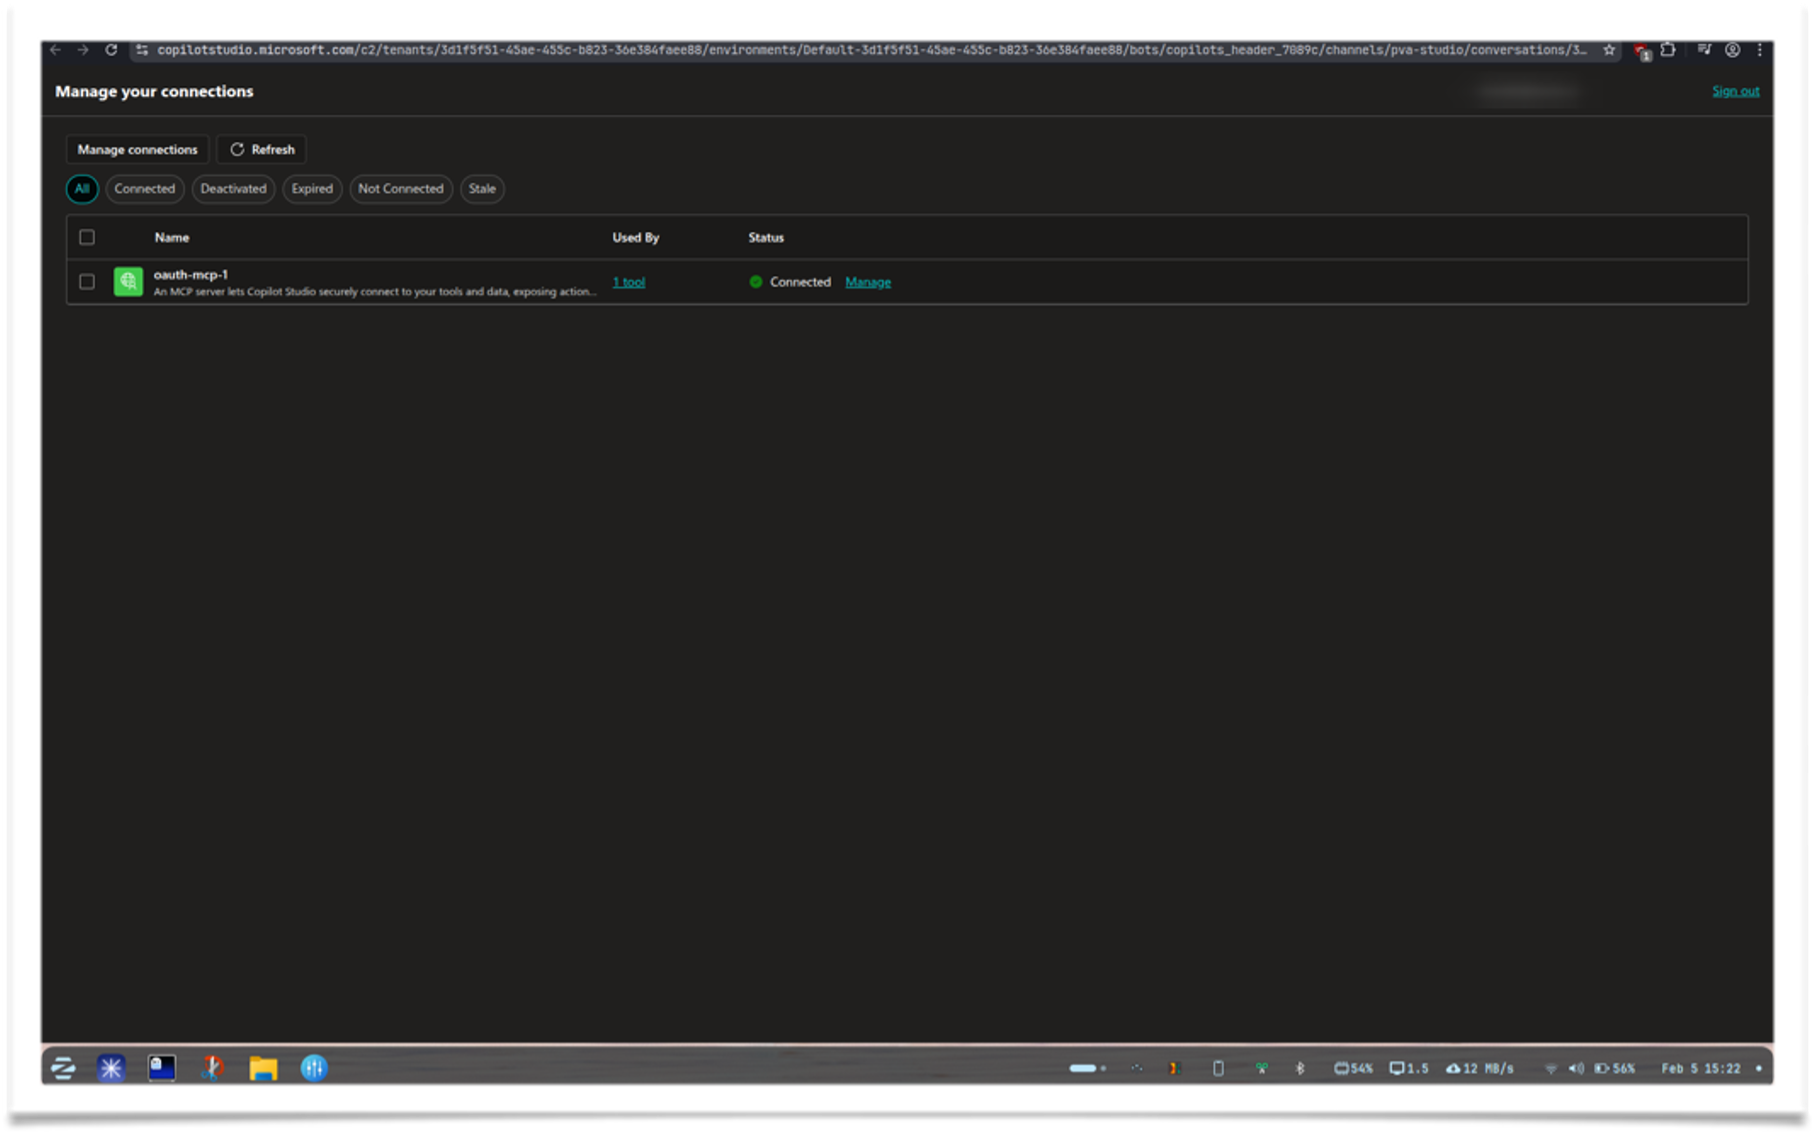
Once connected, go back to the test agent tab and try another query
Microsoft Teams
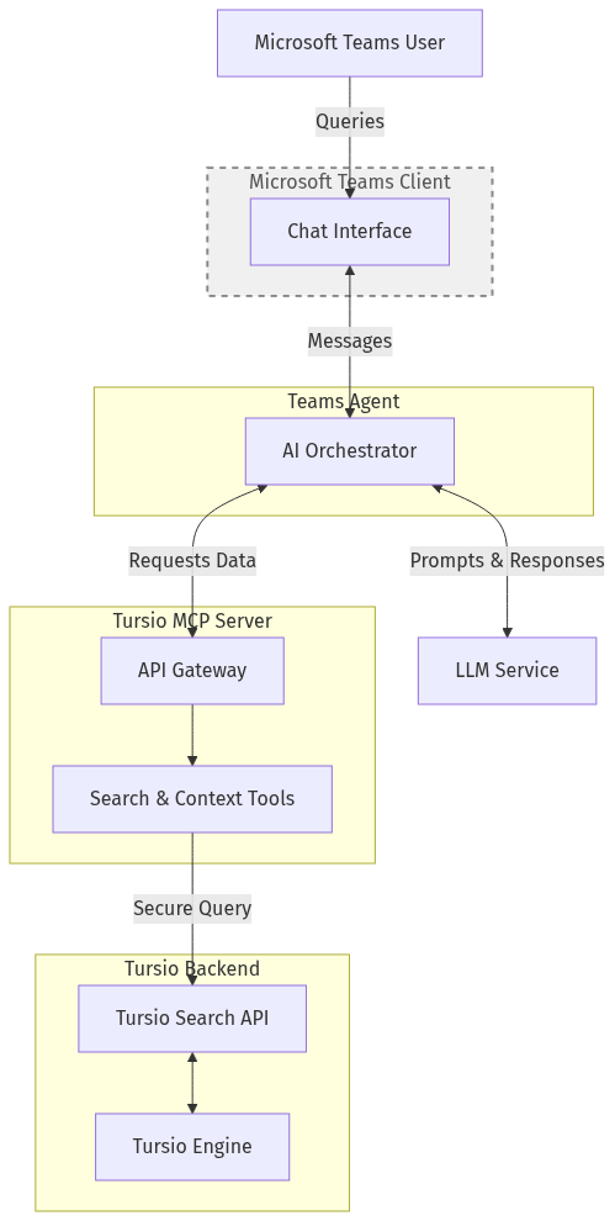
This document outlines the high-level architecture, data flows, and security model for the Tursio agent in Microsoft Teams.
System Architecture
The diagram below illustrates the high-level components and the flow of information among the user platform (Microsoft Teams), the Teams Agent, and the Tursio Backend.
Security & Authentication
The architecture enforces multiple layers of security and authentication to ensure data privacy and appropriate access control across services.
Teams Users and Client
Admins control which users have access to Tursio’s Teams Agent. Once they have access, users can use the agent in three ways:
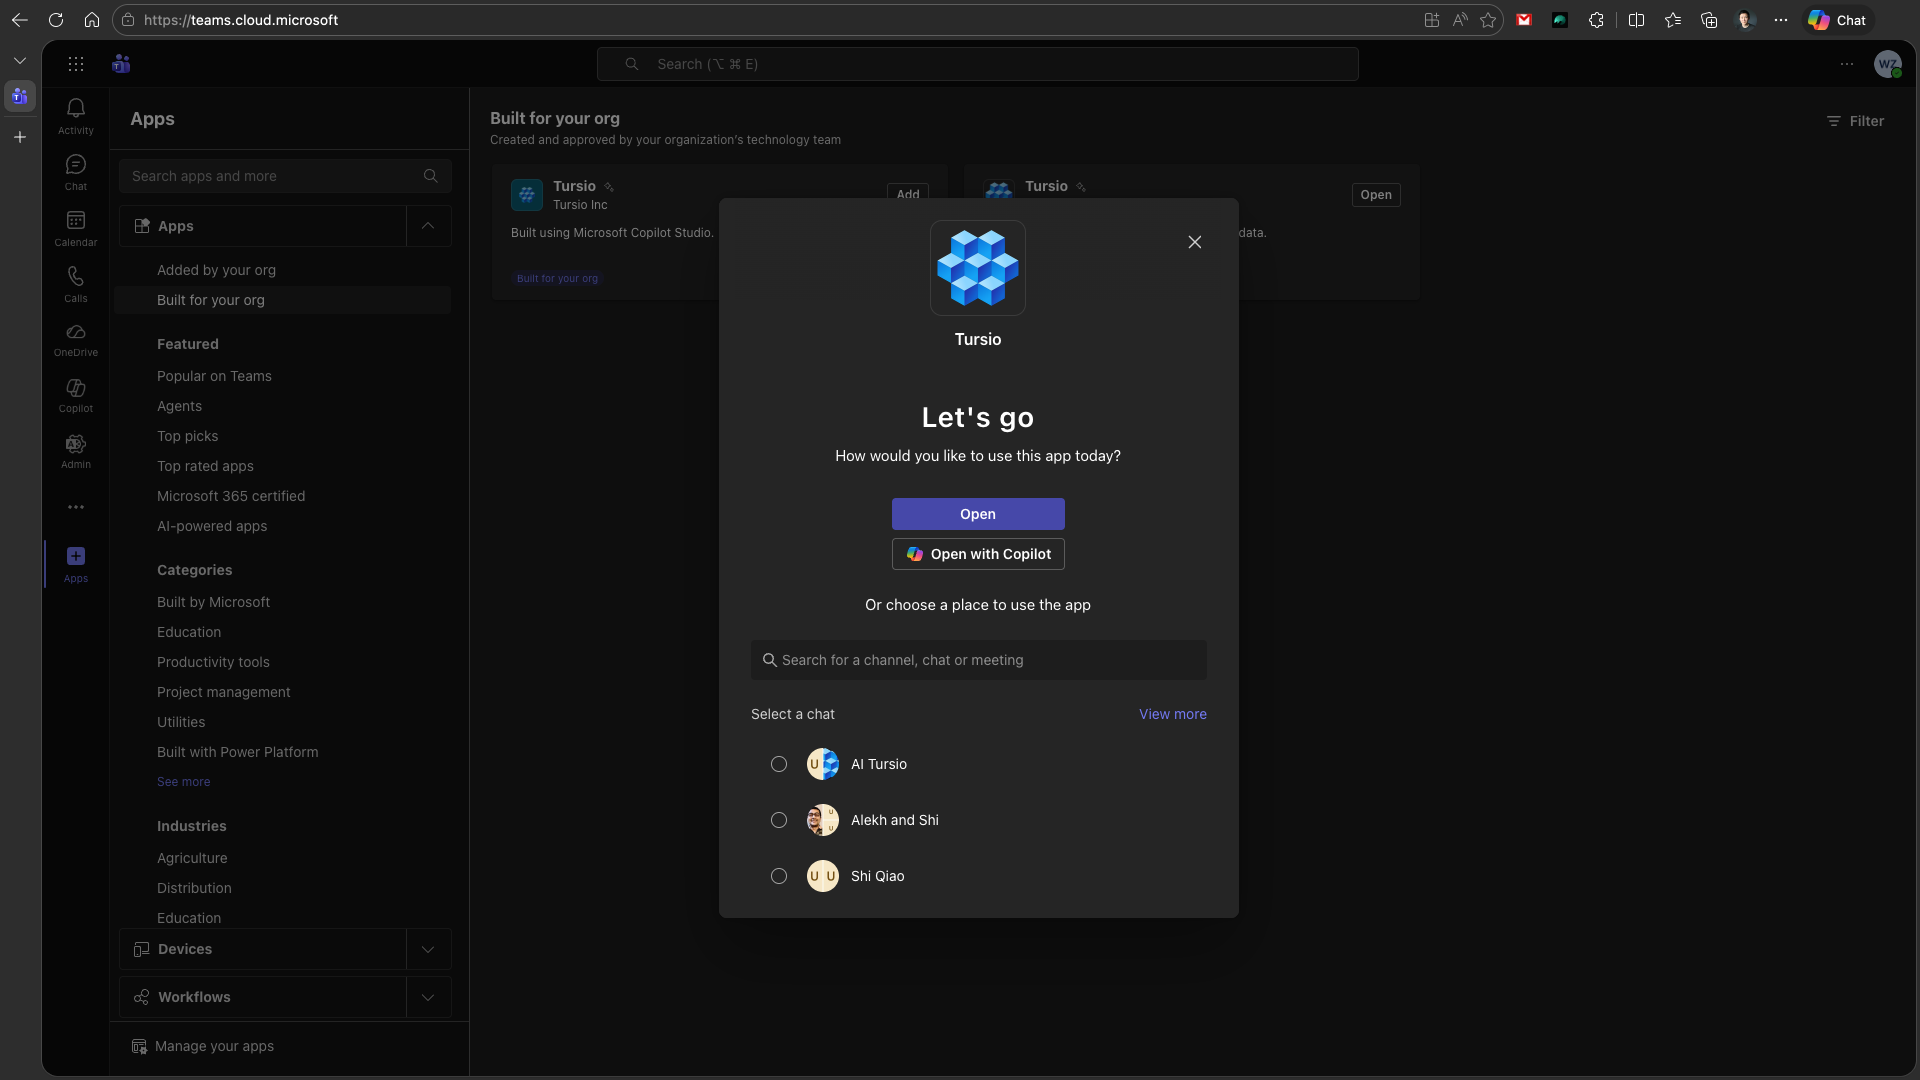
- Direct conversation: From the Apps sidebar in Teams, go to “Built for your org” and install the “Tursio” app. Once installed, choose “Open” to start a direct conversation.
- Group conversation / Channel / Meeting: People who have access to the Tursio Agent can also add it to a group chat or a channel, and only they can trigger the agent to respond. Note that anyone present in that conversation can see the responses.
- Copilot tooling: Once the “Tursio” app is installed, it can also be added as a tool in your Copilot conversation.
Teams Client to Teams Agent
All interactions originating from Microsoft Teams are securely authenticated via the Microsoft Bot Framework. This layer utilizes Entra ID (Azure Active Directory) validation. The Teams Agent verifies the cryptographic tokens attached to each incoming message to confirm user identity and tenant origin before processing the request.
Teams Agent to LLM Service
The Teams Agent communicates with the LLM Service over an encrypted TLS connection. Access is governed via OpenAI API key authorization, ensuring the reasoning engine is accessible only from approved infrastructure. Note that this LLM service is the same instance already used by the Tursio Backend.
Teams Agent to Tursio MCP Server
When the AI determines that answers must be retrieved from the Tursio backend, the Teams Agent initiates a query via the Tursio MCP Server. This connection implements OAuth 2.0 / Bearer Token authentication. The Teams Agent must hold a valid, non-expired access token, obtained through a secure authentication flow (e.g., Client Credentials), to successfully query the MCP Server.
Tursio MCP Server to Tursio Backend
The Tursio MCP Server routes the query into the core Tursio Search API. This layer uses restrictive API key authentication or license tokens tied directly to specific datasets. This ensures that even authenticated MCP Server instances can only query data repositories for which they hold explicit configuration licenses.
Note
Admins can create multiple database connections in the Tursio portal and expose one with limited data access to a MCP Server. For example, users may request a limited set of aggregated information directly within Teams, but will need to visit the Tursio portal for more details. Multiple database connections can each be exposed through a different MCP server and Teams agent, enabling proper isolation and access control.
Deployment
Deploying the Tursio Teams agent leverages the official Microsoft 365 Agents Toolkit to configure and provision the resources for hosting the Teams agent in your Azure environment.
Prerequisites
- Ensure you hold a Microsoft 365 Tenant with permissions to upload custom Teams apps.
- Have an Azure account to provide the resources and host the Teams agent online.
- Have an OpenAI API key (or Azure OpenAI setup) ready.
Required Configuration Variables
The application relies on specific environment variables. These are mapped into the execution context (maintained in a .env file locally and within the App Service configuration remotely).
Key variables (setup in environment config):
OPENAI_API_KEY: Your OpenAI or Azure AI API key.OPENAI_MODEL_NAME: e.g.,gpt-5.2or your specific deployment model name.MCP_SERVER_URL: The public HTTPS endpoint of your Tursio MCP Server (e.g.,https://demo.tursio.ai/mcp).
Deployment Process
Tursio provides a packaged Teams agent solution, and a script will automatically deploy the agent using your M365 and Azure accounts. The script internally uses the official Microsoft Teams toolkit teamsapp-cli and executes the following steps in the command line to guide the deployment process:
- Log in to your Microsoft 365 (Teams) account
- Log in to your Azure account (to create the infrastructure)
- Provision the Azure resources for the Tursio Teams agent
- Deploy the agent to the newly created Azure App Service
- Submit to publish the agent app to your Teams admin portal
After the agent is deployed, you can navigate to the Teams admin portal to approve the app and publish it to your org. Once published, organization members can install the Tursio Teams Agent as an app within their Teams client, while administrators can configure policies to control app access for specific user groups.
Audit Logs
The Teams logs are available for the admins in the Teams admin panel. For direct or copilot conversation, the respective activities are logged. For group conversation, the activity for adding and triggering the agent is also logged.
All requests by the Tursio Agent to the Tursio Backend are logged into the Tursio portal.
Customization
Path-Based Routing — Multiple Tenants on a Single Public IP
Use this setup when you need to run multiple MCP server instances behind a single public endpoint, each serving a different tenant or dataset.
Each instance runs as a separate MCP server instance or service and is assigned a unique path prefix. A reverse proxy (e.g. Azure Application Gateway) routes requests to the correct instance based on the path — with no URL rewriting.
| Tenant | Path Prefix | Connector URL |
|---|---|---|
| Tenant A | /tenant-a |
https://<host>/tenant-a/mcp |
| Tenant B | /tenant-b |
https://<host>/tenant-b/mcp |
Each MCP server instance must be configured with:
PATH_PREFIX— the path prefix assigned to that instance (e.g./tenant-a)PUBLIC_URL— the full public base URL including the prefix (e.g.https://<host>/tenant-a)
Configuration by Deployment Mode
Deploy one mcp-server.yaml per tenant, each with its own namespace or a distinct deployment name. In the ConfigMap, set:
PATH_PREFIX: "/tenant-a"
PUBLIC_URL: "https://<host>/tenant-a"
OAUTH_ENABLED: "true"
MICROSOFT_CLIENT_ID: "paste-your-client-id-here"
MICROSOFT_TENANT_ID: "paste-your-tenant-id-here"
And in the Secret:
Repeat with /tenant-b and https://<host>/tenant-b for the second tenant.
Run a separate compose.yaml per tenant in its own directory, each with its own .env file:
# Tenant A — .env
PATH_PREFIX=/tenant-a
PUBLIC_URL=https://<host>/tenant-a
OAUTH_ENABLED=true
MICROSOFT_CLIENT_ID=paste-your-client-id-here
MICROSOFT_CLIENT_SECRET=paste-your-client-secret-here
MICROSOFT_TENANT_ID=paste-your-tenant-id-here
# Tenant B — .env
PATH_PREFIX=/tenant-b
PUBLIC_URL=https://<host>/tenant-b
OAUTH_ENABLED=true
MICROSOFT_CLIENT_ID=paste-your-client-id-here
MICROSOFT_CLIENT_SECRET=paste-your-client-secret-here
MICROSOFT_TENANT_ID=paste-your-tenant-id-here
Each tenant's compose stack must use a different host port (e.g. 8001 and 8002). The reverse proxy routes to those ports based on path.
Edit each instance's config file at /opt/tursio-mcp/mcp/server/configs/<your-config>.yaml and set:
path_prefix: /tenant-a
public_url: https://<host>/tenant-a
oauth_enabled: true
microsoft_client_id: paste-your-client-id-here
microsoft_client_secret: paste-your-client-secret-here
microsoft_tenant_id: paste-your-tenant-id-here
Run each instance on a different port and configure your reverse proxy to forward to the correct port based on path.
How PATH_PREFIX Works
Each MCP pod uses PATH_PREFIX to know which requests belong to it. The gateway forwards the full path unchanged — the pod reads the prefix, registers its routes under it, and strips it internally before processing.
Request: GET /tenant-a/mcp
    ↓
Gateway matches /tenant-a/* → forwards to Pod A (no URL rewrite)
    ↓
Pod A reads PATH_PREFIX=/tenant-a → handles /mcp
    ↓
Response: 200 OK
The same instance also registers tenant-specific OAuth discovery endpoints with the tenant identifier as a path segment after /.well-known/oauth-authorization-server/ (e.g. /.well-known/oauth-authorization-server/tenant-a), which is why the gateway needs explicit rules for those paths — they don't fall under the /* catch-all.
Reverse Proxy Routing Rules
apiVersion: networking.k8s.io/v1
kind: Ingress
metadata:
  name: tursio-mcp
  namespace: tursio-mcp
  annotations:
    nginx.ingress.kubernetes.io/proxy-read-timeout: "3600"
    nginx.ingress.kubernetes.io/proxy-send-timeout: "3600"
spec:
  ingressClassName: nginx
  rules:
    - host: <your-host>
      http:
        paths:
          - path: /tenant-a
            pathType: Prefix
            backend:
              service:
                name: tursio-mcp-tenant-a
                port:
                  number: 8000
          - path: /tenant-b
            pathType: Prefix
            backend:
              service:
                name: tursio-mcp-tenant-b
                port:
                  number: 8000
No URL rewriting — paths are forwarded as-is. Set
PATH_PREFIX=/tenant-aandPATH_PREFIX=/tenant-bon each pod respectively.OAuth: Also add explicit rules for
/.well-known/oauth-authorization-server/tenant-aand/.well-known/oauth-authorization-server/tenant-bpointing to the correct backend — these paths don't start with/tenant-*so they won't be matched by the Prefix rules above.
apiVersion: traefik.io/v1alpha1
kind: IngressRoute
metadata:
  name: tursio-mcp
  namespace: tursio-mcp
spec:
  entryPoints:
    - websecure
  routes:
    - match: Host(`<your-host>`) && PathPrefix(`/tenant-a`)
      kind: Rule
      services:
        - name: tursio-mcp-tenant-a
          port: 8000
    - match: Host(`<your-host>`) && PathPrefix(`/tenant-b`)
      kind: Rule
      services:
        - name: tursio-mcp-tenant-b
          port: 8000
Traefik forwards the full path unchanged. Set
PATH_PREFIX=/tenant-aandPATH_PREFIX=/tenant-bon each pod respectively.OAuth: Also add
PathPrefix(`/.well-known/oauth-authorization-server/tenant-a`)and the equivalent for tenant-b as separate routes pointing to the correct service — these won't be matched by the/tenant-*rules.
Configure path-based routing rules in your Application Gateway HTTP listener. No URL rewriting — paths are forwarded as-is.
| Path(s) | Backend pool |
|---|---|
/tenant-a/* |
tenant-a pod |
/tenant-b/* |
tenant-b pod |
/.well-known/oauth-authorization-server/tenant-a/.well-known/openid-configuration/tenant-a/.well-known/oauth-protected-resource/tenant-a |
tenant-a pod |
/.well-known/oauth-authorization-server/tenant-b/.well-known/openid-configuration/tenant-b/.well-known/oauth-protected-resource/tenant-b |
tenant-b pod |
In the Azure Portal: Application Gateway → Rules → Path-based routing — add one rule per tenant pointing to separate backend pools. Ensure URL rewrite is disabled on all rules.
Set PATH_PREFIX=/tenant-a and PATH_PREFIX=/tenant-b on each pod respectively.
The /.well-known/ rules are required for OAuth
When Claude connects, it fetches /.well-known/oauth-authorization-server/<path-prefix> for OAuth discovery. Without a gateway rule routing this to the correct pod, OAuth fails with a 404.
Azure App Registration
Register one redirect URI per tenant under Authentication in your Azure App Registration:
Connector URLs
Give these URLs to users when adding the connector in their AI tool: